

Hardware components | ||||||
| × | 1 | ||||
| × | 1 | ||||
| × | 1 | ||||
 |
| × | 1 | |||
 |
| × | 1 | |||
| × | 2 | ||||
Software apps and online services | ||||||
 |
| |||||
Hand tools and fabrication machines | ||||||
 |
| |||||
| ||||||
| ||||||
Another two-part project to add to my "What Do I Build Next?" series tag-line. The Osoyoo Mecanum platform is affordable now and can be coded using the Arduino 2560 and Raspberry Pi platforms.
This is link to Arduino based Mecanum platform:
https://www.hackster.io/alien-energy-3/what-do-i-build-next-two-mecanum-bots-part-1-a58387
I learned the hard way about software coding on both platforms, now you won't have to. I usually do not preface my projects with so much "historic info" but these two builds took over 6 months of my time to resolve all the coding issues that I discovered.
I will continue with the Raspberry Pi 3B+ based platform, because that's where I used what I learned from the Arduino 2560 based mecanum bot and developed and spent almost three months experimenting with code revisions and troubleshooting wiring to make my mecanum robot move as I expected it to.
The Raspberry Pi based mecanum bot will require additional hardware not included in the Arduino based kit I first purchased in January of 2019, but hadn't built until earlier this year "2020".
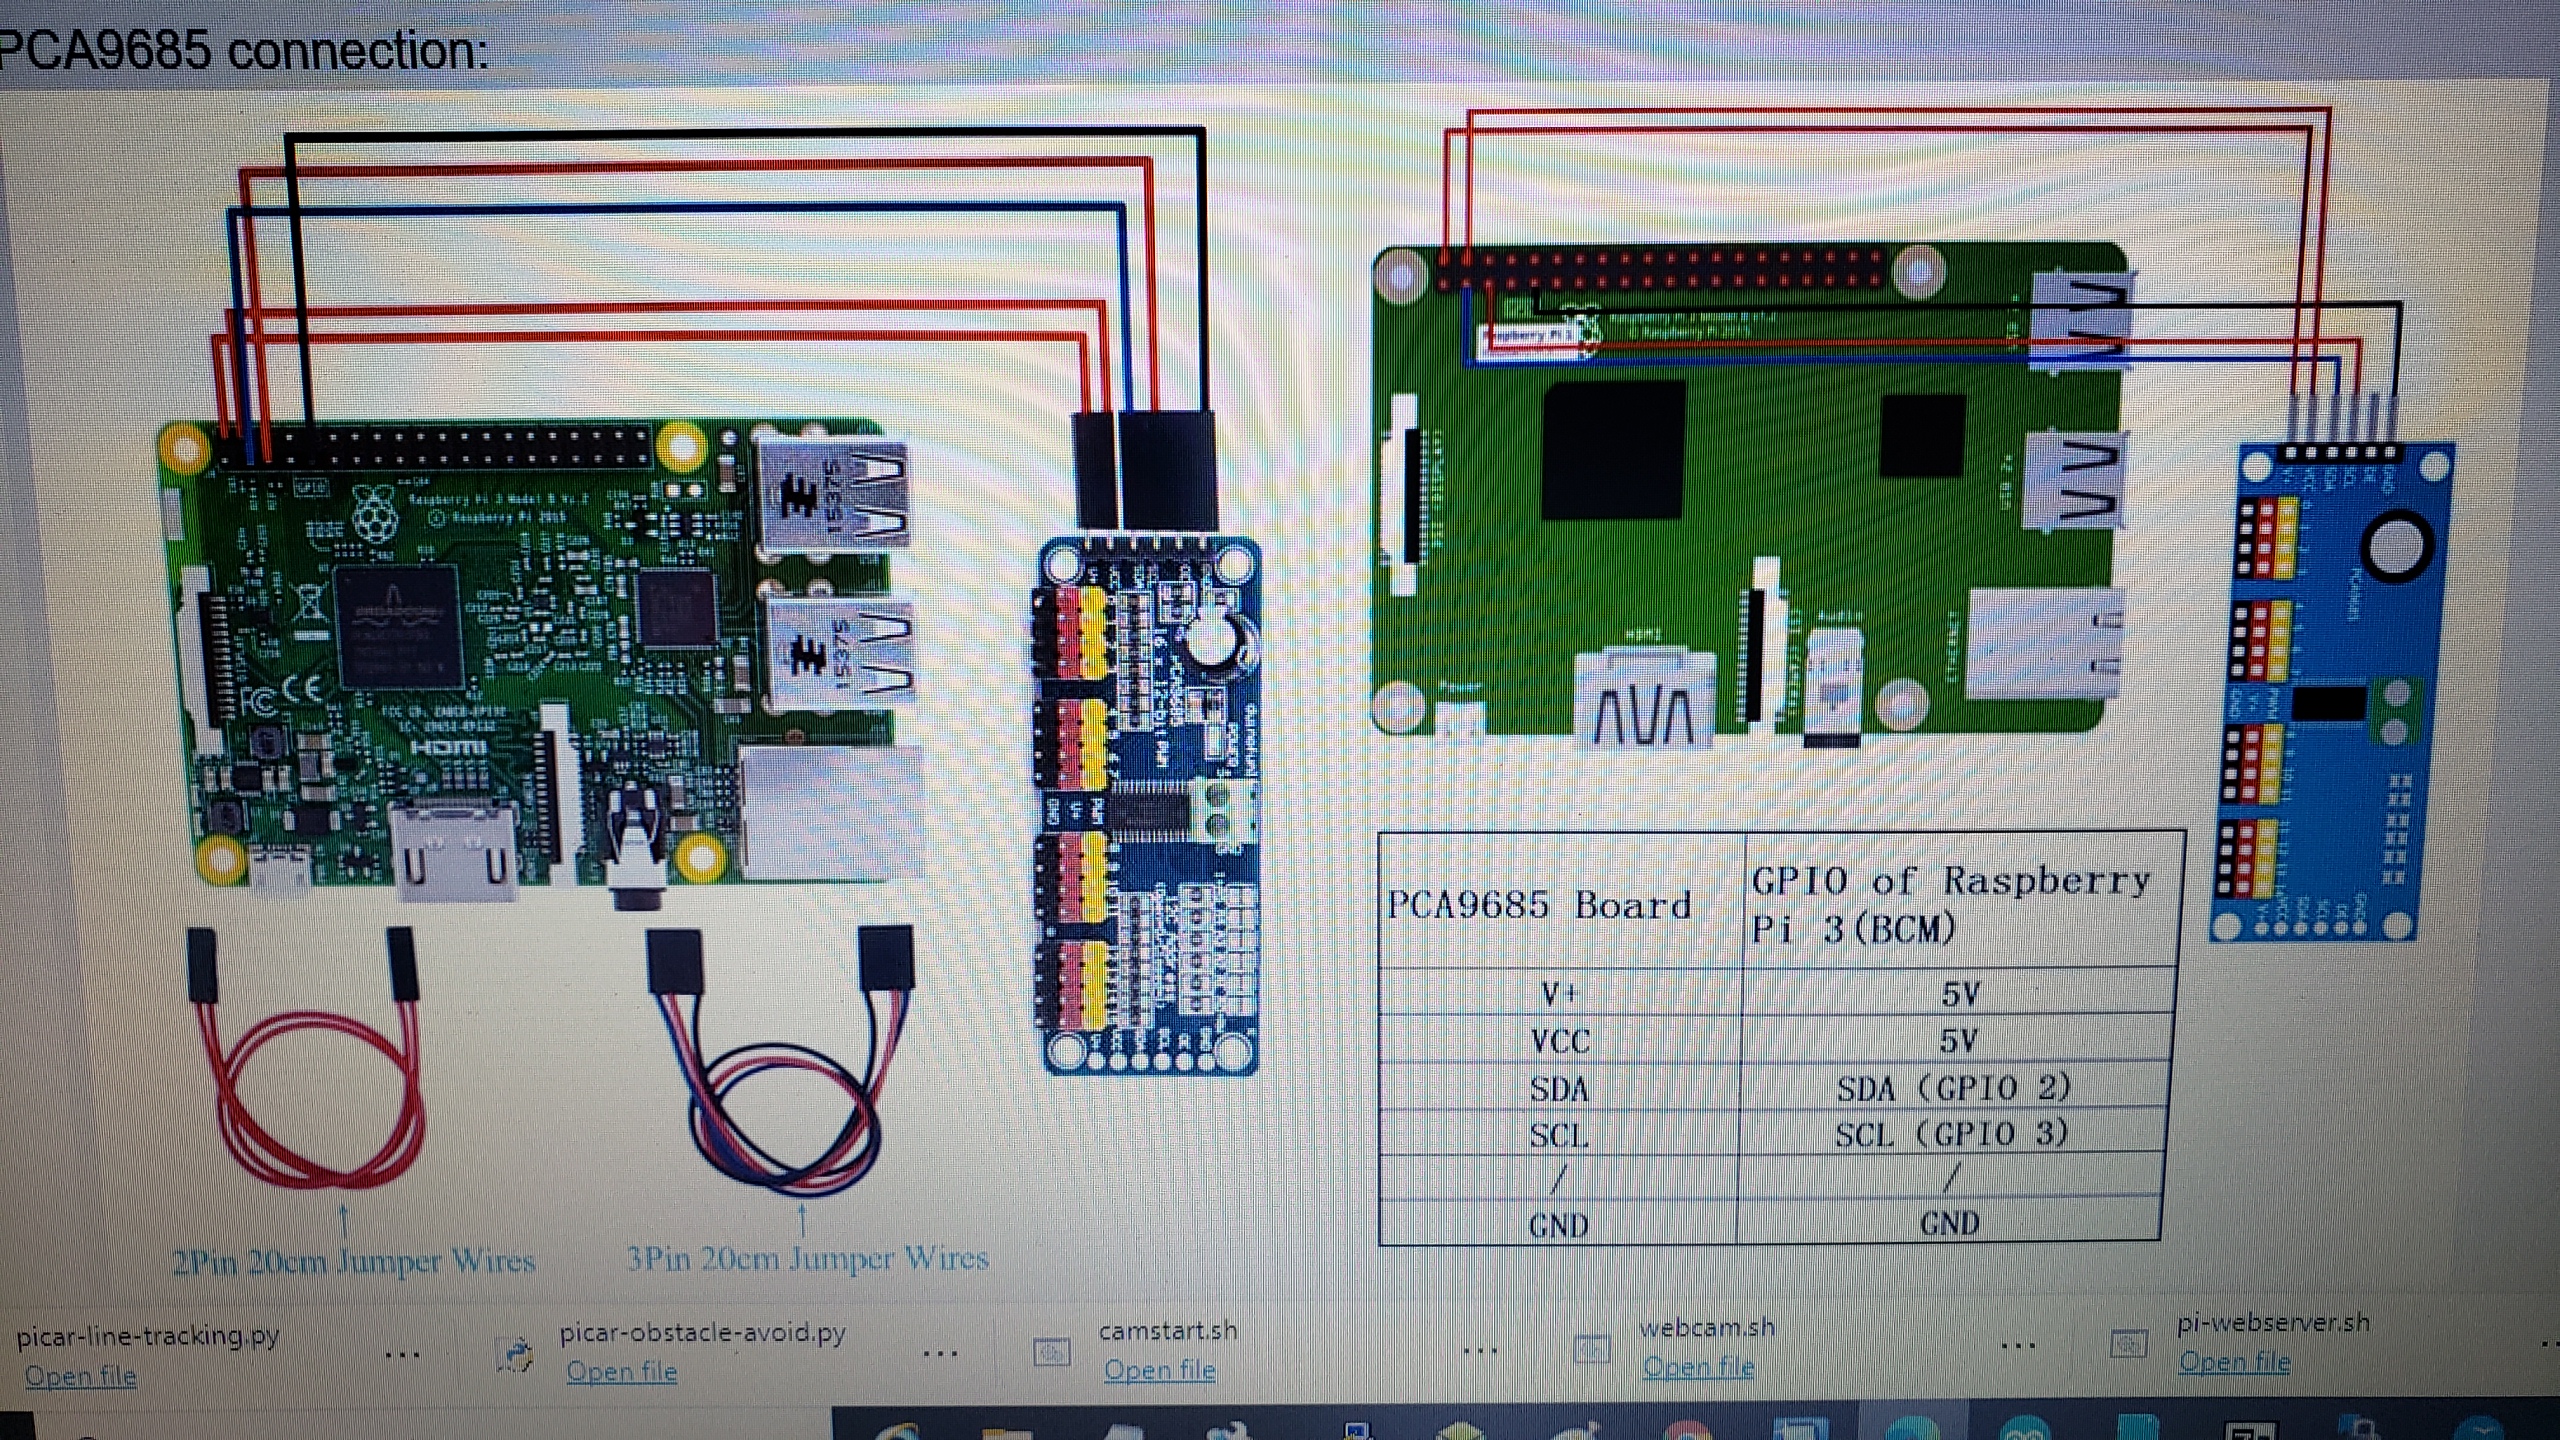
An Osoyoo Model Pi L298N motor driver board for the Raspberry Pi, a PCA9685 16 Channel-Driver-interface, and two 18650 batteries with a charger and the Osoyoo Omni-directional Mecanum Wheels Robot Car kit and of course the Raspberry Pi 3B+ and Raspberry Pi Camera (if you don't have an extra one laying around unused) all can be purchased on Amazon or the distributor of your choice.
To get started with the conversion or new build, I researched requirements from these web pages: (I am sorry, there are a lot of links included here to step you through the basic robot build, hardware install and code development, and expansion).
There is NO OSOYOO Official guide of all steps to adapt the Mecanum robot from the Arduino build to the Raspberry Pi Build, it is left to the end-user to sift through their website for relevant material. (as I did) I could not get resolve from the "lost soles on the forum".
Arduino 2560 kit ( these are required so you can build the basic Mecanum base robot without Raspberry Pi components )
" https://osoyoo.com/2019/11/08/omni-direction-mecanum-wheel-robotic-kit-v1/ "
" https://osoyoo.com/2019/11/08/omni-direction-mecanum-wheel-robotic-kit-v1-lesson-2-tracking-line/ "
Raspberry Pi Mod ( these aid with sub-module test, configuration and development based upon the PiCAR v1 and v1.1)
" https://osoyoo.com/2020/03/01/use-raspberry-pi-to-control-mecanum-omni-wheel-robot-car/ ".
" https://osoyoo.com/2018/05/15/raspberry-pi-robot-car-diy-learning-kit/ "
" https://osoyoo.com/category/raspberry-pi-diy-project/raspberry-pi-robot-car/ "
" https://osoyoo.com/2018/05/15/lesson-1rpi-robot-car-test/ "
" https://osoyoo.com/2018/05/15/lesson-2line-follow/ "
" https://osoyoo.com/2018/05/15/raspi-car-lesson3/ "
Osoyoo RPi Smart car v2
" https://osoyoo.com/category/raspberry-pi-diy-project/raspberry-pi-car-v2/ "
" https://osoyoo.com/2020/08/01/osoyoo-raspberry-pi-v2-0-car-introduction/ "
" https://osoyoo.com/2020/08/01/osoyoo-raspberry-pi-v2-0-car-lesson-2-line-tracking/ "
" https://osoyoo.com/2020/08/01/osoyoo-raspberry-pi-v2-0-car-lesson-4-obstacle-avoidance/ "
" https://osoyoo.com/2020/08/01/make-a-simple-raspberry-pi-webserver-webserver-with-python3-flask/ "
" https://osoyoo.com/2020/08/01/install-a-web-camera-on-raspberry-pi/ "
" https://osoyoo.com/2020/08/01/web-camera-controlled-iot-raspberry-pi-robot-car/ " (**camera/ultrasonic servo must be connected to PCA9685 PWM 15 port **)
" https://osoyoo.com/2019/11/08/how-to-test-motor-encoder-with-arduino/ "
" https://osoyoo.com/2020/03/01/use-raspberry-pi-to-control-mecanum-omni-wheel-robot-car/ "
" https://osoyoo.com/2017/11/26/opencv-raspberry-pi-robot/ " (I have yet to install opencv)
Before I explain and show the build, I want to list out lessons learned
1. Webpage links (NEXT, BACK, etc) may lead to dead pages or different versions of the product and text listing code hyperlink may be different than embedded hyperlink to same code ( I discovered different versions of code downloaded using the text weblink vs the wget... hyperlink) couldn't figure that one out at first but side by side comparison of downloaded code proved I wasn't insane.
2. Assembly descriptions, drawings, or illustrations may not be complete or applicable to your robot version/model
3. Downloaded code provided by Website owner may not work as expected or at all (move on to next part of build or use as a guide)
4. Rely on your experience to solve coding mistakes or anomalies; I found that these multi-lesson builds have code written by different "coders/individuals" and naming conventions for code snippets may change from lesson to lesson.
5. Make notes while troubleshooting code.
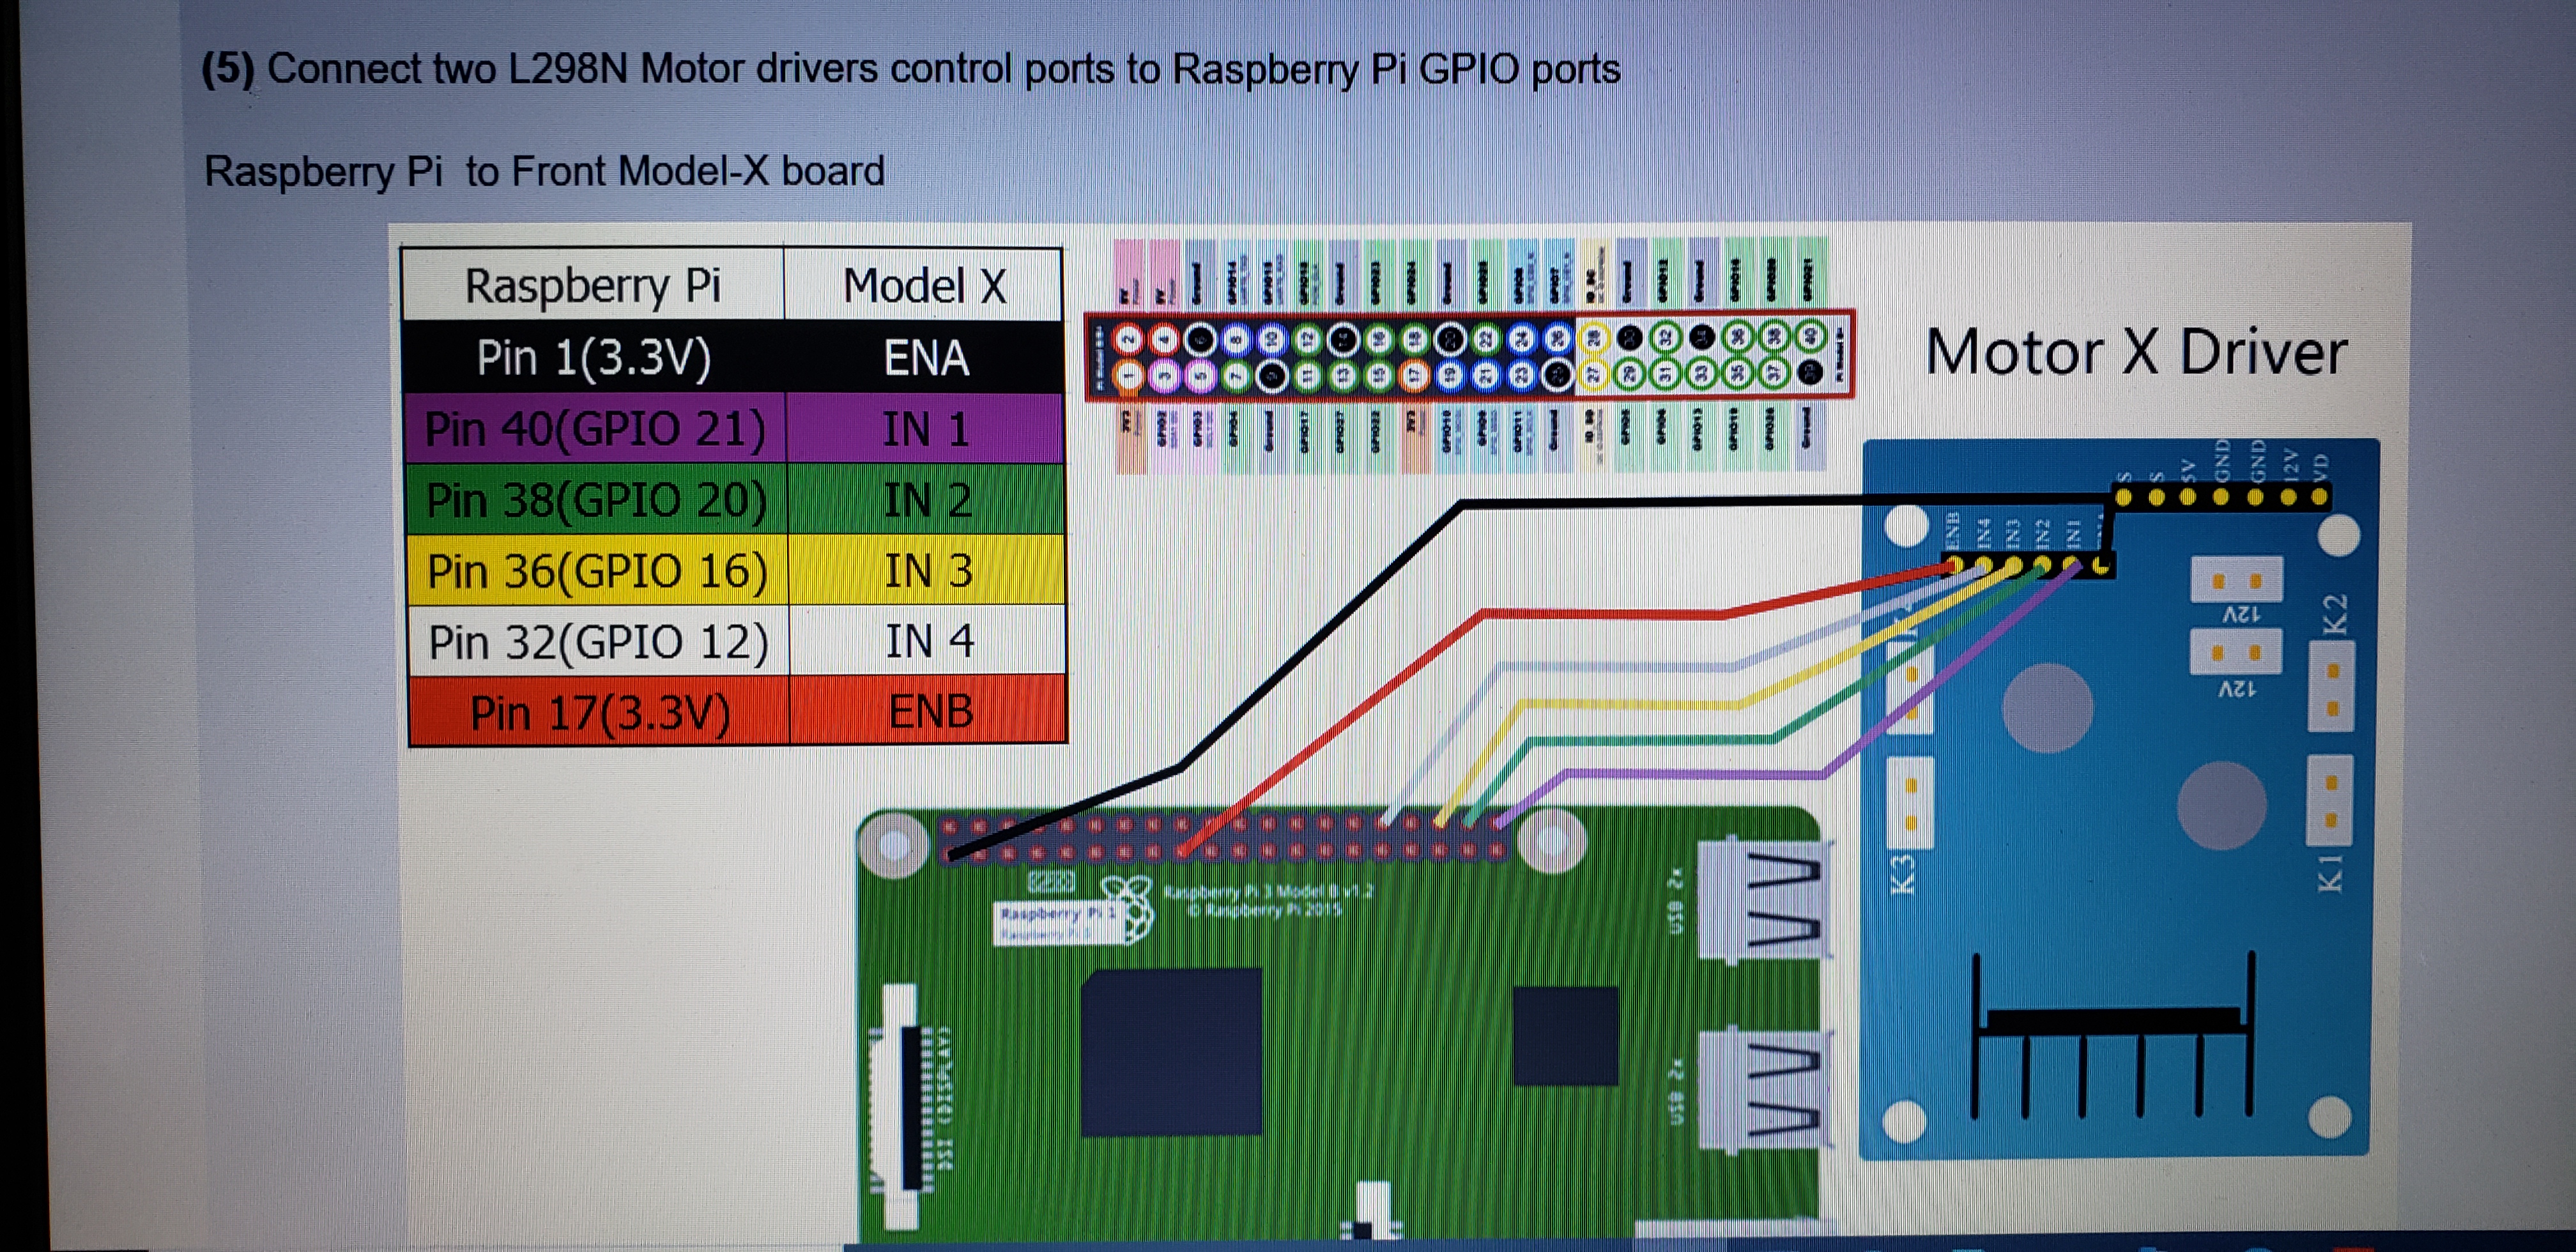
6. Pay attention to color of wires/jumpers and "pictured pin-out connections" versus the displayed table of interconnects.
7. If you plan on using the line following capability of this product, the webpage links are for five individual IR line sensors and the "wget" and "text" links are for five IR line sensors included in the OSOSYOO PiCAR V2.0 kit as well, BUT the Mecanum robot kit includes a three IR sensor module so you will need to revise that code.
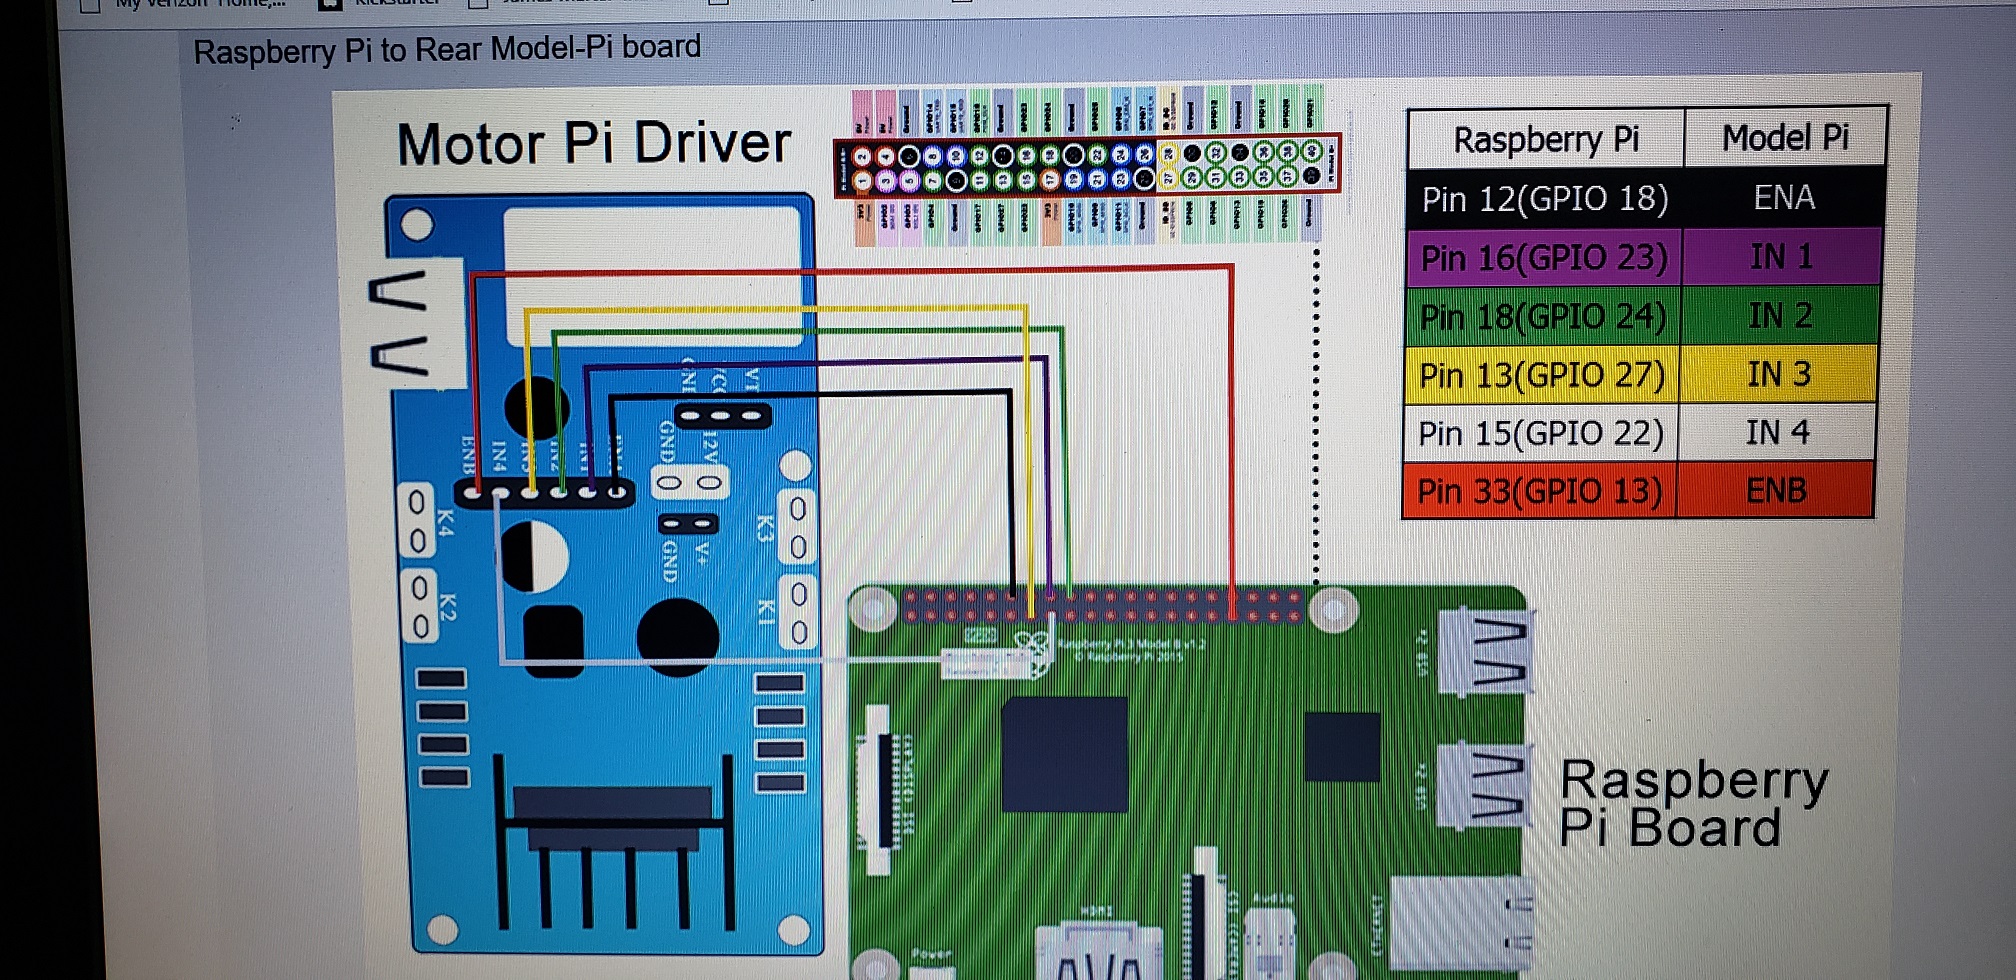
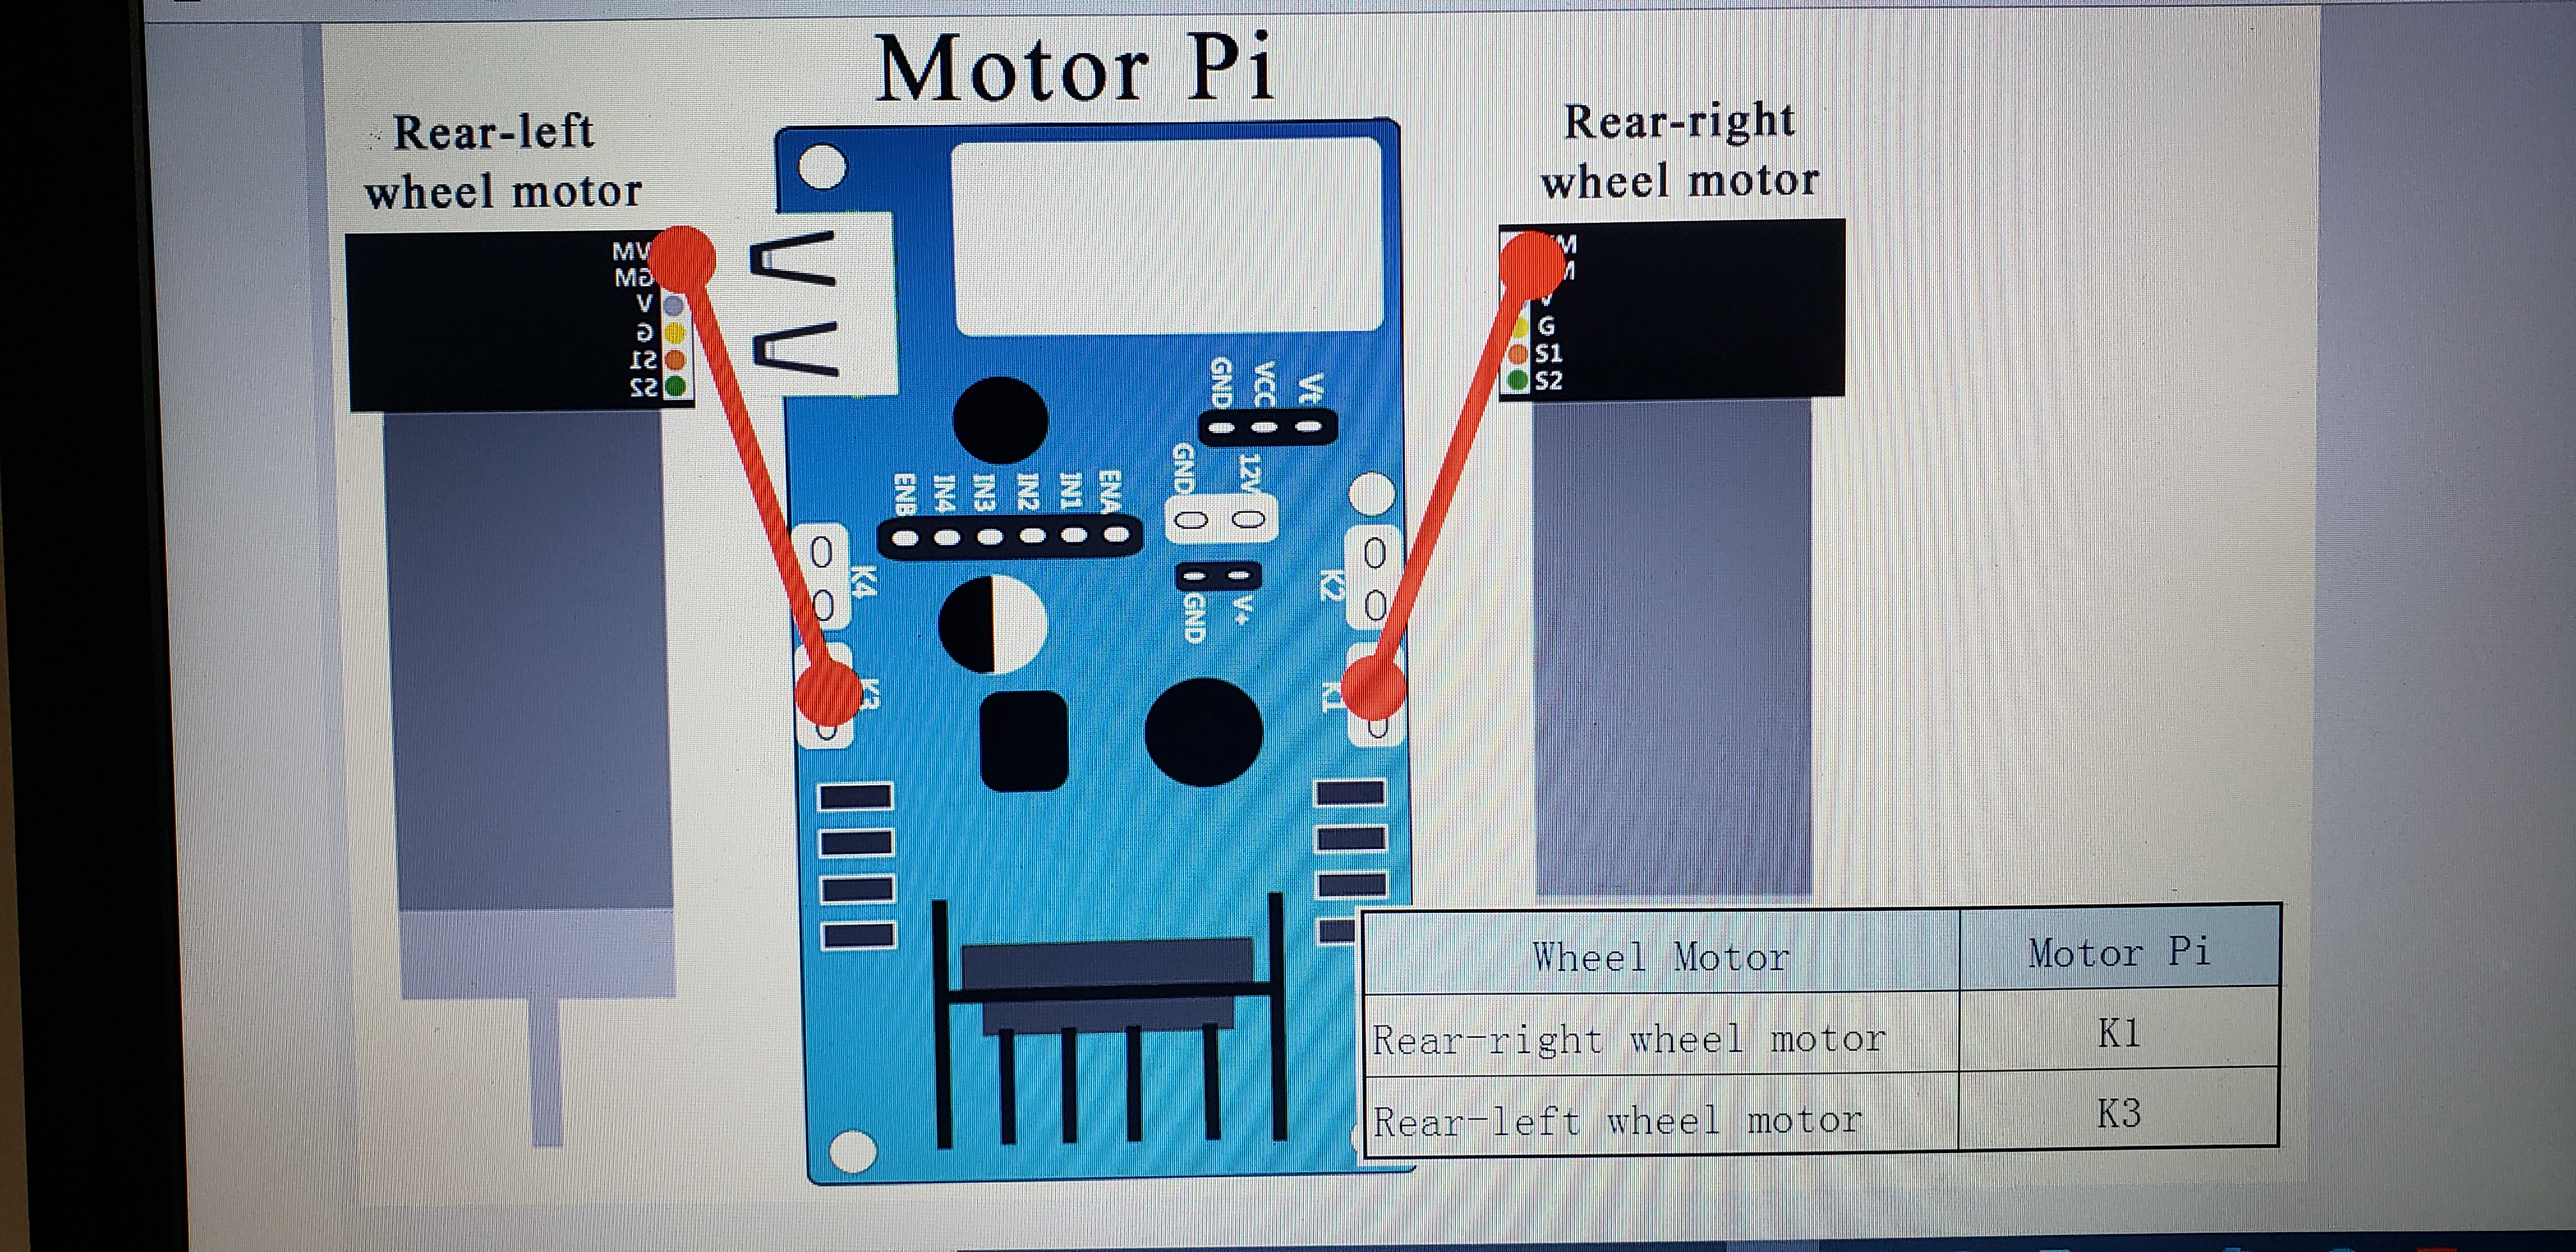
8. Most importantly, I needed to reverse the motor power connections on my 2 pin motor connector on my rear two motors because all motors are wired the same polarity but on a 4 Wheeled robot the front motors are inversely mounted from the rear so the RED and BLACK wires need to be swapped. This is because the Osoyoo L298N Motor Pi module has K1 and K2 ports tied together, and K3 and K4 ports tied together. "WHY!!!!!" (I tried desperately to correct this with code but found that both motors would spin opposite of each other no matter what I tried)
9. I had issues with the Osoyoo L298N Motor Pi module, it provides power to the Raspberry Pi at 5.1 volts and 2.5 amps via its battery pack of two 18650 3.7 volt batteries. The Motor-X L298N included with the Mecanum kit is designed for the Arduino so its output is not regulated down to Raspberry Pi specifications. I had one Motor Pi and Motor-X module that when powered ON would start spinning the left rear motor immediately while booting up. This initially was thought to be a wiring issue, a hung GPIO pin on my Raspberry Pi, or bad code, BUT the motor would function correctly when the code was running. It would start/stop/ and change direction of rotation as code requested but It was enabled HIGH when in the IDLE state. Since I had bought two Motor Pi modules I could swap it out and the issue went away. I am also running all four motors on the Model PI L298N module and not using the Model-X module at all.
Today is October 28, 2020; I started writing this project back in March/April of this year. Due to the demands of my day-time paying job, I have not had time to complete documenting these two projects.
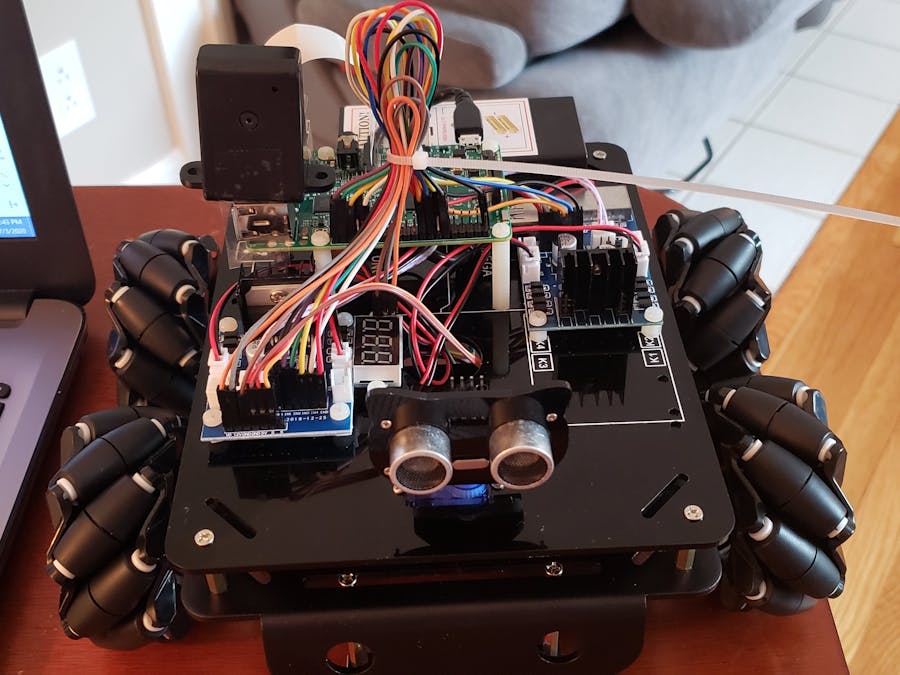
Now for my Build Experience:
Below is the common Mecanum Build procedures for the Arduino, ultimately the Raspberry Pi is installed instead of the Arduino UNO and WIFI module and one Motor-X module.
https://www.hackster.io/alien-energy-3/what-do-i-build-next-two-mecanum-bots-part-1-a58387
A. Research and Ordering
I had been monitoring Mecanum kits or wheels but were too costly. This kit's cost fluctuated +/- $20.00 USD. There are two similar kits offered by Osoyoo, one has plastic wheels and basic drive DC motors and this one with the Rubber wheels and geared motors with HALL sensors (but HALL sensors are unused). There is even a stripped down version without electronics. Pay attention to kit descriptions, features, and capabilities.
Plastic wheels
Arduino Rubber wheels
Basic platform
" https://www.amazon.com/OSOYOO-Robotic-Mecanum-Platform-Raspberry/dp/B07WZJYVB5/ref=pd_rhf_se_p_img_7?_encoding=UTF8&psc=1&refRID=RYPA66MSTEWV8RCDX6CS " for $79.99 USD.
B. Document Control- select documents for the Metal Chassis Mecanum Robot
After reviewing web links and documents, I had determined that I was initially following the wrong assembly and coding documents. I had thought my kit was the Mars Rover version that used the plastic wheels "Amazon's descriptions are very similiar", and I soon discovered that the Arduino Motor code examples were reversed from the Metal Mecanum version. After contacting Osoyoo's support through many emails, I determined the motor cables were wired differently thus code examples were incorrect. I also discovered that different Osoyoo's engineers had coded each development lesson, thus function naming schema were different and not expanded upon as the kit was built and features added.
C. Unpacking and Assembly
1. Gather hardware required for each assembly step- Robot Base with Motor Mounts
2. Attach Motor Mount to Robot Metal base plate
3. Now attach the remaining three motor mounts
4. Gather hardware for motors and wheels
5. Now attach other three motors
6. Gather hardware for wheel hub extension adapters
7. Now attach the other three wheel hubs
8. Now attach the wheels-thread pattern should be angled inwards towards center
9. Now lay out electronic module for standoff usage and installation (i will be substituting a Raspberry Pi and Motor-Pi modules)
Raspberry Pi 3B+ updates
10. Now attach electronics and battery holder with plastic screws-Arduino version for differences/reference only
It's now October 28, 2020; I've been busy with day-time paying job...but not to busy to keep thinking about this project's and the Raspberry Pi's version's write-up completion.
11. Installation of Ultrasonic sensor servo and top plate standoffs
12. Assembly of Ultrasonic Sensor and holder.
13. Wiring up motors and hardware to Interconnect Board
14. Motor control interconnect to UNO WIFI board
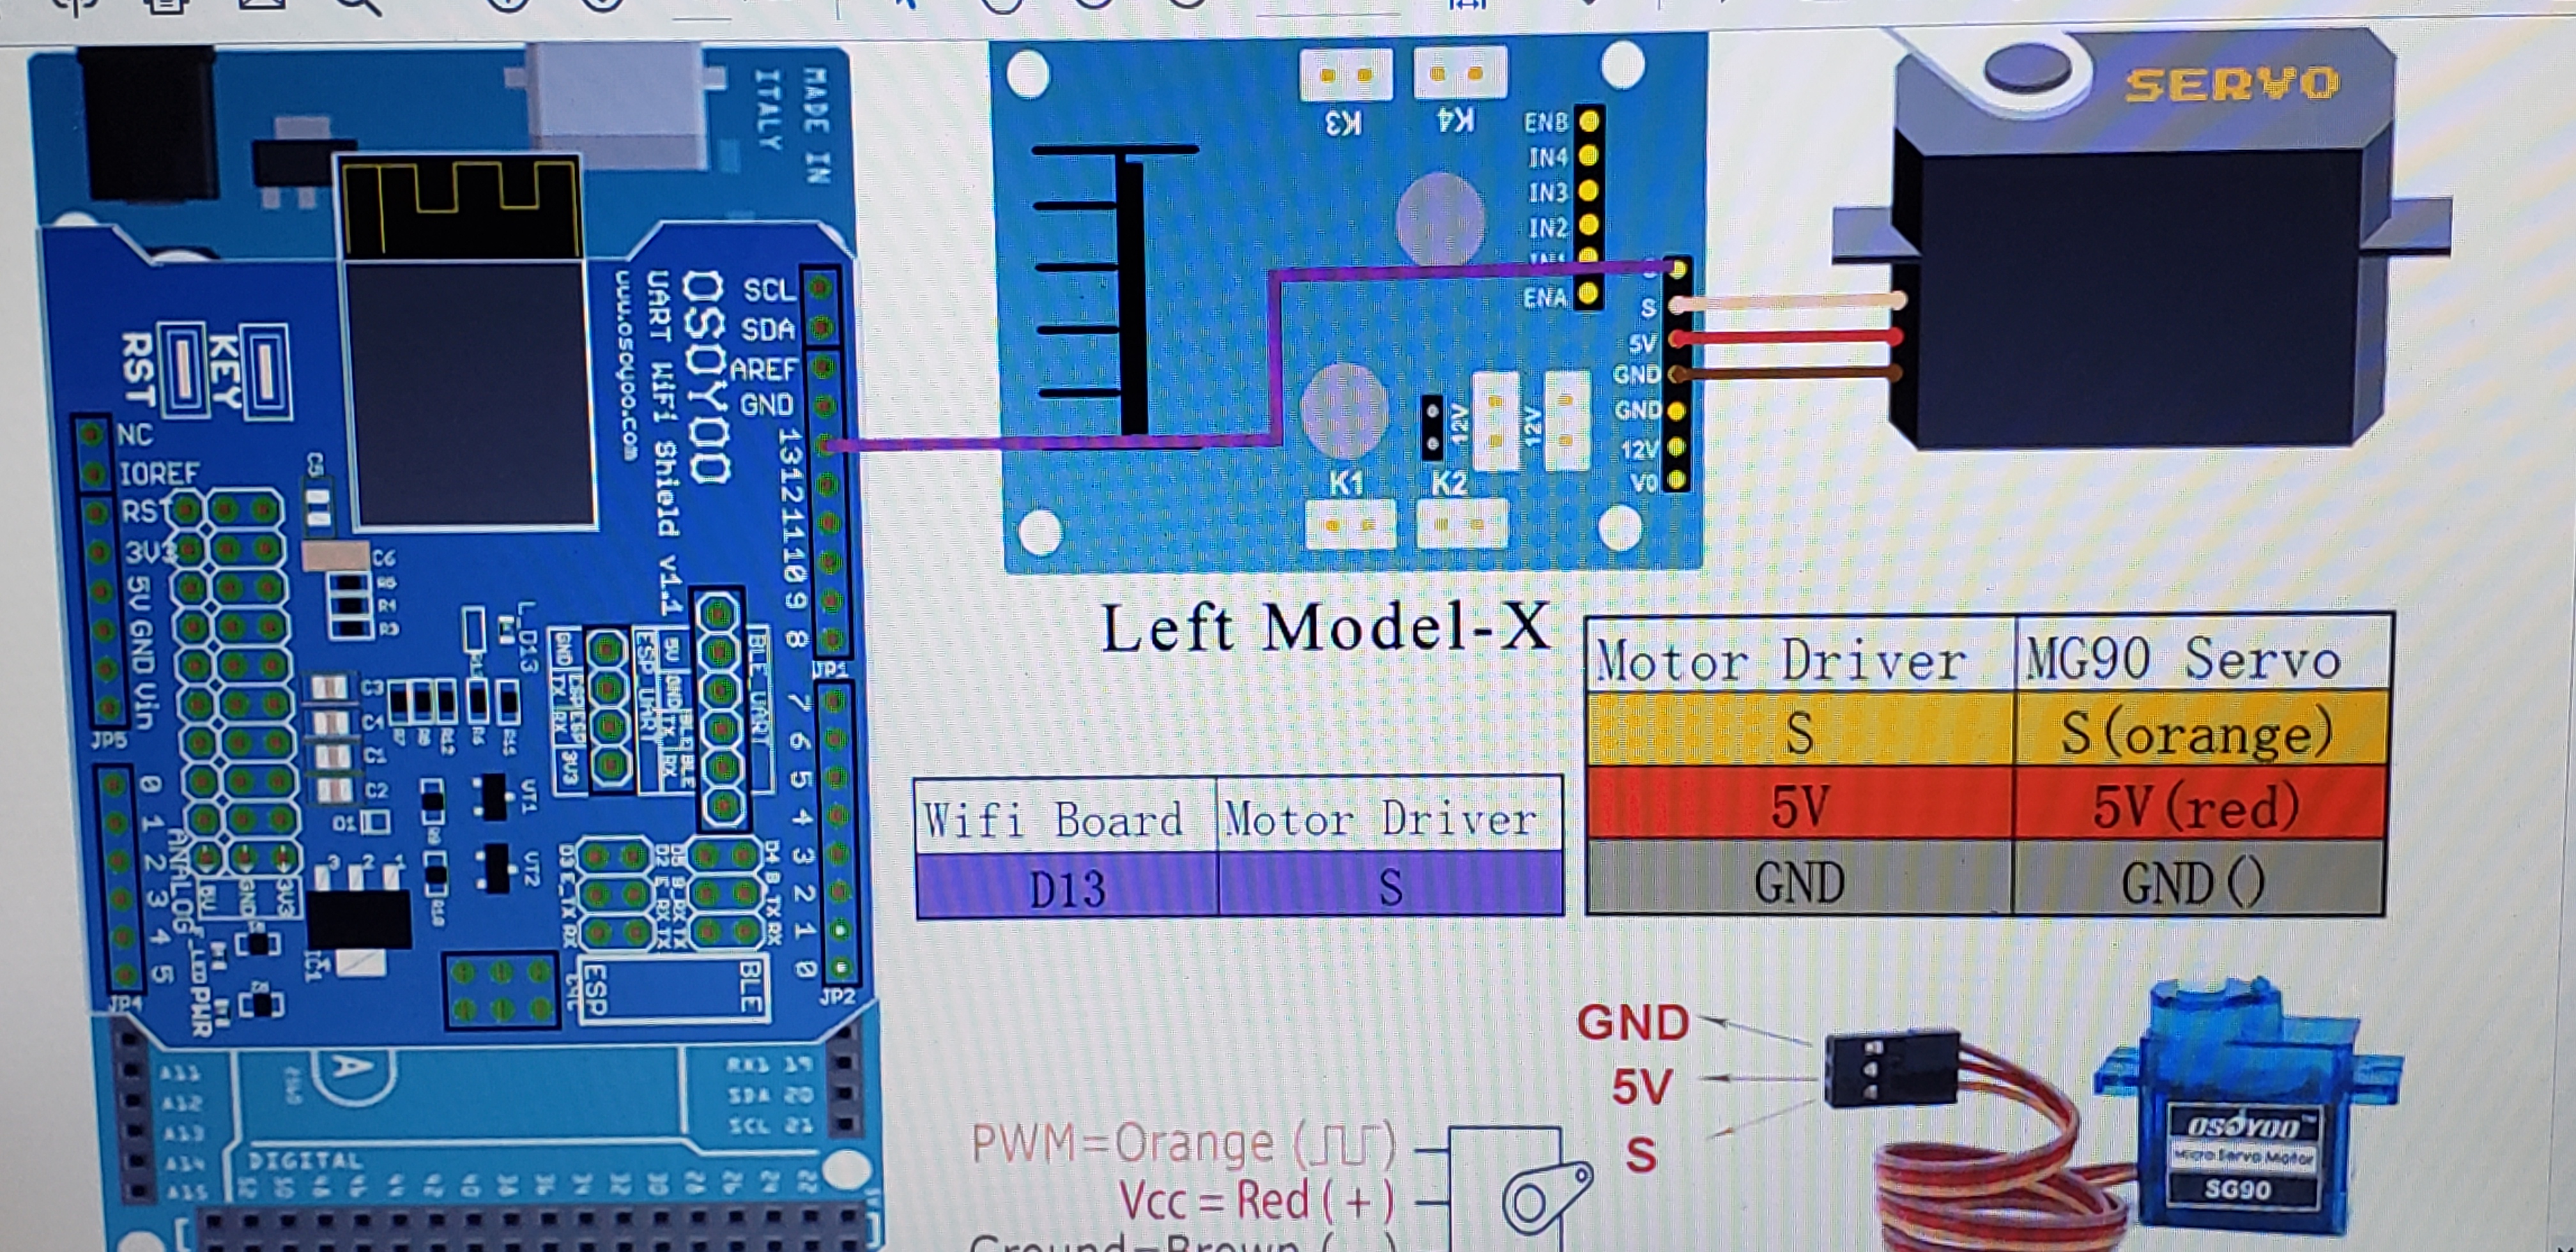
15. Voltage Meter and Battery interconnect
16. Ultrasonic Sensor and servo interconnect
Raspberry Pi 3B+ updates
17. Line Following sensor installation and interconnect
18. Bluetooth connection or WIFI use... you decide (This Bluetooth adapter not used with Raspberry Pi 3B+)
19. Download Android App for the Arduino Version and let the fun begin
21. Software Installation- this is where I needed to take liberties and utilize software procedures from the Osoyoo PiCar v1.0 and v2.0 (these links were also provided at beginning of this project)
Raspberry Pi Mod ( these aid with sub-module test, configuration and development based upon the PiCAR v1 and v1.1)
Review and install each of these "lessons" to expand functionality of raspberry Pi based Mecanum Platform
" https://osoyoo.com/2020/03/01/use-raspberry-pi-to-control-mecanum-omni-wheel-robot-car/ ".
" https://osoyoo.com/2018/05/15/raspberry-pi-robot-car-diy-learning-kit/ "
" https://osoyoo.com/category/raspberry-pi-diy-project/raspberry-pi-robot-car/ "
" https://osoyoo.com/2018/05/15/lesson-1rpi-robot-car-test/ "
" https://osoyoo.com/2018/05/15/lesson-2line-follow/ "
" https://osoyoo.com/2018/05/15/raspi-car-lesson3/ "
Osoyoo RPi Smart car v2
" https://osoyoo.com/category/raspberry-pi-diy-project/raspberry-pi-car-v2/ "
" https://osoyoo.com/2020/08/01/osoyoo-raspberry-pi-v2-0-car-introduction/ "
" https://osoyoo.com/2020/08/01/osoyoo-raspberry-pi-v2-0-car-lesson-2-line-tracking/ "
" https://osoyoo.com/2020/08/01/osoyoo-raspberry-pi-v2-0-car-lesson-4-obstacle-avoidance/ "
" https://osoyoo.com/2020/08/01/make-a-simple-raspberry-pi-webserver-webserver-with-python3-flask/ "
" https://osoyoo.com/2020/08/01/install-a-web-camera-on-raspberry-pi/ "
" https://osoyoo.com/2020/08/01/web-camera-controlled-iot-raspberry-pi-robot-car/ " (**camera/ultrasonic servo must be connected to PCA9685 PWM 15 port **)
" https://osoyoo.com/2019/11/08/how-to-test-motor-encoder-with-arduino/ "
" https://osoyoo.com/2020/03/01/use-raspberry-pi-to-control-mecanum-omni-wheel-robot-car/ "
" https://osoyoo.com/2017/11/26/opencv-raspberry-pi-robot/ " (I have yet to install opencv)
22. Weblinks and videos
HAVE FUN
Future enhancement would be to install and configure OPENCV...


Comments