Where all began
After some months of having a couple of OLIMEX ESP8266 evaluation boards lying around in my office desk, I decided to jump in the ESP8266 hype train and see by myself how this US$5 WiFi module changed the maker landscape.
I was not dissapointed.
The ESP8266
The ESP8266 is a highly integrated SoC (System on Chip) which includes Xtensa LX106 core processor, RAM, a RF front end and allow WiFi TCP/IP stack to be implemented on board. The ESP8266 is capable of either hosting an application or offloading all WiFi networking functions from another application processor.
I wasn't interested in driving the ESP8266 with another controller, but to flash an application and use it as a stand-alone module, mostly to keep any future BOM as low as possible. After taking a look at the ESP8266 features it seemed possible to run most applications from within the device:
- It has GPIO, I2C, ADC, SPI, PWM.
- A 80 MHz operation frequency
- 64 Kb of instruction RAM
- 96 Kb of data RAM
- 64 Kb boot ROM
- Winbond W25Q40BVNIG SPI flash
- RISC architecture
- The core is a 106micro Diamond Standard core (LX3) made by Tensilica.
As we need to consider also the available resources left for the application taking into the account the stack itself, from this page the actual RAM/ROM are about 40 Kb and 64 Kb.
The ESP8266 evaluation board by OLIMEX features a 220VAC/10A relay module and conveniently exposes most pins in a standard 2.54 mm header, which is great to have available when developing. It also features an user button which can also be used to put the ESP2866 in bootloader mode, to allow flashing over UART.
The toolchain
The instructions to install the Toolchain were straightforward to use, I had one dependency issue with my current autoconf version, easily fixable with the following:
sudo add-apt-repository ppa:dns/gnu -y
sudo apt-get update -q
sudo apt-get install --only-upgrade autoconf
As a general recommendation install the ESP8266 toolchain as suggested in the /opt/Espressif, as many applications (like the OLIMEX examples and resources) are heavily hard-coded to use this path.
I also recommend to use the suggested Espressif SDK v0.9.3 instead of the newer v.1.2.0, as I (painfully) found that many applications and examples were written for the earlier version, and porting for the new SDK version required more time than I had available for a simple test run.
Flashing the ESP2866
The ESP2866-EVB comes with factory-enabled flash mode, which allows to program the device over UART. I used a cheap USB to serial converter, wired as shown below.
- GND (blue wire to pin 2)
- USB to Serial UART RX pin to ESP2866 UART TX (green wire to pin 3)
- USB to Serial UART TX pin to ESP2866 UART RX (red wire to pin 4)
The ESP8266-EVB datasheet has more information.
To put the device in bootloader mode just make sure the board is powered off, press and hold the user button (the big white one), and while pressing the button power the board (connect to 5VDC).
Making a WiFi enabled power cord switch
I wanted to see how fast would it be to make a connected application. In nearly 10 minutes I had a WiFi enabled power cord switch. The motivation was simple: power on and off anything in my house running at 220V/10A from anywhere in the world (as in my bed), without having to cut or adapt any home appliance for this purpose, a non-intrusive approach to keep my wife happy and myself out of the couch.
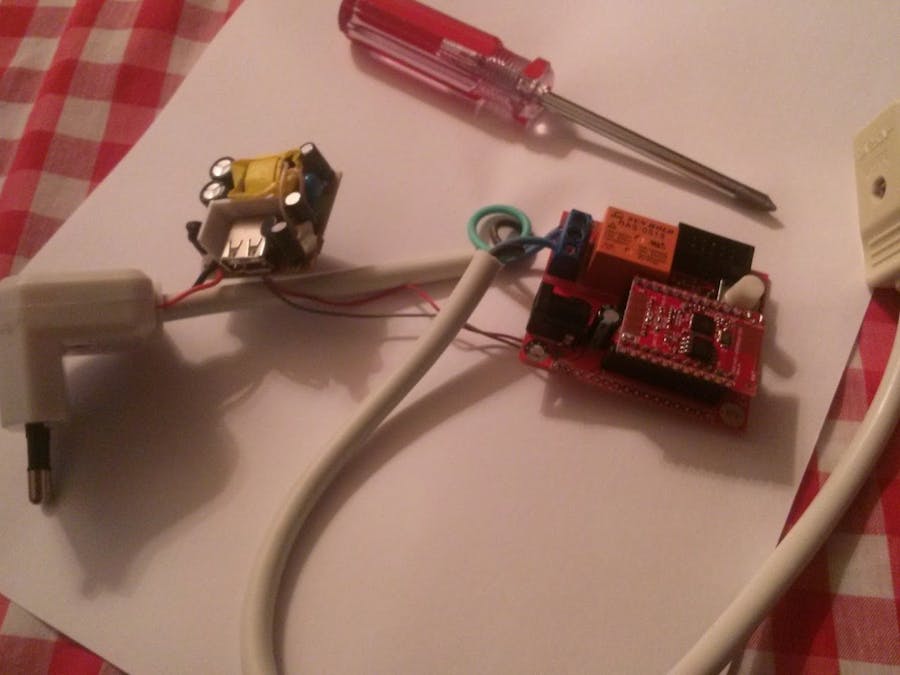
The specification was simple enough: power the ESP8266 directly from mains and use the relay with the normally open (NO) mode as devices would normally have to be off. As time was my premise, I destroyed took an USB charger to power up the board, using a multimeter I found the 5VDC/GND pins on the USB charger and solder wires to pins 1 and 2 of the CON3 header.
I kept the USB charger casing to isolate the electronics and avoid someone touching mains by accident.
Now for the firmware I used the stock IoT Firmware image from OLIMEX resources, this handy application allows any web developer to easily control most of the ESP8266 evaluation board features, like managing the wireless network, create and poll events and status related to the user button and relay, manage I2C devices, update the Firmware image remotely, amongst others.
To drive the relay over WiFi the ESP-Sample-Application.html provides a friendly web interface, a screenshot is shown below.
And that's it! a simple WiFi-enabled power cord in 10 minutes.
I tested with a desk lamp and other appliances (under 10A), as it only requires to plug into the female connector of the power cord is easy to use anywhere.
A future enhancement would be to add sensors like an ambient light or temperature sensor, to provide more information about the current location, maybe a presence sensor to allow an event-based operation. Of course making a proper PCB with a 220VAC/5VDC transformer would be mandatory.
The project is also featured in my blog, keep tuned for updates.


Comments
Please log in or sign up to comment.