


Colleges and universities put emphasis on attendance, as a result they tend to waste a lot of time on it. Consider this, a normal day has around 6 periods, every period is of 1 hr, the first 5-10 min is used up for taking attendance.So, in a day we lose around half an hour of learning time. In order to save this time we can make a system that tracks people during the class. One way of doing it is using computer vision.
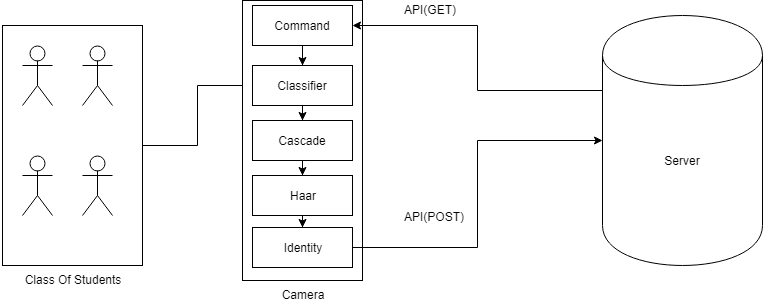
How Do We Go About It?1) First we need to detect faces using a Cascade Classifier. Now what is a Cascade Classifier?A cascade classifier is used to detect the presence of an object at a specified region of interest. For example, if a camera is pointed at a person it need to classify the person as a person. Now for the camera the region of interest is the person so with in that region of interest it will make several classifications like face, ears, lips etc. using features like Haar-like features.
2) After having detected a face we need to identify that face. For this we need ample amount of data sets to train our model. This model is in form of an xml and yml file which we will discuss later.
3) Now, we need to communicate with our server telling it who was present in a class at a certain time. For this we need to create a robust database. This database should be available for communication over an API.
4) The aforementioned API should be REST Based.
Things We Need1) Camera
2) Wi-Fi
3) Server
4) User Interface
Let's with the user interface!
User InterfaceFig 1 shows a basic login screen I have created.
Fig 2 shows how we can monitor user information.
Fig 3 shows how we are storing user information.
Fig 4 shows the main screen.
On clicking start attendance we get the screen as shown on figure 5.
Upon clicking start attendance, the camera is given a command to switch on and starts detecting and then tracking faces.
If you need help building your own facial recognition program, follow the tutorial below:
However, I have made few changes to the code:
import numpy as np
import cv2
import json
import requests
import pickle
import math
import requests
import time
face_cascade=cv2.CascadeClassifier("cascades\data\haarcascade_frontalface_alt2.xml")
recognizer=cv2.face.LBPHFaceRecognizer_create()
recognizer.read("trainer.yml")
labels={}
with open("labels.pkl","rb") as f:
    og_labels=pickle.load(f)
    labels={v:k for k,v in og_labels.items()}
cap=cv2.VideoCapture(0)
from imutils import paths
import numpy as np
import imutils
import cv2
while True:
    response = requests.get('http://127.0.0.1:8000/AttendaceAPI/')
    a, b, c = str(response.json()).split(',')
    print(b)
    k, l = b.split()
    print(l)
    if(l=="\'1\'"):
        ret, frame = cap.read()
        gray = cv2.cvtColor(frame, cv2.COLOR_BGR2GRAY)
        faces = face_cascade.detectMultiScale(gray, scaleFactor=1.5, minNeighbors=5)
        for x, y, w, h in faces:
            roi_gray = gray[y:y + h, x:x + w]
            roi_color = frame[y:y + h, x:x + w]
            id_, conf = recognizer.predict(roi_gray)
            if conf >= 45 and conf <= 80:
                print(id_)
                print(labels[id_])
                print(conf)
                font = cv2.FONT_HERSHEY_SIMPLEX
                name = labels[id_]
                name += " " + str(math.floor(conf)) + "%"
                color = (0, 255, 0)
                stroke = 2
                cv2.putText(frame, name, (x, y), font, 1, color, stroke, cv2.LINE_AA)
            my_item = cv2.imwrite("alton2.jpg", roi_gray)
            my_item = cv2.imwrite("alton3.jpg", roi_color)
            color = (255, 0, 0)
            stroke = 2
            cv2.rectangle(frame, (x, y), (x + w, y + h), color, stroke)
        cv2.imshow('frame', frame)
        if cv2.waitKey(20) & 0xFF == ord('q'):
            break
cap.release()
cv2.destroyAllWindows()
Fig 6 shows how we can upload images to the server, however we have to again copy those files to the camera and train the camera.


Comments
Please log in or sign up to comment.