This pandemic has claimed millions of lives and studies on social distancing published in the medical journal Lancet found that social distancing at least 3 feet lower the chance of contracting Covid-19 by 82%. More and more places are enforcing social distancing with fines but unfortunately using law enforcement is both ineffective and expensive. Now with schools reopening,understanding the prevalence and effectiveness of social distancing is of the upmost importance. Using an autonomous detection system would reduce costs of gathering this important data dramatically, and allow the aggregation of data from more people, while also allowing law enforcement to direct their resources to more important situations.
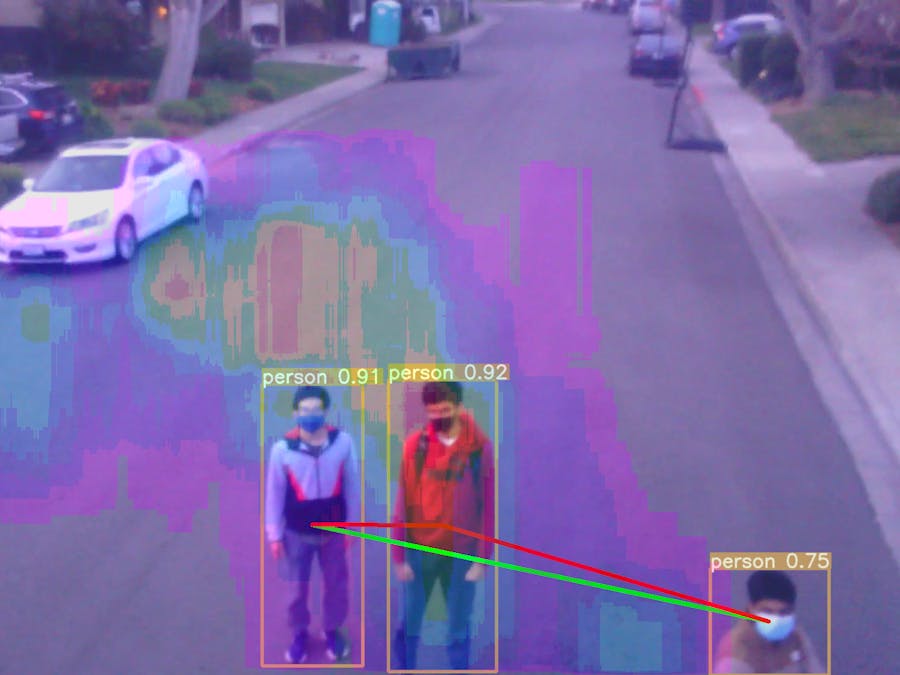
PurposeOur system, Eagle Eye, encourages the study of social distancing by identifying people and the distance between them. When Eagle Eye identifies 2 people that are no effectively social distancing Eagle Eye is able to record this data for research purposes. In addition, Eagle Eye can create a heatmap of the most populated areas of the area to allow city planners to optimize an outdoor space and make plans and policy to allow for social distancing.
Our SystemCamera
The drone is equipped with the google coral camera included in the px4 developer kit. We designed a custom 3D printed mount to point the camera down so the drone can be flown at high altitudes allowing it to monitor more area.
Streamer
The camera is connected to the navq companion computer which streams the video to the ground. To stream the video we are using GStreamer with a TCP link.
Wifi Antenna
To stream video, the 900Mhz telemetry radio proved inadequate as it has a maximum bandwidth of 500kbps. A hotspot would have also not worked since it doesn't have enough range. Instead, the team employed a Ubiquiti WiFi system in order to create a high bandwidth wifi link between Eagle Eye and the ground. The system consists of a Ubiquiti PowerBeam transmitting to the wifi antenna on the navq, allowing the software stack to transmit WPA2 AES encrypted data over a 2.4GHZ WiFi link at usable speeds.
Antenna Tracker
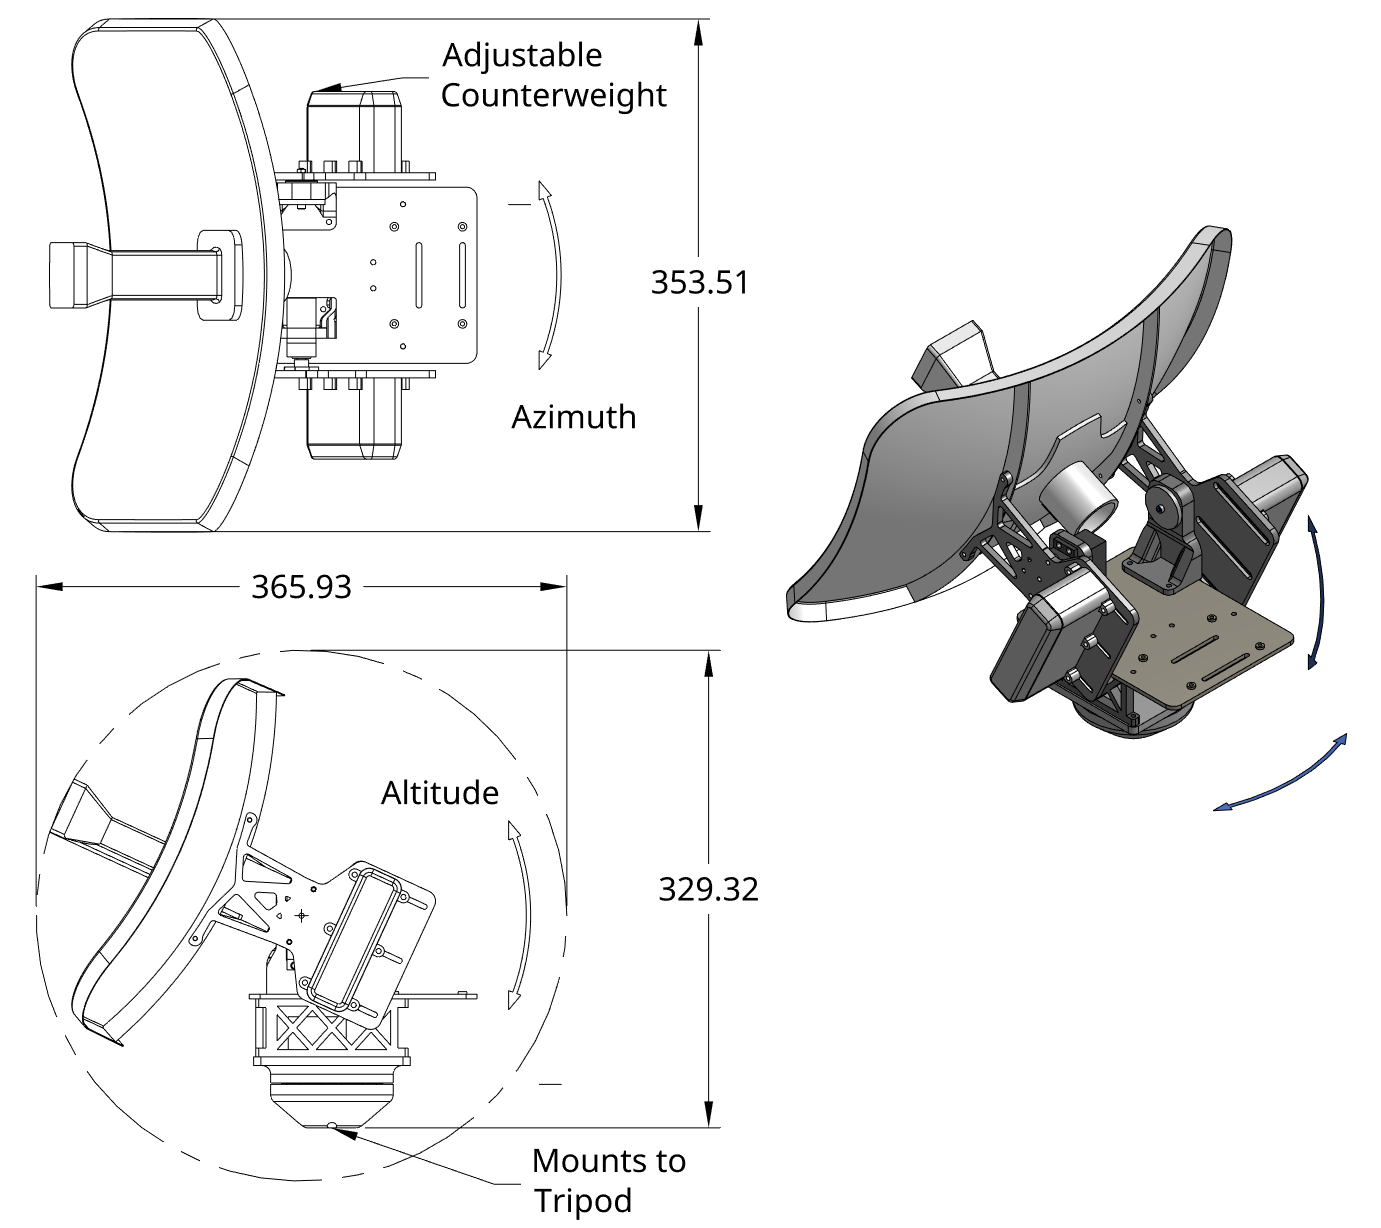
In order to use a directional antenna for the GCS wifi link, the team designed a 2 axis antenna tracking system to follow the drone. The antenna tracker consists of 2 high torque continuous rotation servos for controlling the azimuth and altitude axes along with a largely 3d printed frame and antenna mount. The software controller is a 2 part system consisting of a high-level tracking algorithm and a low-level control system. The tracking algorithm is implemented as a python script that consumes MAVLink GPS telemetry messages from the drone and sends low-level control setpoints to the control module, which is implemented in C++ using an STM32F4 microcontroller and the Zephyr RTOS framework. The control module interfaces with an IMU [R M] and outputs speed setpoints to the continuous rotation servos to achieve the desired attitude. The result is a robust antenna tracker system that can maintain a high-quality link with the drone within 5 degrees of accuracy.
Yolov5 Model
Initially the team wanted to use the crowdhuman dataset with yolov5 to train. Unfortunately when we tried to train the crowdhuman dataset we found that it took extremely long to train with all the images since each image had hundreds of objects in it. When we tried to reduce the number of images the accuracy of the model was very poor. We switched to yolov4 which reduced the train time substantially. Although we had achieved a high accuracy, when we tried to run the model we learned that our server was too slow and each frame took over 30s to process. When we compare yolov5 with other neural networks like efficient det it is clear yolov5 is the best. Since we were on a time constraint the best way for us to run our model was with the coco model which has very accurate detection of people and is extremely efficient. We filter out only the person classes from the model to use.
Distance Calculator
The Distance Calculator takes the bounding boxes from the Yolov5 model and calculates the distance between the center of each bounding box. In addition, it draws lines between the images. Lines that are green show social distancing guidelines are being followed, lines that are red show they are not.
GPS Location Finder
When the Social Distancing guidelines are not being followed the GPS Location Finder takes the center of the bounding box and uses that to create a gps coordinate of the area where people are not following guidelines.
MAVSDK Proximity
MAVSDK Proximity takes the GPS coordinate and creates a way point for the drone to travel autonomously.
Audio Player
When the drone reaches the GPS coordinate MAVSDK Proximity triggers the Flask server on the Raspberry Pi 4 which plays a sound on an external speaker mounted on the drone. We could not use the navq in this case because it does not have a sound card or an aux port to play the sound. The navq was still necessary to receive video from the camera.
Heatmap
The heatmap program takes, as input, all the bounding boxes of detected people in a certain time frame. As output, the program creates a map of the most densely-walked area(s). The differences in walking frequency across positions are indicated by the different colors (with pink being the least-walked and red being the most-walked). This is a heavy task so it is only done once every couple of minutes. A heatmap can inform officials of necessary redesigns of spaces that cause people to prohibit social distancing guidelines.
Building ProcessAfter opening the kit box, we first assembled the frame with the tools included in it. Once all of the tubes were clamped into the frame, we proceeded to mount all of the necessary electronics onto their proper locations. Connecting the electronics was a simple task; connectors made it easy to wire all of the radios and propulsion systems. The bullet connectors on the PDB were a good sight to see, as it meant that we would not need to solder the ESCs onto the board. To power all our electronics we used an external battery pack. We also had the opportunity of making a video for px4 of setting up the drone which can be found here.
ResultsAs shown both our object detection algorithms and our heatmap for Eagle Eye work extremely well. Unfortunately, because of cost restrictions our server is not very good at running the model as it does not have a gpu. Currently it is only able to process images at 3 frame per second. We were forced to store the video and process it after the fact. We are confident that with a system with a graphics card and a better cpu, it should be able to process the video at near real time.
Eagle Eye is an exceptionally useful tool for a wide variety of applications. If you would like to replicate Eagle Eye follow these steps:
- Setup Yolov5 on your system with this tutorial https://medium.com/quantrium-tech/working-with-yolov5-7623a41fbdf8
- Clone our code here
- 3D print and assemble all the part
- Buy the px4 developer kit
- Follow the instructions of our video to assemble your drone
- Buy the other necessary equipment
- Follow the Ubiquiti tutorial to setup the PowerBeam an connect it to the navq
- Run the streamer code to establish a connection with the navq
- Run the model to process the stream
- Run the flask server
- Run mavsdk_proximity to fly the drone and get your output data!
We have been very active in the PX4 community. We have made videos for px4 on everything from tutorials on setting up the NXP dev kit to documenting our progress on our octocopter.
https://twitter.com/PX4Autopilot/status/1331430041129979905?s=20
https://twitter.com/PX4Autopilot/status/1354474553418735619?s=20
https://twitter.com/PX4Autopilot/status/1283331253077336065?s=20
https://twitter.com/PX4Autopilot/status/1280581107239526401?s=20
https://twitter.com/mrpollo/status/1322715712218046464?s=20
Sourceshttps://www.thelancet.com/journals/lancet/article/PIIS0140-6736(20)31142-9/fulltext#%20
https://medium.com/quantrium-tech/working-with-yolov5-7623a41fbdf8
https://blog.roboflow.com/yolov4-versus-yolov5/
https://medium.com/deelvin-machine-learning/yolov4-vs-yolov5-db1e0ac7962b


Comments
Please log in or sign up to comment.