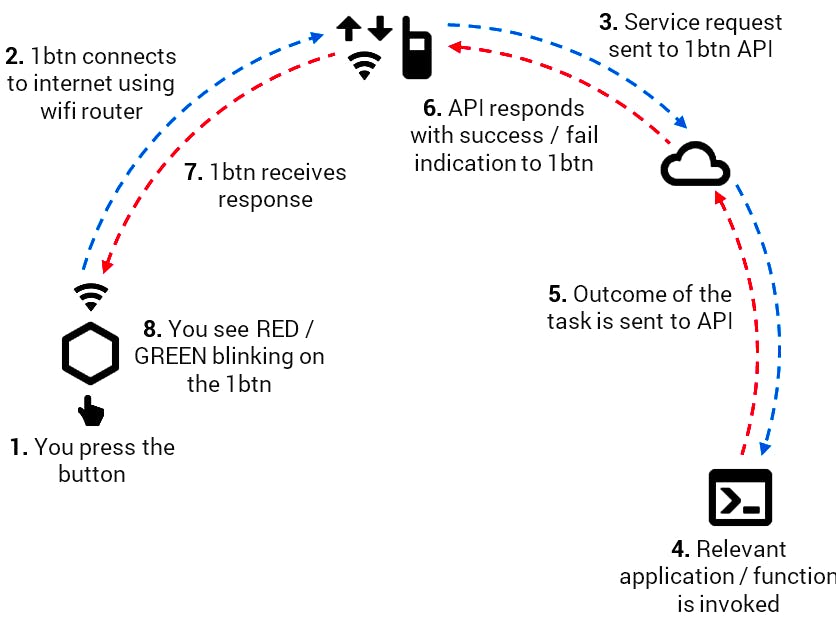
1btn is open source wifi connected device uses the internet to complete a task with the simple, satisfying click of a one button.
Currently crowdfunding on crowd-supply (www.crowdsupply.com) 1btn has got decent attention from makers and greater attention from enterprises.
While 1btn device comes with a few pre-defined actions out of the box, one of the capabilities of 1btn is can prove quite powerful. This capability is to invoke a URL action on remote servers. The actions are also known as web-hooks. Ability to do this becomes particularly powerful since it lets you interact with and control any internet-enabled application.
IFTTT is one tool to get these things quickly going and test out some of the integration easily; however, when it comes to some serious IoT design and development, you need robust cloud application and workflow.
Enter Losant — a Powerful IoT PlatformLosant offers complete development platform that provides scalable device management, data collection, visualization, and data reaction workflows.
Losant also supports many popular hardware options and has happily joined in as a development partners for 1btn device.
One of the cool thing about Losant is its drag and drop workflow design interface. This lets you build complex workflows in minutes and deploy them instantly.
Integrating 1btn and Losant1btn literally acts as a table-top shortcut for your cloud applications; similar to a desktop shortcut icon on your PC. This makes 1btn-Losant integration more meaningful.
There are two options to integrate 1btn with Losant. First choice is to create a new device on platform and modify firmware of 1btn to redirect calls to your application directly which in turn would activate the workflow. Second options (relatively simpler and quicker) is to create a web-hook in Losant application and configure it on 1btn action (invoke URL i.e. web-hook).
We will go with second — easy option and see how can do this in a few steps.
Step 1: Create new Application and add Web-HookBefore adding a web-hook, we need to create an application in Losant, and then in the “More” tab on top-right, select “Web-hooks”.
Give a name to the web-hook and set request method as POST. Nothing else would be required; just copy the web-hook URL someplace as we will need it while configuring 1btn.
Step 2: Modify 1btn ConfigurationIn order to enable 1btn activate the web-hook we just created, we need to configure it necessary details. This is done on 1btn web service. Login to 1btn web service with your credentials and select add new button or modify if you already have one added there.
After giving button MAC ID and nick name, and active timing, last stage is to update the action type. Select Invoke URL as an action type and paste the web-hook URL we copied in previous step into the text box for URL end-point
In addition to URL end-point, we will also add a few parameters here. These will be passed on to Losant web-hook as a query string and we can then use them in our Losant workflow later. I have added, 1btn id, nick name, battery voltage and time stamp as parameters for passing.
Step 3: Add a WorkflowVisually defined workflow is one of the powerful functionalities of Losant. Workflow let you receive data from the web-hook and then you can use any of the attributes or data received from web-hook call.
In order to keep it simple for now, I created a simple workflow, which checks incoming parameters. If the button id is matching, it then sends an email and also publishes a message on (Losant’s) MQTT. You can read through detailed documentation on creating workflow at https://docs.losant.com/.
The good thing about email setup here (as compared to 1btn’s email) is you can set a few more extra parameters; such as sender’s email address, reply-to address, subject, and can have Cc and Bcc added too. Message body supports payload templating same as 1btn’s email body format.
As you will see, all the parameters we’ve set in step 2 on 1btn configuration page are available here in format like data.query.buttonName, and alike.
In the end of workflow, debug node has been added just to see a log as and when workflow is triggered.
Step 4: Testing the IntegrationOnce the workflow is defined, press “Deploy Workflow” just above the workflow visual in top-right corner.
Well there you have it now. All it needs is 1btn press and your Losant workflow will run each time 1btn is pressed. For this test case, whenever 1btn is pressed, you should receive an email containing the message you’ve added in the workflow settings and at the same time also see a mqtt message under given topic in MQTT message stream.
There are plenty options on Losant platform itself which would let you do multiple complex tasks at the press of 1btn. Some of them also let you store data values in persistent database, give access to AWS Lambda, allow you to use other APIs such as Sendgrid, Twilio and Slack or tie in this workflow output to other workflows in your entire application. Possibilities are only limited by your imagination.


Comments
Please log in or sign up to comment.