


Hardware components | ||||||
 |
| × | 1 | |||
| × | 1 | ||||
| × | 1 | ||||
 |
| × | 1 | |||
 |
| × | 1 | |||
 |
| × | 11 | |||
 |
| × | 1 | |||
Software apps and online services | ||||||
 |
| |||||
 |
| |||||
Basic description
The following project is designed to improve on the standard infrared body temperature thermometer by adding the option of sending an email notification to an administrator or to the nearest medical centre, should someone have a higher temperature than normal. A demonstration of the thermometer can be seen below.
Possible applications
The thermometer can be used as a security measure to screen possible positive cases of COVID-19 and to facilitate the process of testing and isolating the suspected case by sending a notification to local health authorities. This should improve the average time of detecting a case, especially with the rise in the number of cases due to the recent Delta strain.
Notes
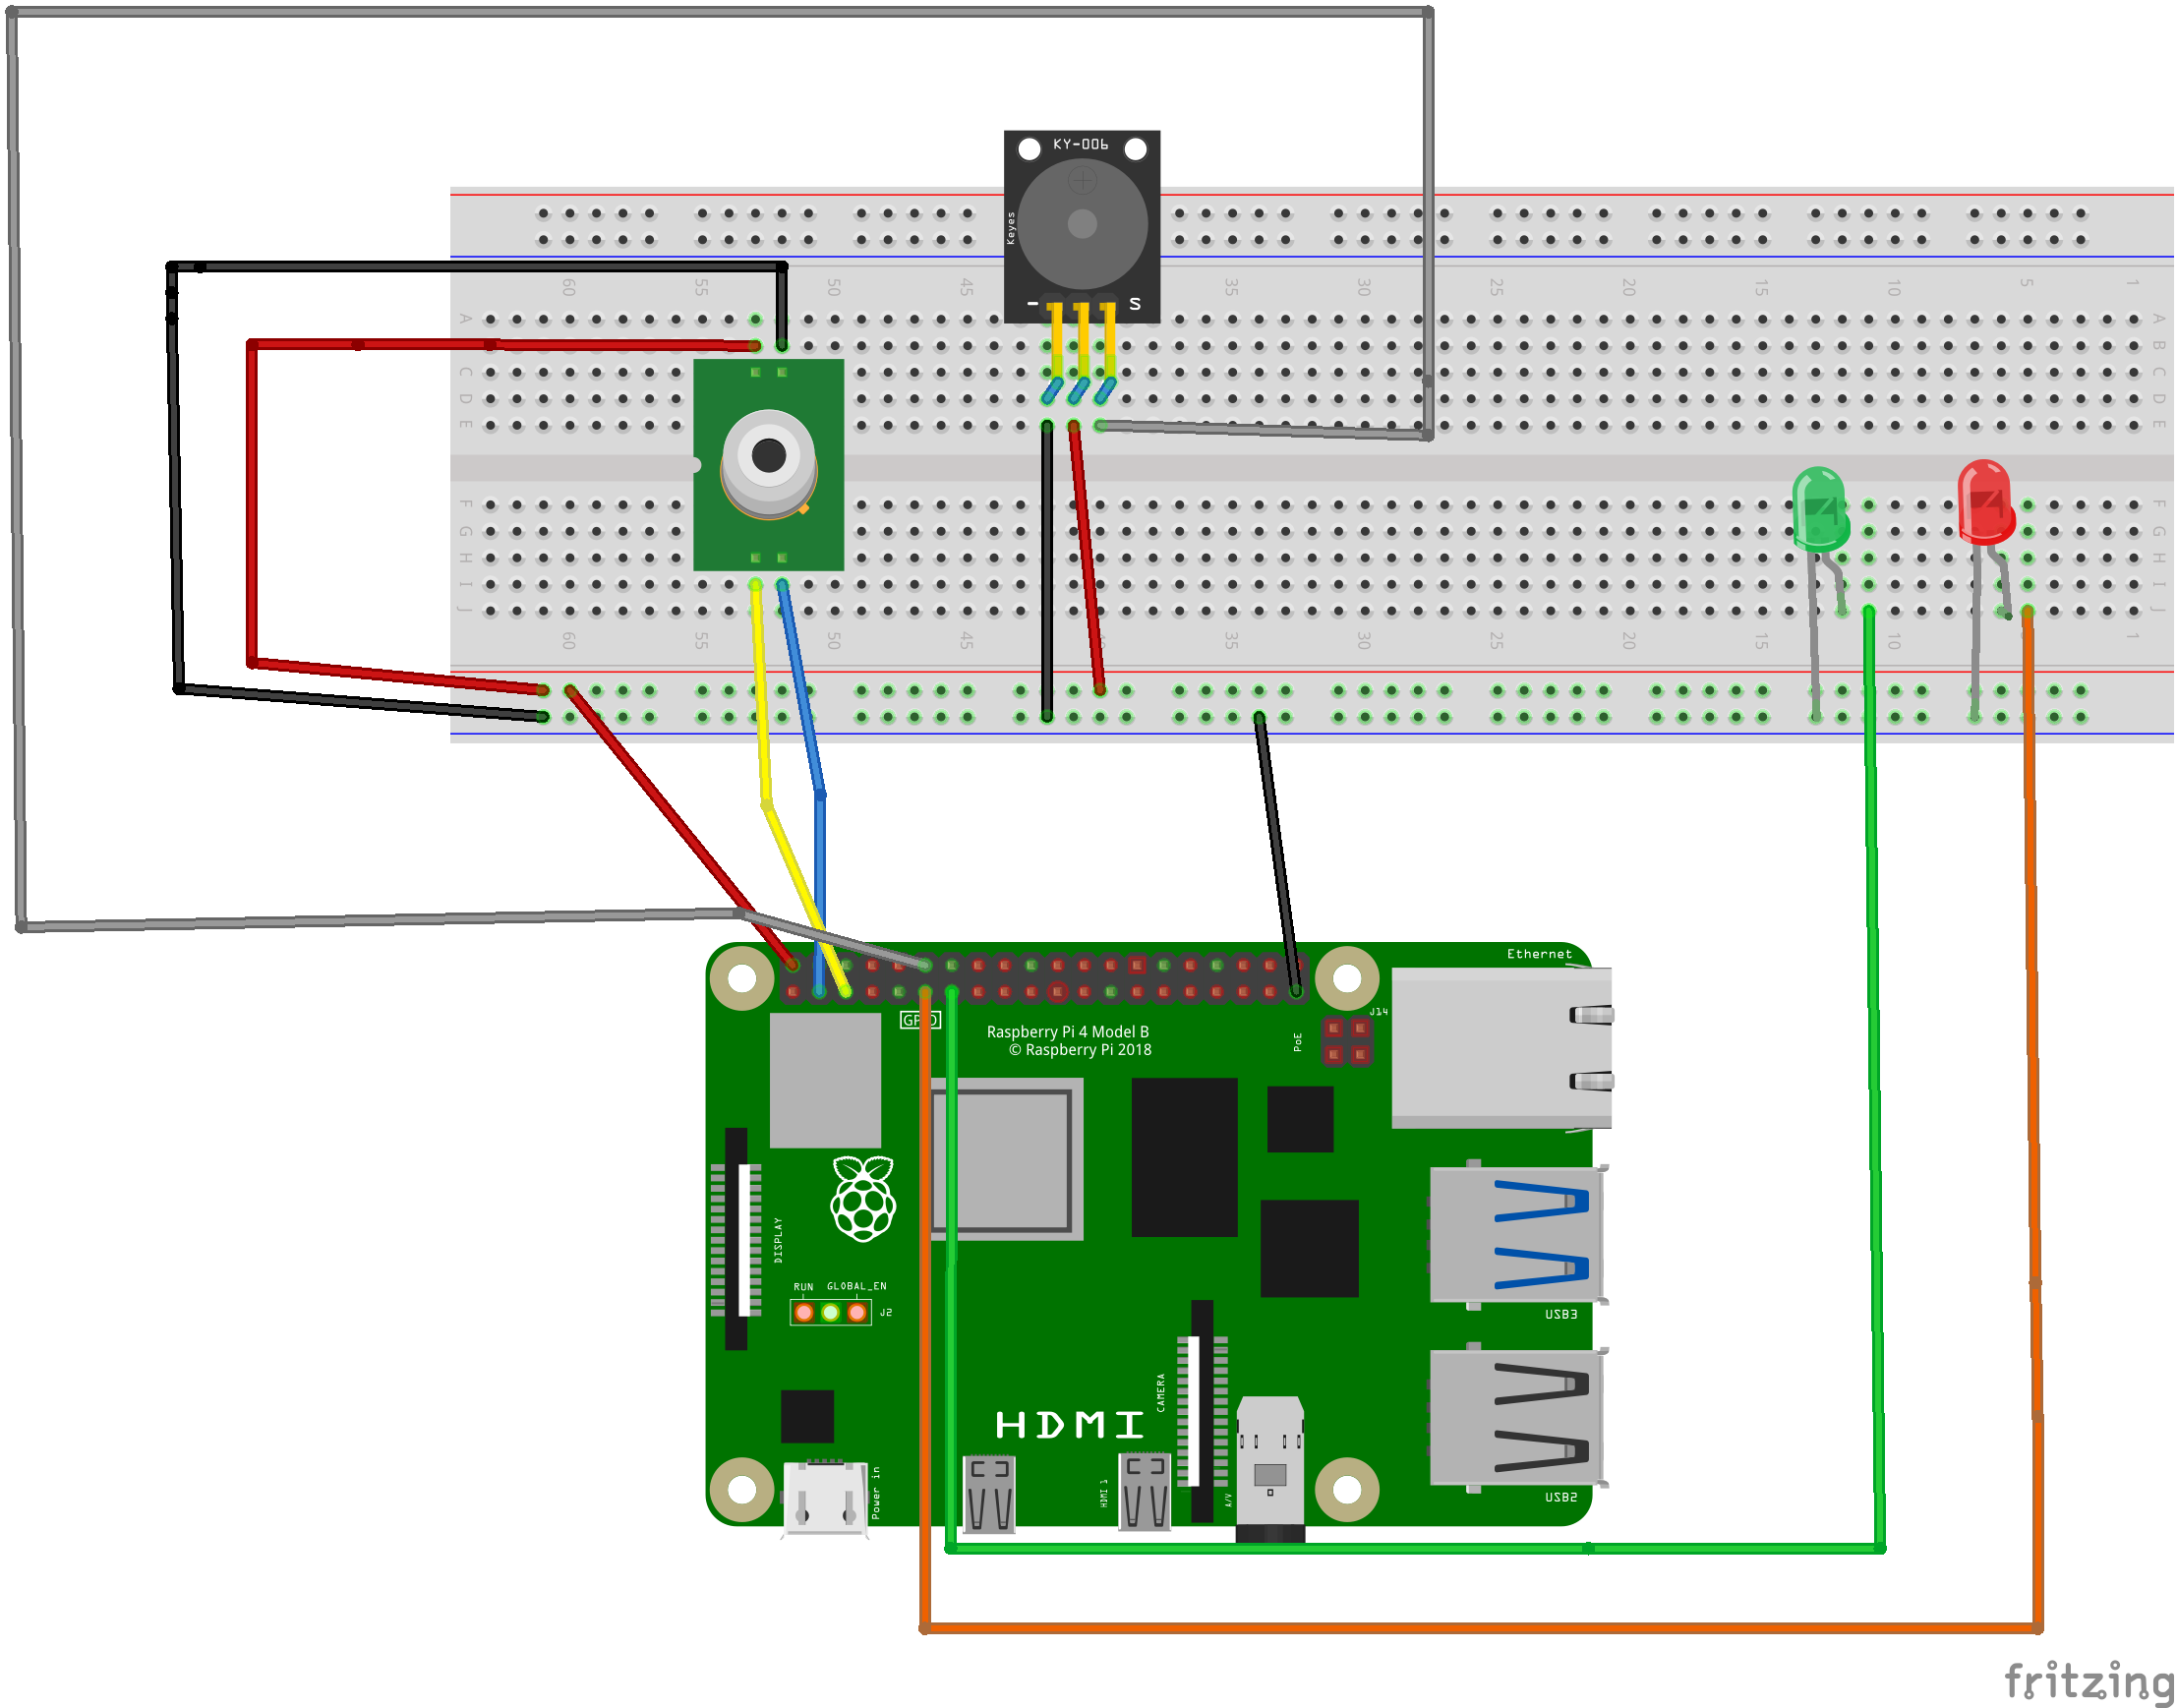
In the project's cover image, the wiring is quite complicated, since I used a combination of male-to-female, female-to-female and male-to-male jumper wires. However, you do not need to worry about the wiring, as the schematics at the bottom of the page should show quite easily how to connect each module to the Raspberry Pi board.
The things you need for this project- Raspberry Pi 4 Model B (a Pi Zero should also work)
- MLX90614 infrared temperature sensor
- KY-008 laser module (used for easier targetting)
- Red and green LEDs
- Male-to-Female jumper wires
- Male-to-Male jumper wires
Setting up the Raspberry Pi
To get started with the Raspberry Pi, you will need a microSD card (preferably with an adapter) in order to install the Raspbian OS. A full tutorial can be found here: https://www.raspberrypi.org/documentation/installation/installing-images/
After you installed the OS and finished setting it up, open a terminal and install Python 3 and pip (if it isn't already included with the OS):
sudo apt-get install python
sudo apt-get install python3-pip
Then, install the following libraries for the project using pip:
pip install board
pip install adafruit-blinka
pip install adafruit-circuitpython-mlx90614
Using IFTTT for the email service
IFTTT (If This Then That) is a simple service that lets you implement various functions in applets using as little code as possible, such as sending files to cloud servers or notifying users through apps, and it's heavily used in Internet-of-Things applications.
Make a free account on https://ifttt.com and then go to the create tab to make the necessary applet:
Then, click on the "If This" tab:
From the list of services, search for "Webhooks":
Here, you can write a trigger name so your program can use the applet whenever the trigger is activated. You can name it however you want, but you must modify the trigger name in the code as well.
For example, if your trigger name is "sendMail", you must modify covidFlag in the code to sendMail.
After you created the trigger, click on the "Then That" tab:
Choose the "Email" service:
Here, you can add what should the email contain; if you want to display the temperature as well, add a {{Value1}} bracket in your message. Then, save your changes and your service is complete!
Writing and running the code
Now that the applet is set up, you can start writing the code. Open the terminal in your Raspbian OS and make a new Python file using
nano main.pyAlternatively, you can use a text editor like Mousepad or a dedicated Python IDE like Geany or Thonny.
Once you are in the Nano interface, write the code provided down below and save your changes with CTRL+S.
How do I insert my IFTTT key?
To find your IFTTT key for webhooks, go to your applet and press the webhook icon above the title. Then, on the Webhooks page, click on "Documentation".
Here, you can find your unique key. Copy it and paste it in place of the YOUR_MAKER_KEY text on line 48.
The request shoud look like this (I will be using the sendMail trigger as an example):
requests.post('https://maker.ifttt.com/trigger/sendMail/with/key/YOUR_MAKER_KEY?value1='+str(covidThreshold)+'')Now that the code is complete, exit the Nano editor and run the code using
python3 main.pyin the terminal.
How does the program work?The sensor continuously scans the temperature of passing people every 9 seconds.
If the temperature is below 37.3 degrees Celsius, then a message will appear that the scanned person is safe and may not have any symptoms. At the same time, the green LED will flash for aproximatively 2.5 seconds.
However, if a the measured temperatures is above 37.3 degrees, a message will appear confirming that the scanned person might have symptoms and the red LED will flash instead.
Afterwards, an email will be sent to the registered email address of the applet. The message should look like this:
Checking if the infrared sensor is working
Unlike the other modules, which are read through the GPIO library, the MLX90614 sensor can only be interfaced through the I2C serial bus. To check if the sensor is working properly, type
i2cdetect -y 1in the terminal. If the resulting table is identical to the one from the image below, then Raspbian has successfully read the sensor.
If the program still doesn't work, make sure to install all of the required libraries and check if the wires have been properly wired to the breadboard.
ConclusionThis project will hopefully be used by various businesses and/or institutions who desire to implement a better temperature checkpoint system to comply with the ever-changing social distancing and safety regulations. I plan to modify this project in the future by adding a 4-digit display to show the temperature without using a terminal and to improve the portability of the entire package, since the current setup with my Pi 4 is quite cumbersome to use. Please let me know if there are any problems with the project or if there are other solutions and improvements!


Comments
Please log in or sign up to comment.