Imagine that you can leverage your existing Android programming skills acquired for many years, to develop an app for Internet of Things. Android Things allows you to do that. Personally, I'm happy with Google's direction to take on Internet of Things.
As an IoT influencer and maker in Indonesia, I need to learn and share it to the community. Last Jul 22, I had the opportunity to share about Android Things development in a event called Google I/O Extended Jakarta - Indonesia.
But developing for Android, and also Android Things, requires us to use Java (you can always use C++ with NDK, but that's not for mere-mortals. I have no issue with Java, I acquired Java skill since 18 years ago, working on my under-graduated project with it, and it will always be a part of my life. I've also been using Java for developing Android apps since 4 years ago. But my love to it became less and less lately due to its nature and new languages came along.
KotlinLuckily, there's a new kid on the block, Kotlin. Actually, it's been around since 2011, but made popular lately, especially after Google announced to officially use it for developing for Android. It kinda made me curious how good it is. So, to learn developing for Android Things, I think it will be a good opportunity to also learn Kotlin. So, this project is my first attempt to use Kotlin.
It turns out, Kotlin is very easy to learn. I have a bonus already having experience with Swift programming language, you know, the one that you can use to develop app for Apple platforms. Turns out both languages share similar syntax. I don't say Kotlin copies Swift or vice versa, I just happen to know Swift first.
So the learning journey began. It's very hard to learn new technologies without objective, so this project is my objective to learn Kotlin.
The ProjectThis project has simple objective to read temperature and pressure from BMP280 sensor and display the reading to OLED display.
This video shows how the final result will look like:
As both modules are accessible via I2C protocol, I need to know how to work with I2C in Android Things.
Further exploring it, turned out I don't need to go down to I2C level, reading and writing registers by myself. In Android Things, there's a concept called User Driver, which are the components registered from within apps that extend existing Android framework services. It happens that Google is nice enough to make User Driver for both BMP280 and SSD1306 modules. I can just use those, yay!
The CodeIn order to use User Driver for both BMP280 and SSD1306, we need to make entry in app level build.gradle
compile 'com.google.android.things.contrib:driver-bmx280:+'
compile 'com.google.android.things.contrib:driver-ssd1306:+'
The main entry to the app is SensorActivity.kt file. To instantiate and register BMP280 user driver, we need these lines:
       try {
           bmp280Driver = Bmx280SensorDriver(BoardDefaults.i2cBus, 0x76)
           bmp280Driver?.registerTemperatureSensor()
           bmp280Driver?.registerPressureSensor()
       }
       catch (e: Exception) {
           Log.e(TAG, "Error registering BMP280")
       }
Notice an operator "?" there. That's beauty of Kotlin, is that it's very hard to cause Null Pointer Exception (NPE) unless you really want it :P NPE has been a major bug cause since the early of time, and Kotlin attempt to avoid it by introducing "safe call operator". That "?" is exactly it. Using "?" operator won't cause NPE when calling method or property from a null object. I even don't need that try-catch, I just need it to properly show error messages.
To access BMP280 sensor reading, as it's a sensor, we need to work with SensorManager. This block of code exactly does that:
       mSensorManager = getSystemService(Context.SENSOR_SERVICE) as SensorManager
       val dynCb = object: DynamicSensorCallback() {
           override fun onDynamicSensorConnected(sensor: Sensor?) {
               super.onDynamicSensorConnected(sensor)
               Log.i(TAG, "Registering ${sensor?.stringType}")
               if (sensor?.type == Sensor.TYPE_AMBIENT_TEMPERATURE || sensor?.type == Sensor.TYPE_PRESSURE) {
                   mSensorManager.registerListener(
                       object: SensorEventListener {
                           override fun onAccuracyChanged(theSensor: Sensor?, accuracy: Int) {
                               Log.i(TAG, "Sensor accuracy changed: " + accuracy)
                           }
                           override fun onSensorChanged(event: SensorEvent?) {
                               if (event != null) {
                                   Log.i(TAG, "Sensor changed: ${event.sensor.stringType} = ${event.values[0]}")
                                   if (event.sensor.type == Sensor.TYPE_AMBIENT_TEMPERATURE) {
                                       mTemp = event.values[0]
                                   } else if (event.sensor.type == Sensor.TYPE_PRESSURE) {
                                       mPress = event.values[0]
                                   }
                                   mHandler.post(uiRunnable)
                               }
                           }
                       }, sensor, SensorManager.SENSOR_DELAY_NORMAL)
               }
           }
       }
       mSensorManager.registerDynamicSensorCallback(dynCb)
Look at the beauty of that code. I don't need to create listener inner classes to handle callbacks, like I will do if using Java.
The ScreenDisplaying sensor reading is done using SSD1306-based OLED screen. As mentioned, there's also user driver for it so I can just use it. However, apparently the driver doesn't provide API for writing text just like what you'll find in Arduino libraries. Everything you want to display on it should be drawn as bitmap. Luckily, as Android Things is basically Android and most of Android APIs work just well, it's easy to manipulate bitmap an dump it to the screen.
However, to offload the bitmap manipulation from the main thread, we need to use one of the mechanisms suggested, which one of them is using Handler and Runnable. So, here's the code:
   private val mHandler = Handler()
   private val uiRunnable = Runnable {
       if (mScreen == null) {
           return@Runnable
       }
       mScreen?.clearPixels()
       val text1 = "T: %.2f °C".format(mTemp)
       val text2 = "P: %.2f Pa".format(mPress)

       val paint = Paint()
       paint.textSize = 22f
       paint.color = Color.WHITE
       paint.textAlign = Paint.Align.LEFT
       val textAsBitmap = Bitmap.createBitmap(SCREEN_WIDTH, SCREEN_HEIGHT, Bitmap.Config.ARGB_8888)
       val canvas = Canvas(textAsBitmap)
       canvas.drawText(text1, 0.0f, 0.0f + (24.0f), paint)
       canvas.translate(0.0f, 50.0f)
       canvas.drawText(text2, 0.0f, 0.0f, paint)
       BitmapHelper.setBmpData(mScreen, 0, 0, textAsBitmap, true)
       mScreen?.show()
   }
Later, I can just call this in order to update the screen:
mHandler.post(uiRunnable)
The rest of the code should be self-explanatory.
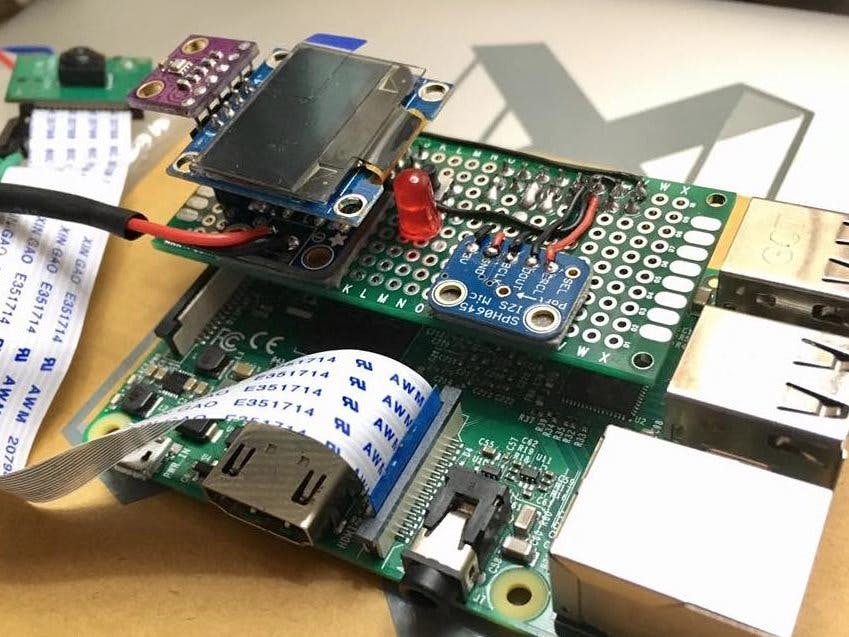
The SetupQuite frankly, I hate jumper cables. So I made a simple Raspberry Pi HAT by soldering everything on a proto-board as following photo.
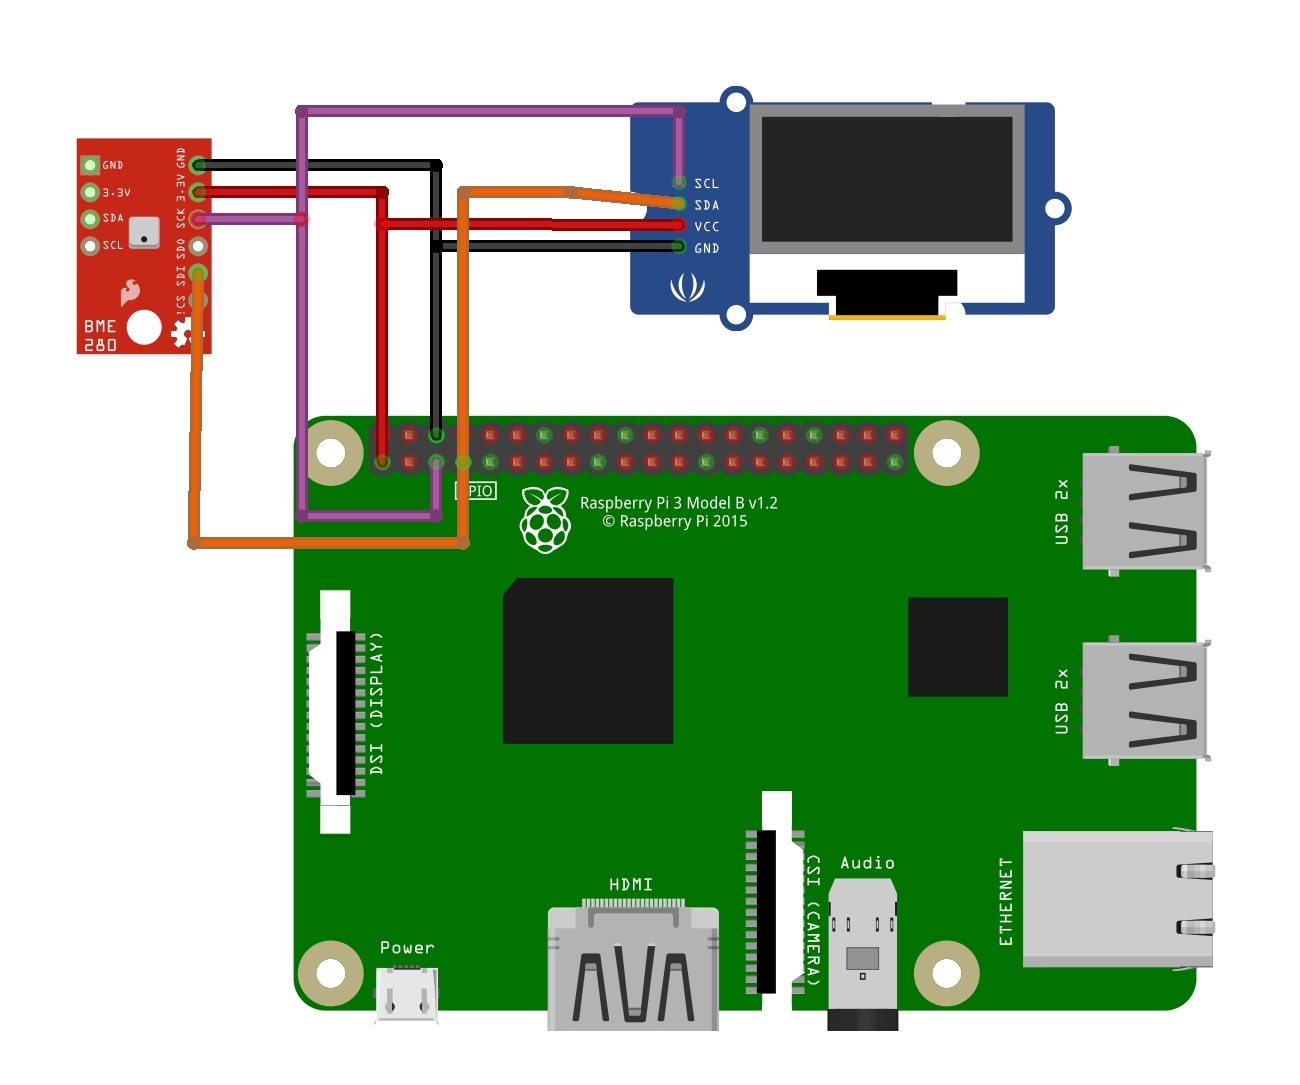
You don't need to do that. You can just connect the modules to the Raspberry PI by following the attached schematics. It's just I2C after all.
Run ItRefer to the details on GitHub repo page to run the project. I think that's it for now. Good luck recreating it by yourself. Enjoy!


Comments
Please log in or sign up to comment.