


Hardware components | ||||||
 |
| × | 1 | |||
 |
| × | 1 | |||
| × | 2 | ||||
| × | 1 | ||||
 |
| × | 1 | |||
Software apps and online services | ||||||
 |
| |||||
Hand tools and fabrication machines | ||||||
 |
| |||||
Do you know the issue, that you have finished cooking and you want that all family members come to eat, but nobody reacts on your call and after the third time shouting through the whole house without any response you go (a little bit angry, the food in the meantime burned or cold) upstairs and find your child with headphones painting a picture?
This project is my answer to this problem! Maybe it will help you in similar cases.
The ProblemShouting as way of communication is not always the most effective solution.
The SolutionThe IdeaBecause of the most favorite pursuit to hear nothing of the surrounding from my daughter, I want to create a message board which has a lot of blinking lights to catch the attention of my daughter, so that she reads the messages on it. The message board also should have different types of messages, so that my daughter can differentiate if she has to react immediately or has a task that is in no hurry. It should be a way to respect the privacy of my child and also inform it about different topics. In addition, the board should have the possibility to respond.
Because I don't want, that my daughter have her own smart phone and I want to reach her, if she is in her room, I decided that a stationary message board is the right solution. My wife and I need a counterpart which we can use in the whole house. In this case a android app is the right decision.
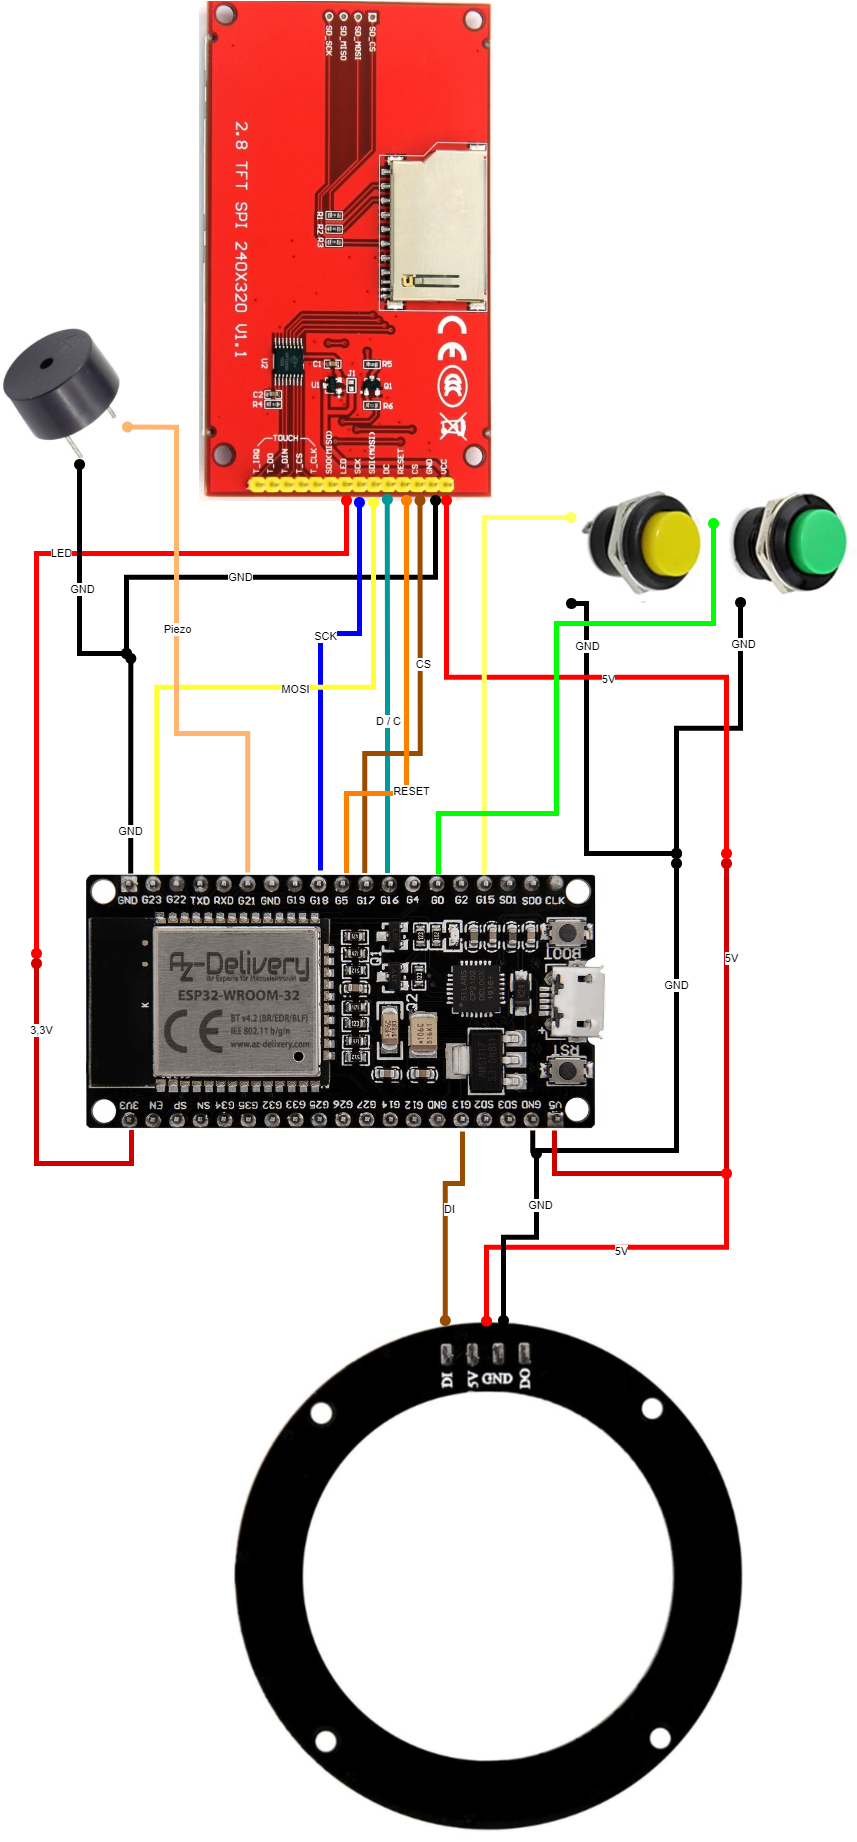
The ComponentsTo realize the before described idea, I need a lot of different components to display some messages, have lights and sound to catch the attention of my daughter and buttons to have the ability to get some response.
TheDisplay
To display some information like time, message and response texts, I will use a 2.4 inch LCD display with the connection module ILI9341.
The lights
To get the attention of my daughter I will use the NeoPixel LED ring. Additionally to the blinking functionality, I will use it to make a clock.
The piezo buzzer
To have some sound in the case that my daughter does not hear some music, I will use a piezo buzzer.
The buttons
With the button we can switch the screen on the display between the main- and the response view.
In the following section I will describe all the function you need to realize the message board on a ESP32.
The MQTT connection
To get a communication between the message board and the android app I need to set up a wifi connection on the ESP32. As communication protocoll I will use MQTT. How to set up a MQTT broker please take a look on my project my_smarthome#1. I also use the same code from the my_smarthome#1 project for the MQTT connection on the ESP32. Additionally I use a NTP client to have always the right time.
In order to receive some data via MQTT, we need to define a callback function. With this function we get the topic and the payload and save them in global variables in order to have them available in the main program.
In order to send some data via MQTTwe need to define a publisher function called sendMQTTMessage(). This function gets a response text and send it over a fixed topic to remote devices.
The clock
To realize a digital clock on the message board I have wrote some functions to fetch the time in the format I need.
In the getTime() function I fetch the time from a NTP server in the format after ISO 8601 as string.
To use the LED ring as clock I need the hours and minutes separated. For this I wrote the getHours() and getMinutes() functions.
The LEDring
To draw attention on the messageboard we let blink the LED ring in different colors. Over the blink() function can we easily flash the LED's in a high frequency and change the color.
Additionally we use the LED ring to realize a kind of analog clock for which we use the getHours() and getMinutes() functions to get the current time. One pixel of the LED ring will show the hours in a pink and another the minutes in turquoise light. If the minute and hour pointers need to be on the same pixel a combination of the two colors are shown.
The ringAlarm() function will be called if a new message is arrived. In this case the LED ring will flash one pixel after the other in different colors. So that the attention should be draw to the messageboard.
The buttons
To get fast reaction after clicking on a button we define some interrupt service routines (ISR). ISR's should always be really fast, because the main program and other lower prior ISR's will be interrupted or blocked for the procedure. This is why we load this function always to the RAM over the IRAM_ATTR definition. To debounce the buttons we always check how much milliseconds are gone since the last interrupt is gone. If itare more than 200 milliseconds past we run the ISR.
The display
The display is the heart of the messageboard. Here we will see new messages arrive, a digital clock and a screen to choose a response text. To have a smart use of the display fixed on the functionality of the message board, I defined a lot of functions.
The main screen is dominated by a header text and a digital clock. To realize this I defined the headerText() and clockText() functions. The main screen will change if some message arrived. First the display will blink in red, yellow or green depending of the topic from the message. Here I defined three kinds:
- urgent (red)
- task (yellow)
- information (green)
After that the message text will be shown on the screen. For this I have written the alarm(), task(), information() and messageText() function. The first three are almost the same, except that the color of the screen change. The alarm function also has the specialty, that the piezo buzzer will beep.
The response screen will be shown after clicking on the yellow button. Here we can see some default texts to answer.
This is realized over the responseScreen() function.
By clicking on the green button we will change the courser on the next text filed. This shown to the user by a orange rectangle. The rectangle will be drawn by the drawChooseBox() function.
The setup
Now we have to setup all the components. Here we shine the LED ring to have a optical feedback for the user, than we will connect to the wifi, set up the MQTT, NTP connection, start the display and print a "Starting..". Than we have to set up the digital pins for the buttons and the piezo buzzer.
The main loop
Now we have to define the logic of the program. Here we have to stick together all the small program parts we defined before to a logical procedure.
In the first part we start the communication and display the main screen with the clock and also define whats happen if a message arrived with a specific topic. For example you can see, that we call the alarm() function if a urgent message arrived. After alarm we will display the header text, the message text and the clock.
In the second part we define whats happen if the yellow button is pressed. First we will change to the response screen. With selection of the first text.
If the green button will be pressed a counter will increment and in dependency of the counter another text will be selected. If the counter is bigger than 5, the counter will be reset to zero. So the choose box will jump again to the first text.
If the yellow button will be pressed again, the view will be jump back to the main screen. If the counter is between zero and four the message board will send the appropriate message, if it is greater than 4 the screen will jump back without sending a message.
To send messages to the message board, I want to use a android application. This is my first android app I ever have written, so if you find some points to improve please tell me :).
To have user interface everybody can use instinctively, I have searched after a message framework witch implements a UI like WhatsApp or Instagram (UX). For this I found stfalcon-studio/ChatKit, which is a great library for quick implementations of a chat.
In the beginning we will create a new project in Android Studio and choose a Basic Activity as template.
Now Android Studio will create a project structure for us. You will find a lot of default files which implements the MVC pattern.
The activity is here a kind of entry point into the application, what would be the main in other context. In a mobile application you do not have always the same entry point, because app could be started from another app, at a other activity. In our case we only need one activity.
In the layout folder you will find some xml-files which will define the view of the application. In Android Studio you can change this file in the code or in design context.
The AndriodManifest.xmldefines essentials information about your application. For example the permissions your application needs to run correctly. In our case we need the INTERNET, ACCESS_NETWORK_STATE, WAKE_LOCK and READ_PHONE_STATE permissions.
In the build.gradle file you define the dependencies of your application for build process. Here we need to include the paho and the ChatKit framework.
Now lets start developing the application. In the beginning we can design the UI of the app. For this click with the right mouse button on layout and press on New->Fragment->Fragment(Blank). And call it message_fragment.xml.
To use the ChatKit framework include the following widget into your message_fragment.xml.
<com.stfalcon.chatkit.messages.MessagesList
   android:id="@+id/messagesList"
   android:layout_width="match_parent"
   android:layout_height="match_parent"
android:layout_above="@+id/input" />Now click on the Design button and take a look on your work.
Now we have the basic structure of our app. But because we want to send messages over MQTT we need a topic. Because the message board reacts only on three topics we will implement the selection over radio buttons, but only one should be active at the same moment. For this we will first drag a RadioGroup into the view and than three RadioButton's into this group.
Now name the buttons urgent,task and information like the topics we have defined for the message board. Also you have to set the id of the buttons like the text. Now go to the code view of the xml-file.
Over the id we can get information about the state of the button in the java class. Additionally we will define a function name which will be called if the RadioButton is clicked. To have a default value we will set the urgent button to checked: true.
Now we can start to program the controller of the buttons. First we will define a private static variable topic in the MainActivity.java.
And than have to implement the onRadioButtonClicked-function, which will be called if a RadioButton is clicked. Here we make switch-case over the id's of the RadioButton's. If a case is true we set the corresponding topic. Additionally we define a getTopic-function to query the topic. Here we also have to define what happens if no button was clicked when calling the function. In our case we set the default topic to urgent like before in the button definition.
After this we can close the MainActivity.java and start implementing the controller oft the message_fragment.xml called MessageFragment.java. First we need to implement the MQTT framework paho. In the beginning we have to define a clientId and a client to start a connection between the broker and our mobile device.
After this we define a function which starts the connection. We called it startMQTT().
In this function we will first define the broker address and the MQTT port. In this case I use my local MQTT broker I have set this up in the my_smarthome#1 project. Here you can read how to set up a MQTT broker on a raspberry pi.
Than we try to connect to the broker and if it is successful we give a short feedback to the user over a toast. Also will subscribe on the responsetopic we implemented on the message board.
For subscribing we need also an function. This we call subscribeMessage().Here we have to define the quality of service (qos) and the topic on which we want to subscribe. To be informed about new messages we have to set up a callback function which will call the onMessage() function if a new message is arrived.
In the onMessage() function we have to convert the arrived message to a String. We also need to set up a user and a date for our ChatKit message view.
To send some data to the message board we also need to define a publishMessage() function. In this function we convert the given payload and publish it over the topic.
After implementing the MQTT functionality we can start to implement the ChatKit-Framework. To use this library we need to define an User and a Message class.
Lets start with the User which will implement the IUser interface.
The class describes the info of the message user, such as the user id, user name and a avatar. The last point we do not use in this case and over returning null nothing will be shown in the message view.
The Message implements the IMessage interface, which describes the information of the message, such as the user, creating date, id and content.
Now lets implement it in the MessageFragmant.java. In the beginning we have to define some objects, which will describes the message flow.
First we implement and link the objects with the view message_fragment.xml. In the onSubmit function we take the input from the user, display it on the screen and send it to the message board.
I'm really happy that my big brother, as product manager, took so much time to develop a functional and well-designed case for the message board.
message board case designed by Matthias Greiß


Comments