


Hardware components | ||||||
_ztBMuBhMHo.jpg?auto=compress%2Cformat&w=48&h=48&fit=fill&bg=ffffff) |
| × | 1 | |||
 |
| × | 1 | |||
 |
| × | 1 | |||
 |
| × | 1 | |||
 |
| × | 1 | |||
Software apps and online services | ||||||
 |
| |||||
 |
| |||||
| ||||||
| ||||||
This project will enable us to control an LCD screen over the internet with the help of Bolt WiFi Module. So, first of all, to address the major uses, this project can be that this model can be kept at your desk so that you can set your daily reminder or goal to achieve. Also, we can print some news for all to take a glance on; therefore, news such as the game score, stock prices etc. can be printed.
Here, we have used a Bolt WiFi module to convert an ordinary 16x2 LCD to a smart IoT enabled display which you can control via the internet.
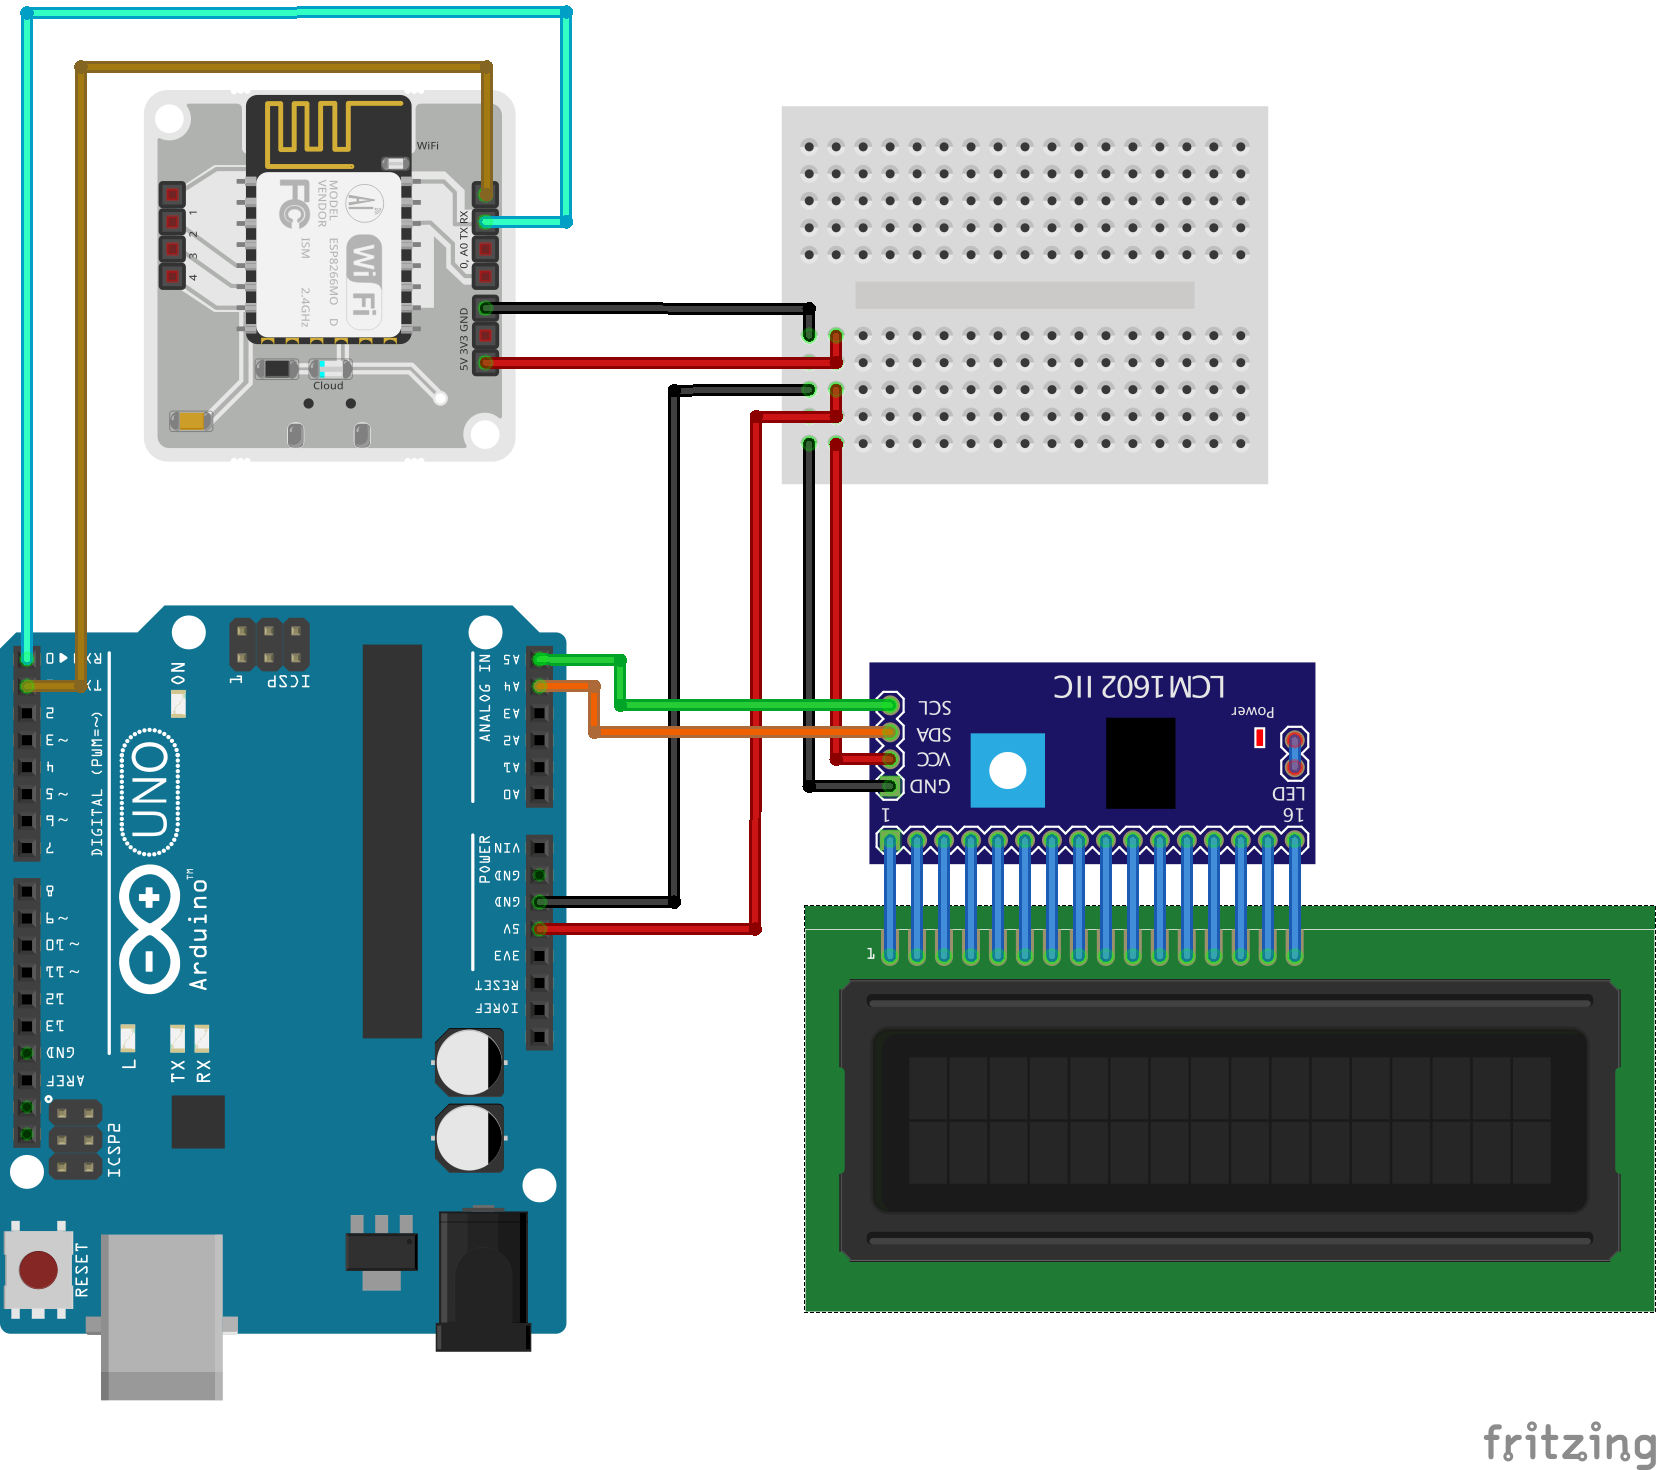
Connections:Note: Please make sure to use an I2C enabled LCD display because this reduces the effort required to connect the LCD to half (i.e. there will be only 4 connection to do instead 16).
Connecting LCD to the Arduino
1) A5 pin of the Arduino to the SCL of the LCD display.
2) A4 pin of the Arduino to the SDA of the LCD display.
3) 5V pin of the Arduino to the Vcc of the LCD display.
4) GND pin of the Arduino the GND of the LCD display.
Connecting Bolt WiFi Module to the Arduino
1) Tx pin of Arduino to Rx of the Bolt WiFi Module
1) Rx pin of Arduino to Tx of the Bolt WiFi Module
1) GND pin of Arduino to GND of the Bolt WiFi Module
1) 5V pin of Arduino to Vcc of the Bolt WiFi Module
(Note: You can refer to the circuit diagram in the Schematics section)
Setup:HTML Code
Here, for this project, I have created a website, and to this, I have used Github Pages (Websites get hosted directly from your GitHub repository) to host my Website.
Link for the website: https://anshpatel02.github.io/boltsmartbanner/
So, for any Bolt user can just follow the simple hardware connections and then use this website to print on their LCDs by entering the Bolt ID of their Bolt module and the API key.
I have added both the HTML code and the CSS under the coding section if you want to create your own website.
Note: For more understanding about how to use GitHub pages you can refer to this video
Arduino setup:
The function of this code is to enable the Arduino UNO to print the message which you typed on the website.
Also, I have attached the Arduino code below which you would have to upload on your Arduino UNO.
(Important Note: Please remove the Bolt WiFi module while uploading the code to the Arduino)
Working:1) Enter the Bolt ID of your Bolt WiFi Module and your key from your Bolt Cloud.
2) Type the message which you want to print on the LCD screen and then press the Send button.
Note: Please check the API key and the Bolt ID if you don't see the message printed on the LCD screen.
The way forward:This is just the start to the limitless possibilities which the Bolt WiFi Module creates. This project helped me to understand the basics of IoT and how to control a device through the internet. I hope to extend my knowledge in the future by interfacing with many more devices.
_boltproj_mLZOlrENog.jpg)


_boltproj_mLZOlrENog.jpg)
Comments
Please log in or sign up to comment.