

Hardware components | ||||||
 |
| × | 1 | |||
| × | 1 | ||||
 |
| × | 1 | |||
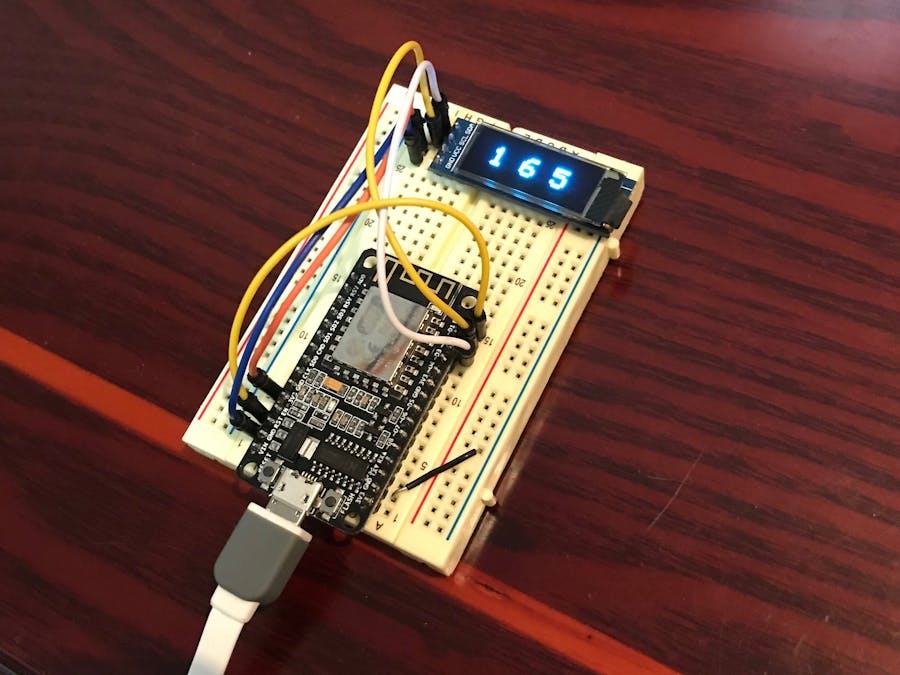
I was in a big city in China in the winter, which unfortunately is a good recipe for air pollution. I would check the AQI (Air Quality Index) almost every time I went outside so I knew whether or not I needed to wear my N95 mask. AQIs didn't reliably show up in my phone's weather apps, and looking it up online every time was tedious. My roommate suggested I build something to continuously display the AQI, so all we would have to do is look at it.
Thus, I present the AQI Display. A NodeMCU ESP8266 dev board connects to wifi and queries an AQI API every 20min or every hour depending on what time of day it is. I figured it shouldn't need to update as often at night when I'm asleep. It knows what time of day it is by querying a NIST time server. In between queries, the ESP8266 deep sleeps (turning off the Wifi, CPU, everything except the real-time clock) to save energy.
------------------------------------Steps to make your own-----------------------------------------
1) Talk to the NodeMCU ESP8266 dev board through the Arduino IDE:
I followed the instructions here: https://www.instructables.com/id/Programming-ESP8266-ESP-12E-NodeMCU-Using-Arduino-/. These instructions include a blink program that will make sure you're able to flash your ESP.
2) The AQI API:
You can explore the AQI webpage here: http://aqicn.org
This page explains the various APIs that are exposed. We want to use the JSON one. https://aqicn.org/api/
This is specific documentation for the JSON API: https://aqicn.org/json-api/doc/
API requests are made by visiting the following URL, with your specific station index and token substituted in: "http://api.waqi.info/feed/@YOUR_4_DIGIT_STATION_INDEX_HERE/?token=YOUR_TOKEN_HERE"
Visit this page to get your unique personal token: https://aqicn.org/data-platform/token/#/
Next, search for your city on aqicn.org. Once you're at the city's webpage, you can click on specific stations within the city on the map to take you to the station's page if you want more localized data. For example, the Beijing city page is http://aqicn.org/city/beijing/ while the U.S. Embassy in Beijing station page is http://aqicn.org/city/beijing/us-embassy/.
We want to find the city or station's 4-digit index, but it doesn't seem to be shown on the web pages themselves. So once you are at the appropriate page, view the page's HTML source and search for "idx". At least one of the search results should be in a JSON block that lists the idx as a 4 digit number. For example, the Beijing city index is 1451, and the US Embassy in Beijing station index is 3303.
Now you can make a test API call via your web browser. Construct the URL as above (don't forget the '@' before the index) and visit it. You should get a JSON response that contains, among many other things, the AQI.
In my testing, the API often returns non-200 (i.e. failed in some way) HTTP responses to the ESP, so my code will send requests until one succeeds or a max number of errors is reached. You can change the max number of errors and other constants in the constants section near the top of the file.
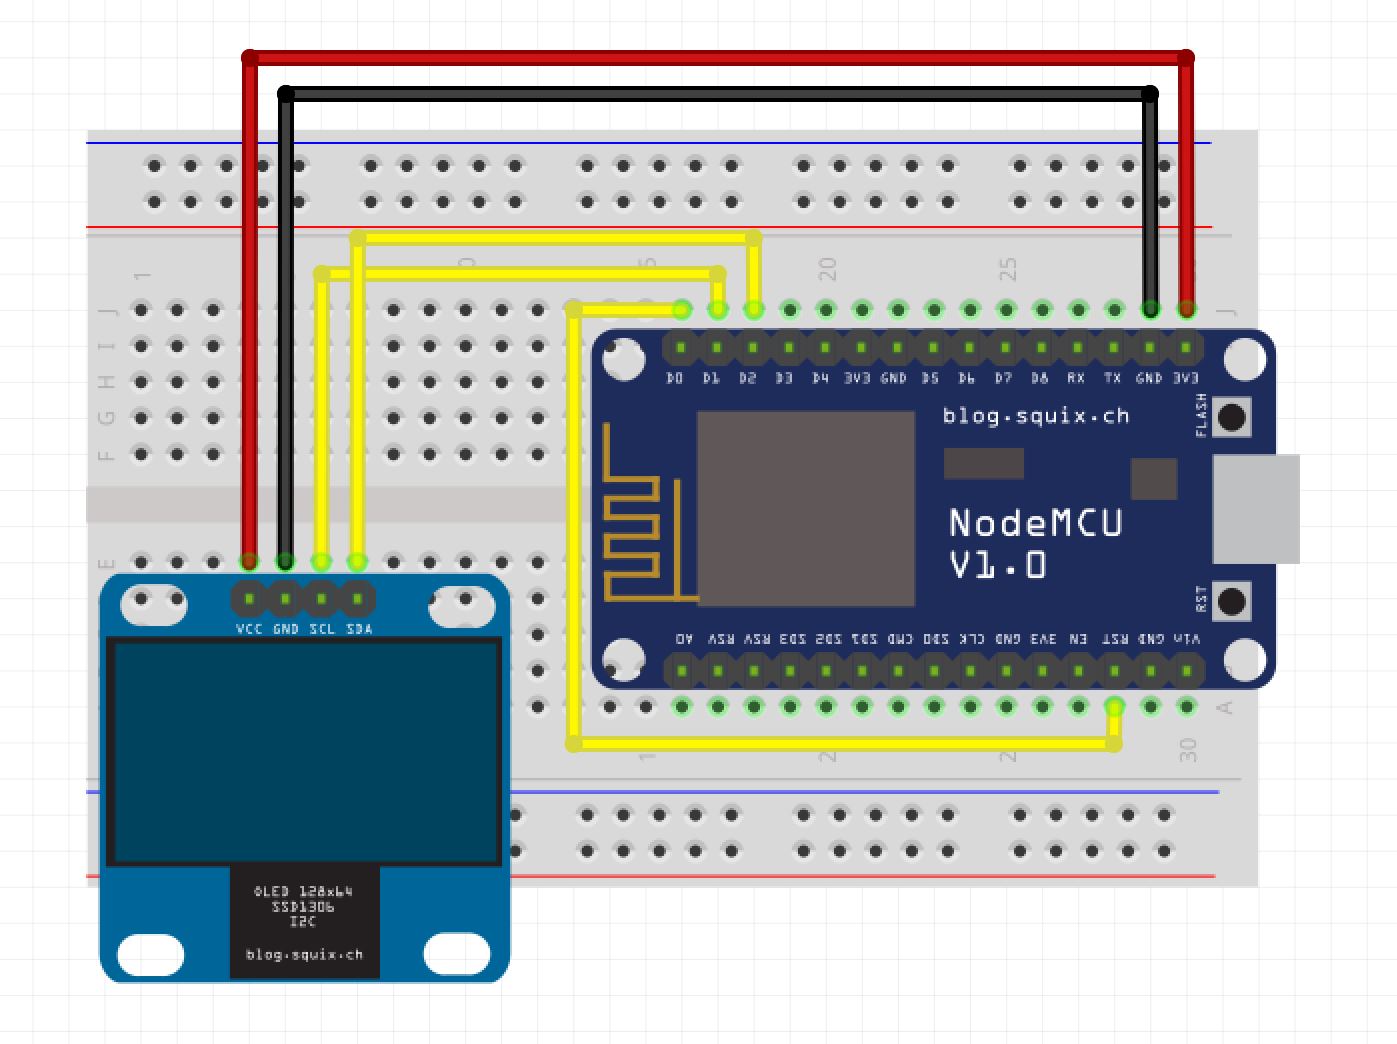
3) Wire it up
See the Fritzing below.
4) Modify and flash the code:
Modify the three lines labeled "CHANGE ME!" in the code (see the linked github repo below) to reflect your Wifi credentials and AQI station and token. Then flash the dev board with this code via the Arduino IDE. If you don't have the Adafruit SSD1306 and Adafruit GFX libraries already, you should install them by following the directions here: https://learn.adafruit.com/monochrome-oled-breakouts/arduino-library-and-examples
-----------------------------------------Notes on the code-----------------------------------------
1) Parsing the API's JSON response:
To parse the received JSON, I used the ArduinoJson library and followed this helpful intro/tutorial: https://circuits4you.com/2019/01/11/nodemcu-esp8266-arduino-json-parsing-example/
2) What time is it?
To minimize the number of unnecessary API requests and to save power, I wanted the AQI Display to update less frequently at night when I'm asleep. To do this, I followed this tutorial to learn how to query time.nist.gov: https://www.hackster.io/rayburne/nist-date-time-with-esp8266-e8b9a9.
This NIST webpage explains the format of the response: https://www.nist.gov/pml/time-and-frequency-division/services/internet-time-service-its.
In short, the expected line is in the form: JJJJJ YR-MO-DA HH:MM:SS TT L H msADV UTC(NIST) OTM. Note that this format is different than what the aforementioned tutorial says.
For example: 58537 19-02-23 08:15:31 00 0 0 420.9 UTC(NIST) *
3) Enable deep sleep:
Deep sleep is cool because it turns off everything except the real time clock to save power, then wakes up after a set amount of time. This time is specified in microseconds, and it is stored as a 32-bit integer so the maximum time the ESP can deep sleep is around 71min.
After sleeping for the specified period of time, the ESP wakes itself up by driving GPIO16 (pin D0 on the NodeMCU dev board) low. Thus, make sure pin D0 is connected to the RST pin on your board (see Fritzing below).
To enter deep sleep use this line of code: ESP.deepSleep(time_to_sleep_in_us);
I used these pages to learn about deep sleep:
https://www.losant.com/blog/making-the-esp8266-low-powered-with-deep-sleep
https://quadmeup.com/esp8266-esp-01-low-power-mode-run-it-for-months/
https://www.espressif.com/sites/default/files/9b-esp8266-low_power_solutions_en_0.pdf
4) Controlling the display:
The OLED I bought is compatible with Adafruit's SSD1306 drivers, so I just included the Adafruit_SSD1306 library and modified their sample code.
See this page: https://learn.adafruit.com/monochrome-oled-breakouts/arduino-library-and-examples
-----------------------------------------------Next steps-----------------------------------------------
The code for displaying things on the OLED screen is pretty hacky. It would be nice to make a generic function or set of functions that could automatically fit and display arbitrary text to the screen.
Alternatively, we could experiment with other types of displays like LED matrices or some sort of projection.
Finally, it would be useful to learn how long this project would run on 2 AA batteries or other non-wall power sources. I've only run it off wall warts so far since cell phone power banks turn themselves off after a short while when I connect it to them. I'm guessing this is because it isn't drawing enough power so the power bank assumes nothing is plugged in.


Comments