/******************/
// Arturo Enrique Rosete Cruz
// arturorosete0@gmail.com
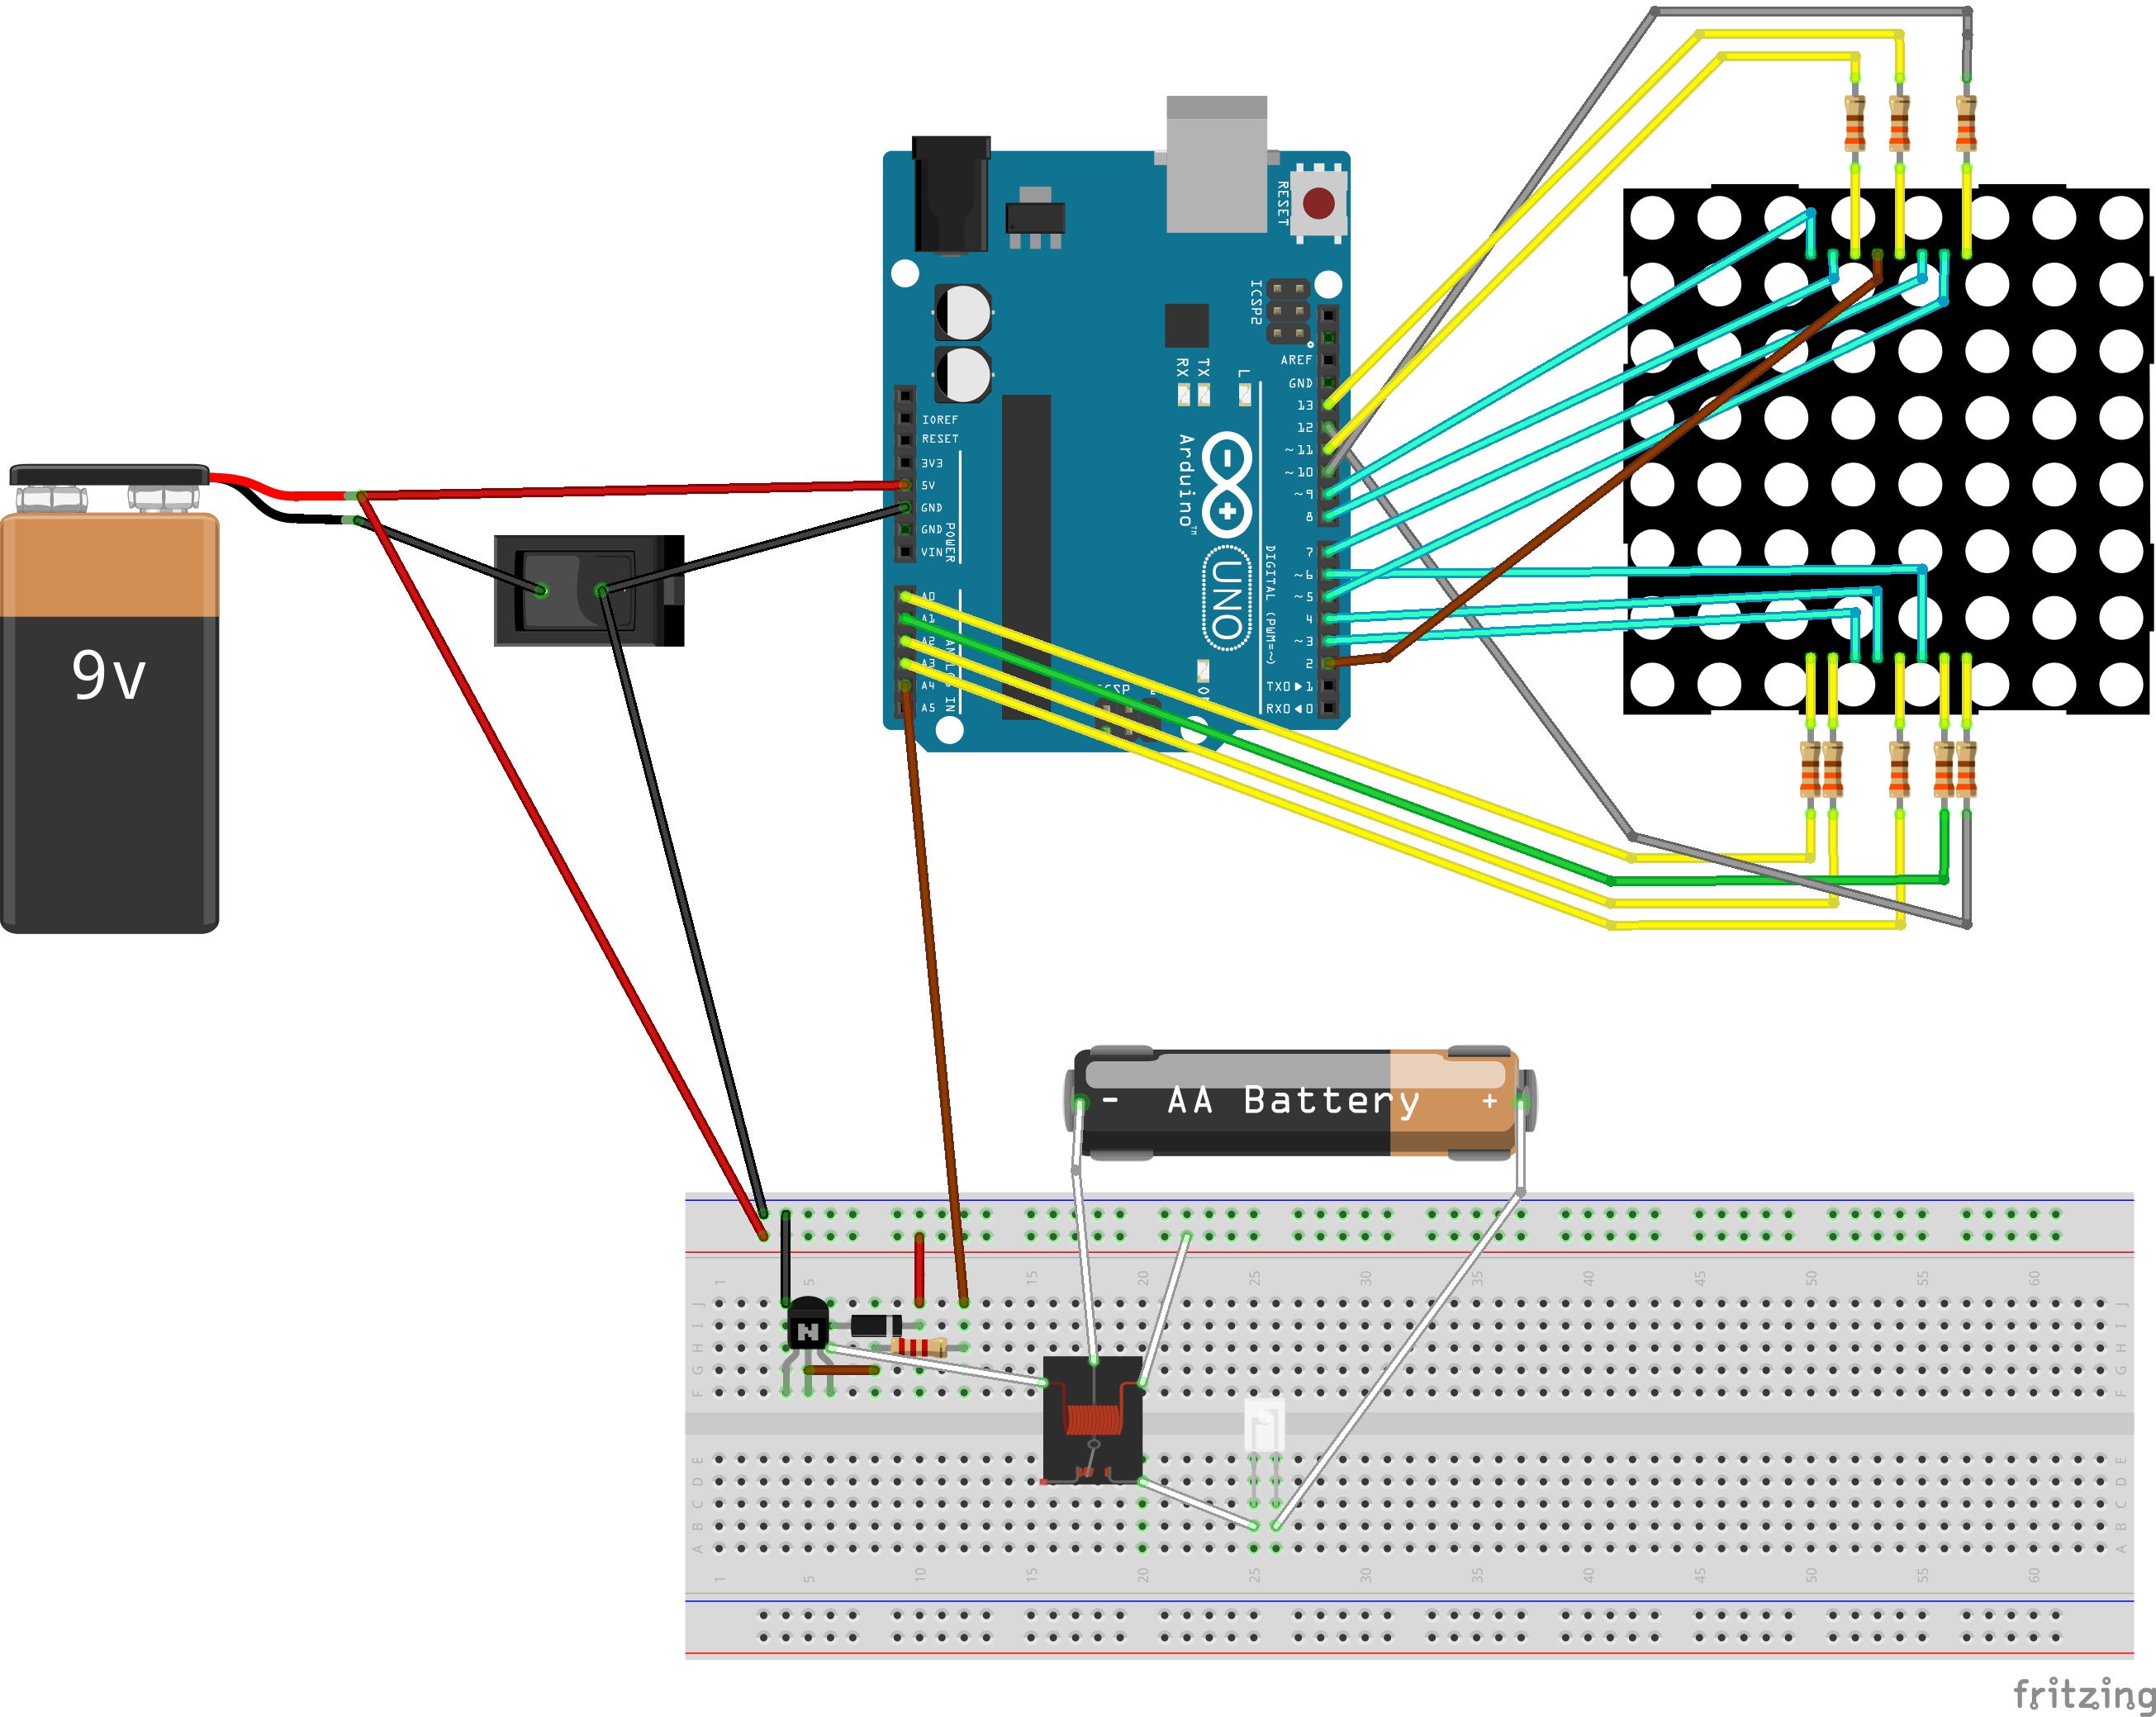
// Control an 8x8 led matrix(GMM-23088CSB) with an Arduino UNO
// Pin connections:
// Remember use a resistor on each anode.
// Columns
// matrix | 13 | 3 | 4 | 10 | 6 | 11 | 15 | 16 |
// Arduino | 2 | 3 | 4 | 5 | 6 | 7 | 8 | 9 |
//
// Raws
// matrix | 9 | 14 | 8 | 12 | 1 | 7 | 2 | 5 |
// Arduino | 10 | 11 | 12 | 13 | A0 | A1 | A2 | A3 |
// More info: https://www.prometec.net/matriz-led-8x8/
// Useful resource for create symbols: http://embed.plnkr.co/3VUsekP3jC5xwSIQDVHx/preview
// 5/April/2018
/******************/
byte sp[]= { 0x00, 0x00, 0x00, 0x00, 0x00, 0x00, 0x00, 0x00 };
byte c_1[] = {B00000000,B01111110,B01000010,B01000010,B01000010,B01000010,B01111110,B00000000};
byte c_2[] = {B00000000,B00000000,B00111100,B00100100,B00100100,B00111100,B00000000,B00000000};
byte c_3[] = {B00000000,B00000000,B00000000,B00011000,B00011000,B00000000,B00000000,B00000000};
byte jenny[] = {B00000000,B01111100,B00010000,B00010000,B00010000,B00010000,B01110000,B00000000};
byte flecha_1[] = {B00000000,B00001000,B00001100,B01111110,B00001100,B00001000,B00000000,B00000000};
byte flecha_2[] = {B00000000,B00001000,B00001100,B01111110,B01111110,B00001100,B00001000,B00000000};
byte heart[] = {B00000000,B01101100,B11111110,B11111110,B01111100,B00111000,B00010000,B00000000};
byte heart_outline[] = {B00000000,B01101100,B10010010,B10000010,B01000100,B00101000,B00010000,B00000000};
byte load1[] = {B00000000,B00000000,B00000000,B00000000,B00000000,B11111110,B10000010,B11111110};
byte load2[] = {B00000000,B00000000,B00000000,B00000000,B00000000,B11111110,B11000010,B11111110};
byte load3[] = {B00000000,B00000000,B00000000,B00000000,B00000000,B11111110,B11100010,B11111110};
byte load4[] = {B00000000,B00000000,B00000000,B00000000,B00000000,B11111110,B11110010,B11111110};
byte load5[] = {B00000000,B00000000,B00000000,B00000000,B00000000,B11111110,B11111010,B11111110};
byte load6[] = {B00000000,B00000000,B00000000,B00000000,B00000000,B11111110,B11111110,B11111110};
//byte load7[] = {B00000000,B00000000,B00000000,B00000000,B00000000,B11111111,B11111111,B11111111};
byte Selecciona( char c, byte fil)
{
if (c == '1') return(c_1[fil]);
if (c == '2') return(c_2[fil]);
if (c == '3') return(c_3[fil]);
if (c == '4') return(jenny[fil]);
if (c == '5') return(heart[fil]);
if (c == '6') return(flecha_1[fil]);
if (c == '7') return(flecha_2[fil]);
if( c == 'l' ) return (load1[fil]);
if( c == 'o' ) return (load2[fil]);
if( c == 'a' ) return (load3[fil]);
if( c == 'd' ) return (load4[fil]);
if( c == 'i' ) return (load5[fil]);
if( c == 'n' ) return (load6[fil]);
//if( c == 'g' ) return (load7[fil]);
if (c == ' ') return( sp[fil]);
}
void setup()
{
for (int j=2; j<19; j++){
pinMode(j, OUTPUT);
}
digitalWrite(18, LOW);
}
void SetChar(char p)
{
Clear();
for (int fil = 0; fil <8 ; fil++)
{
delayMicroseconds(350);
digitalWrite( fil + 10 , LOW) ; // Activamos la fila para el barrido
//byte F = N[fil] ;
byte F = Selecciona( p, fil);
for (int col =7; col >= 0 ; col--)
{
delayMicroseconds(350);
digitalWrite(8-col, LOW); //Bajamos la columna
bool b = GetBit(F, col) ;
if (b){
digitalWrite( 9 - col ,HIGH); //Levantamos la columna, con su pin
}
else {
digitalWrite( 9 - col ,LOW); // Si 0, apagamos
}
} // Solo si b es 1
digitalWrite( fil + 10 , HIGH) ; // Apagamos fila antes de salir
}
}
bool GetBit( byte N, int pos)
{ // pos = 7 6 5 4 3 2 1 0
int b = N >> pos ; // Shift bits
b = b & 1 ; // coger solo el ultimo bit
return b ;
}
void Clear()
{
for (int j=2; j<10; j++) // Valores de los pines de columna
digitalWrite(j, LOW); // Todos apagados
for (int k= 10 ; k<18 ; k++){
digitalWrite(k, HIGH); // Todas las filas cortadas
}
}
String s;
long t;
char c;
void loop()
{
s = "loadin n n n n";
for ( int n = 0; n < 14; n++ )
{
t = millis();
c = s[n];
if(n < 6){
while ( millis()< t + 1000)
SetChar(c);
} else {
while ( millis()< t + 380)
SetChar(c);
}
}
delay(500);
//Jenny
s = "4";
t = millis();
c = s[0];
while(millis() < t + 4000){
SetChar(c);
}
//Corazn
s = "5";
t = 0;
t = millis();
c = s[0];
while(millis() < t + 4000){
SetChar(c);
}
//Flecha a la derecha parpadeando
for(int i = 0; i < 6; i++){
s = "6 ";
for(int n = 0; n < 2; n++){
t = millis();
c = s[n];
while(millis() < t + 600){
SetChar(c);
}
}
}
//Enciende el foco con el transistor y el relay
digitalWrite(18, HIGH);
//Corazn eterno
s = "5";
c = s[0];
while(1){
SetChar(c);
}
}


_ApAKXyHHoN.jpg?auto=compress%2Cformat&w=40&h=40&fit=min&dpr=2)
_c5y4vNZkwz.jpg?auto=compress%2Cformat&w=900&h=675&fit=min)
_ztBMuBhMHo.jpg?auto=compress%2Cformat&w=48&h=48&fit=fill&bg=ffffff)


_ApAKXyHHoN.jpg?auto=compress%2Cformat&w=60&h=60&fit=min&dpr=2)

Comments
Please log in or sign up to comment.