


Hardware components | ||||||
_ztBMuBhMHo.jpg?auto=compress%2Cformat&w=48&h=48&fit=fill&bg=ffffff) |
| × | 1 | |||
 |
| × | 1 | |||
This shows you how to send a byte of data from the Arduino or Genuino to a personal computer and graph the result. This is called serial communication because the connection appears to both the board and the computer as a serial port, even though it may actually use a USB cable, a serial to USB and a USB to serial converter.
You can use the serial monitor of the Arduino Software (IDE) to view the sent data, or it can be read by Processing (see code below), Flash, PD, Max/MSP, etc.
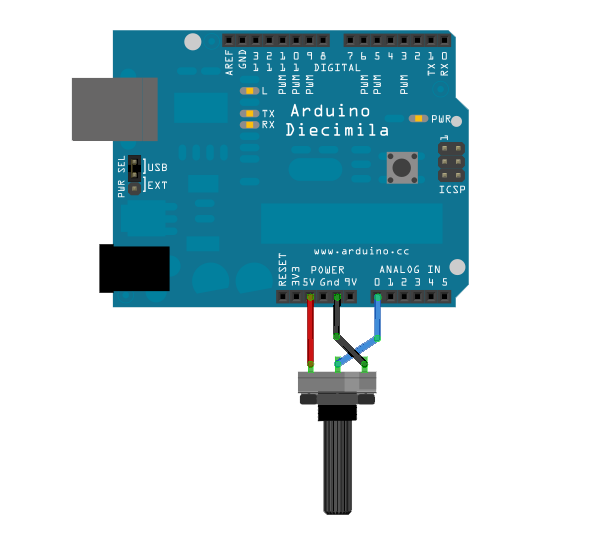
CircuitConnect a potentiometer or other analog sensor to analog input 0.
/*  Graph
 A simple example of communication from the Arduino board to the computer: The  value of analog input 0 is sent out the serial port. We call this "serial"  communication because the connection appears to both the Arduino and the  computer as a serial port, even though it may actually use a USB cable. Bytes  are sent one after another (serially) from the Arduino to the computer.
 You can use the Arduino Serial Monitor to view the sent data, or it can be  read by Processing, PD, Max/MSP, or any other program capable of reading data  from a serial port. The Processing code below graphs the data received so you  can see the value of the analog input changing over time.
 The circuit:  - any analog input sensor attached to analog in pin 0*/
void setup() {  // initialize the serial communication:  Serial.begin(9600);}
void loop() {  // send the value of analog input 0:  Serial.println(analogRead(A0));  // wait a bit for the analog-to-digital converter to stabilize after the last  // reading:  delay(2);}
/* Processing code for this example
 // Graphing sketch
 // This program takes ASCII-encoded strings from the serial port at 9600 baud  // and graphs them. It expects values in the range 0 to 1023, followed by a  // newline, or newline and carriage return
 import processing.serial.*;
 Serial myPort;        // The serial port  int xPos = 1;         // horizontal position of the graph  float inByte = 0;
 void setup () {    // set the window size:    size(400, 300);
   // List all the available serial ports    // if using Processing 2.1 or later, use Serial.printArray()    println(Serial.list());
   // I know that the first port in the serial list on my Mac is always my    // Arduino, so I open Serial.list()[0].    // Open whatever port is the one you're using.    myPort = new Serial(this, Serial.list()[0], 9600);
   // don't generate a serialEvent() unless you get a newline character:    myPort.bufferUntil('\n');
   // set initial background:    background(0);  }
 void draw () {    // draw the line:    stroke(127, 34, 255);    line(xPos, height, xPos, height - inByte);
   // at the edge of the screen, go back to the beginning:    if (xPos >= width) {      xPos = 0;      background(0);    } else {      // increment the horizontal position:      xPos++;    }  }
 void serialEvent (Serial myPort) {    // get the ASCII string:    String inString = myPort.readStringUntil('\n');
   if (inString != null) {      // trim off any whitespace:      inString = trim(inString);      // convert to an int and map to the screen height:      inByte = float(inString);      println(inByte);      inByte = map(inByte, 0, 1023, 0, height);    }  }
*/
/* Max/MSP v5 patch for this example
----------begin_max5_patcher----------1591.3oc0YszbaaCD9r7uBL5RalQUAO3CvdyS5zVenWZxs5NcfHgjPCIfJITRTxj+6AOHkoTDooroUs0AQPR73a+1cwtK3WtZxzEpOwqlB9YveAlL4KWMYh6Q1GLo99ISKXeJMmU451zTUQAWpmNy+NM+SZ2y+sR1l02JuU9t0hJvFlNcMPydOuBv.U5Rgb0LPpRpYBooM3529latArTUVvzZdFPtsXAuDrrTU.f.sBffXxLvGE50lIHkUVJXq3fRtdaoDvjYfbgjujaFJSCzq4.tLaN.bi1tJefWpqbO0uz1IjIABoluxrJ1guxh2JfPO2B5zRNyBCLDFcqbwNvuv9fHCb8bvevyyEU2JKTYhkBSWPAfq2TZ6YhqmuMUo0feUn+rYpY4YtY+cFw3lUJdCMYAapZqzwUHX8ScrjAd+SIOU6UBAwIygy.Q1+HAA1KH6EveWOFQlitUK92ehfal9kFhUxJ3tWcsgpxadigWExbt1o7Ps5dk3yttivyg20W0VcSmg1G90qtx92rAZbH4ez.ruy1nhmaDPidE07J+5n2sg6E6oKXxUSmc20o6E3SPRDbrkXnPGUYE.i5nCNB9TxQjG.G0kCTZtH88f07Rt0ZMMWUw8VvbKVAaTk6GyoraPdZff7rQTejBN54lgyvHE0Ft7AvIvvgvIwO23jBdUkYOuSvIFSiNcjFhiSsUBwsUCh1AgfNSBAeNDBZDIDqY.f8.YjfjV1HAn9XDTxyNFYatVTkKx3kcK9GraZpI5jv7GOx+Z37Xh82LSKHIDmDXaESoXRngIZQDKVkpxUkMCyXCQhcCK1z.G457gi3TzMz4RFD515FG3bIQQwcP3SOF0zlkGhiCBQ1kOHHFFlXaEBQIQnCwv9QF1LxPZ.A4jR5cyQsvbvHMJsLll01We+rE2LazX6zYmCraRrsPFwKg1ANBZFY.IAihr8Ox.aH0oALhB8nQVw0FSJiZeunOykbT6t3r.NP8.iL+bnwNiXuVMNJH9H9YCm89CFXPBERbz422p8.O4dg6kRxdyjDqRwMIHTbT3QFLskxJ8tbmQK4tm0XGeZWF7wKKtYYaTAF.XPNFaaQBinQMJ4QLF0aNHF0JtYuHSxoUZfZY6.UU2ejJTb8lQw8Fo5kRv6e2PI+fOM71o2ecY1VgTYdCSxxUqLokuYq9jYJi6lxPgD2NIPePLB0mwbGYA9Rgxdiu1k5xiLlSU6JVnx6wzg3sYHwTesB8Z5D7RiGZpXyvDNJY.DQX3.HhvmcUN4bP1yCkhpTle2P37jtBsKrLWcMScEmltOPv22ZfAqQAdKr9HzATQwZq18PrUGt6Tst2XMCRUfGuhXs6ccn23YloomMqcTiC5iMGPsHsHRWhWFlaenVXcqwgCQiGGJzptyS2ZMODBz6fGza0bzmXBj7+DA94bvpR01MffAlueO7HwcIpWCwmzJdvi9ILgflLAFmyXB6O7ML0YbD26lenmcGxjVsZUN+A6pUK7AtTrPgM+eRYG0qD9j4I7eEbco8Xh6WcO.or9XDC6UCiewbXHkh6xm5LiPEkzpJDRTumEB44Fgz4NCtJvX.SM1vo2SlTCZGAe7GZu6ahdRyzFOhYZ+mbVVSYptBw.K1tboIkatIA7c1cTKD1u.honLYV04VkluHsXe0szv9pQCE9Ro3jaVB1o15pz2XzYoBvO5KXCAe0LCYJybE8ZODf4fV8t9qW0zYxq.YJfTosj1bv0xc.SaC0+AV9V9L.KKyV3SyTcRtmzi6rO.O16USvts4B5xe9EymDvebK0eMfW6+NIsNlE2meqRyJ0utRq13+RjmqYKN1e.4d61jjdsauXe3.2p6jgi9hsNIv97CoyJ01xzlc3ZhUCtSHx3UZgjoEJYqNY+hYs5zZQVFW19L3JDYaTlMLqAAt1G2yXlnFg9a53L1FJVcv.cOX0dh7mCVGCLce7GFcQwDdH5Ta3nyAS0pQbHxegr+tGIZORgMRnMj5vGl1Fs16drnk7Tf1XOLgv1n0d2iEsCxR.eQsNOZ4FGF7whofgfI3kES1kCeOX5L2rifbdu0A9ae2X.V33B1Z+.Bj1FrP5iFrCYCG5EUWSG.hhunHJd.HJ5hhnng3h9HPj4lud02.1bxGw.-----------end_max5_patcher-----------
*/
Using the Processing sketch in the code sample above, you'll get a graph of the sensor's value. As you change the value of the analog sensor, you'll get a graph something like this:


Comments
Please log in or sign up to comment.