


Hardware components | ||||||
 |
| × | 1 | |||
 |
| × | 1 | |||
 |
| × | 1 | |||
 |
| × | 1 | |||
 |
| × | 1 | |||
 |
| × | 1 | |||
| × | 1 | ||||
 |
| × | 1 | |||
 |
| × | 1 | |||
 |
| × | 1 | |||
Software apps and online services | ||||||
 |
| |||||
| ||||||
 |
| |||||
| ||||||
Hand tools and fabrication machines | ||||||
 |
| |||||
 |
| |||||
 |
| |||||
This project was developed for controlling and monitoring the home appliances through the internet. By using our website, the user can control their appliances, see their current month electricity usage in live, inspect the running time and electricity usage of each device through google charts. Also, they can compare these values with previous month data. At the beginning of a new month, user gets email and SMS notification about last month’s electricity usage and total electricity cost(approx).
Visualization of user data in the form of a chart helps to collect the informations easily. It helps to compare present data with previous values. By using these informations, User can make proper decisions to optimize the usage of their appliances and thereby minimize the electricity cost.
Another important feature is Economy Mode or Eco-mode. Eco-mode implemented to avoid unwanted electricity wastage during day time. This mode is useful when the user turned on the bulb during day time due to lack of availability of sunlight or by accidental means. This function checks the availability of sunlight and if it is sufficient to illuminate the room, then it will turn off the bulb automatically. Thereby the user can reduce electricity usage and monthly electricity cost. User can turn this mode on and turn off at any time.
Steps for building the projectStep 1: Designing the user interface
This website was designed such a way that any user having a bolt module with simple relay connections, They can control and monitor their home appliances. The user interface is created using basic HTML code.
I)Explanation of <head> section
i) jvsrpt.js -This is the file we made for managing the entire website
ii) loader.js-load the loader script for google chart. After loading the loaded script we can make a call to the google.charts.load function to load packages for particular chart type, here we are using['corechart']package because it includes both pie chart and bar chart packages that we are using in this website.
iii) boltCommand.js- for sending and receiving data to and from bolt cloud.
iv)
II)Explanation of <body> section
1.
This section creates buttons( Setup BoltID and API, Clear All, Logout, Settings) using attribute.Also created two span tags, one for showing bolt device status as an indication led and other for showing the status in text format.you can see the status of your bolt device on the website like this;
2.
In this section, we create divisions for showing total electricity usage. also create two buttons for calling drawchart functions in order to display the chart.
3.
Next, we create the “Clear Data” button to clear the chart data by calling ClearData() function from our javascript using onclick attribute.
4.
In this final section, we create buttons for controlling our home appliances and create an extra paragraph like this<p id="elapsed time fan"></p> for displaying elapsed time and unit consumption for each appliance.also create a drop-down list using <select> element and add options using <option> tag. Among these options, one option is pre-selected, which is disabled and hidden from the list <option selected disabled hidden value="0">Choose an Option</option>
Using selected, disabled and hidden attributes. At last, We create buttons for turning on and off the Eco-Mode
Step 2: Creating twilio accountTwillio is a third-party SMS functionality provider. Creating a twilio account is pretty simple.
Sign in to the account, create a new project, and select programmable SMS template. Then create Twilio phone number by clicking on ‘get a number button’. Finally, add your phone number and verify it in order to receive SMS on your mobile number.
Note down your twilio phone number, account SID and auth token. we need these credentials while making integromat scenario.
Step 3: Creating integromat scenarioIntegromat is a powerful tool for automating Manual processes. It helps to connect apps, services and devices with each other without complex programming. In this project, we create an integromat scenario for listening JSON data that we send from our website and send SMS and Email to the user by using this data. JSON data contain last month electricity consumption( in unit)and total electricity cost.it looks like this;
Follow these substeps to create a scenario in integromat:
- Sign in to your integromat account
- Click on
button to create a new scenario.
- Select webhooks, twilio and gmail services from search list
Then click continue button
- Click here to select our first module
- Select webhooks module
And select ‘Custom webhook’
- Add a webhook name by clicking on “Add” button
- Now webhook start listening for sample data.
So we need to send a sample json data to the given webhook address, in this case, it is “https://hook.integromat.com/dx4z8du67njutlk5yxxvw99drreu74ok “
In order to do that:-
I)open a separate tab in chrome. then open your integromat account in this tab.
II)create a new scenario. And select HTTP service
III)select HTTP module
From that choose ‘Make a request’ action
IV)Enter these values
V)Make a request by clicking
button.
VI)Then json data will be sent to the webhook and webhook determine the structure of data.you can see the updated status in webhook tab like this:
- After determining the data structure, set a router from tools bar for passing data to Gmail and Twilio module.
- Add Twilio module
I)Then select “Send a message” action
II)Add your credentials to send SMS via twilio account
III)Create message as shown below and click OK.
- Next, we need to set up email notification. For that, select Gmail module from the list.
I)Then select ‘Send an email’ action
II)provide your email ID and message, to get email notification
III)The message structure should be in this format:
That’s it, successfully created our integromat scenario for email and SMS notification. Next, we are going to discuss javascript that running behind the website.
Step 4: Creating javascript for the websiteThe website uses a set of javascript functions for controlling digital pins of bolt module, collecting values from the analog pin, storing data to the local storage of the device, sending data to integromat webhook, etc. This section explains the javascript code in detail.
1.
FanOn() Function is called by onclick attribute from HTML code. This function is primarily used for digitalWrite the D0 pin to ‘LOW’.
localStorageObject store the data in the local storage of the browser. the data contain a key and a value.both key and value are string type.
2.
Fanoff()-Function has 5 tasks
- DigitalWrite the D0 pin high
- Calculate the time elapsed after turning on the device.
- Calculate the electrical energy consumed during this time and store it in local storage
- Print the elapsed time and electricity consumption on the website by changing innerHTML.
localStorage.getitem()-The getItem method will return the value of the specified storage object item. The return value will be a string.
perseFloat-This function parses a string and returns a floating-point number
BulbOn()BulbOff() AndSocketOn()SocketOff() are the replication of “FanOn” and “FanOff” functions except that the pins they control are D1and D2 respectively. Hence we skip these sections and jumping to the next section.
3.
ClearData()-function is used to set the storage object values into zero.
setItem()-Method sets the value of the specified storage object item.
4.
ResetData()-This function will be executed when the user clicks on the settings button. By executing this function user can store their wattage of appliances and integromat URL through the prompt box, also they can initialize the value of switches and store the current month value in local storage. if the user does not initialize these values, then they can’t access the buttons.
5.
Here we have two functions SetBoltID()and SetBoltAPI().these functions are used to store bolt id and api key that user provided through the prompt box.
6.
window.onload Event is used to execute a global function after loading the website completely. This event executes some functions in a fixed interval, for checking device status, month status and collect ADC value from the analog pin for processing eco mode.
7.
myFunction()-Execute every 30 seconds for checking bolt device status. The status of the device is collected by sending AJAX request to bolt cloud. this function also checks the person who visited our website is a new user or not.if yes, the else block will execute.
8.
This logout() function runs when the user clicks on logout button.By using removeItem method, we can delete a specific storage object, here it is “api” and “id”.After that user needs to re-enter their API key and device ID in order to regain access to the website.
9.
This code block executes after document content of our website loaded. By using this code:
- We can re-select the last selected option(user last selected device. before closing the website)in the HTML drop-down list
- Recall the API key and device ID.
- Set the body colour HTML page.
- Calculate the total value of electricity usage by calling
totalload()function.
10.
drawChart() AnddrawChart1()-functions are used to create pie chart and bar graph respectively. the charts are created using locally stored values.
11.
sendJSON() Function is used to send json data to the integromat webhook by making ajax request.
JSON.stringify Methode convert our javascript object and value to a JSON string
12.
newmonth() Function check if there any month change occurred or not.if new month started, then it will create a new set of storage objects to store last month values and execute sendJSON() function for email and sms. After that last month data values are deleted from present local storage object items.
13. clean() Function is used to clear all local storage objects and their values from the device.
.
14. EcoOn() Function is used to set the interval for Ecosub() function, which make ajax request to the bolt cloud and compare the received value with a threshold value(900) at every 20 seconds.
15. EcoOff() Function turn off Eco mode by stopping the execution of Ecosub() function.clearInterval clears the interval which has been set by setInterval function before that.
The website is hosted using 000Webhost service. So that any user having bolt module with simple relay connection, they can control and monitor their appliances. To do so, follow these steps.
- sign up in 000webhost website using your email id
- Click on “Create New Site” button
- Create your website with free domain
- Upload our HTML and Javascript file to this website
That’s it, Our website is ready to use.you can check it by entering your web URL on your browser.
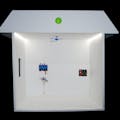
Step 6:Setting hardware connectionIn this project, I’m using 12 V led strip and 9v dc motor to represent the real world ac bulb and ac fan. The LDR connection is made as shown below
And the potential divider formula will be:
Reason for choosing 1K ohm resistor:-From above formula, if we decrease the value of the series resistor, then the value of output voltage also decreases. Which means sensitivity towards the light decreases(it’s necessary to decrease the sensitivity of LDR in high-intensity applications)by decreasing the value of the series resistor.
Next, we assume resistance of LDR at maximum light intensity= 1K ohm
And taking the series resistance value =1K ohm
Then calculate maximum current draw from 3.3v pin =3.3/(1+1)=1.65 mA which is completely safe. So we choose series resistance value as 1K ohm
My connection diagram:
Real-world Connection diagram:
A new user needs to follow two simple steps in order to control their appliances through the website. These are one-time steps. And after setting these values, bowser will automatically load these values when needed.
Step 1: Enter the bolt device ID and API key using the corresponding buttons
Step 2:Click on the settings button
And set
- Wattage of appliances
- Integromat URL(optional/or user can set it later)
- Set initial system values by clicking OK. It includes setting the status values for each button and storing current month value in a local storage object. (Important. otherwise, user can’t access the buttons)
Demonstration:


Comments