


Hardware components | ||||||
 |
| × | 1 | |||
 |
| × | 1 | |||
 |
| × | 1 | |||
 |
| × | 1 | |||
Software apps and online services | ||||||
 |
| |||||
We all are familiar with‘Jarvis’ AI assistant robot from “Iron Man’ movies and Marvel series. It hasalways been a dream of programmers to make something on their own. I will todayshow a simple way to make such an assistant using Python programming. Moreover, I will also make a physical avatar of that robot, so that whenever we talk tothe robot, it can do some movements. That will be more amazing than just asoftware robot. Because if it has a body, it is cool. So today we will learn to use both Arduino and Python programming to make an AIrobot which can control your computer and have a little chit chat with you.Let’s hop in guys!
Why I named the robot‘Jaundice’? Because I painted it yellow, very very yellow!
Parts:Electronics -
- Arduino Nano – 1x
- Micro Servo Sg90 – 3x
- Ultra Sonic Sensor HCsr04– 1x
Body –
- PVC sheet (preferablywhite, better for coloring, I used blue one)
- Servo wheel (for thestand)
Tools:
- Cutter knife
- Scissor
- Hot glue
- Spray paint
Software-
- Python3
- Arduino.ide
Before getting into theactual building, it is great to have an idea of what we will be doing.
So, the main code or AIpart of the code will run on the computer, why? Cuz it supports python and hasmore processing power than the little Arduino, also as the AI bot willcontrol/automate some tasks of my pc it has to run on my pc. So, the Arduinoboard it connected to my computer using the USB cable.
The idea is to run a python program that will do the Speech totext part, process the text and will also do Text to speech. Means the robotwill listen, understand and talk back. For body movement I saved some movements(encapsulated in functions) in Arduino board. The function for each movementsare executed by the python code.
As an example – if therobot has to say ‘Hi/hello’ the python code will send a byte ‘h’, Arduino thenexecute the hi() function. As simple as that.
Now that you have anidea, let’s move on to next process.
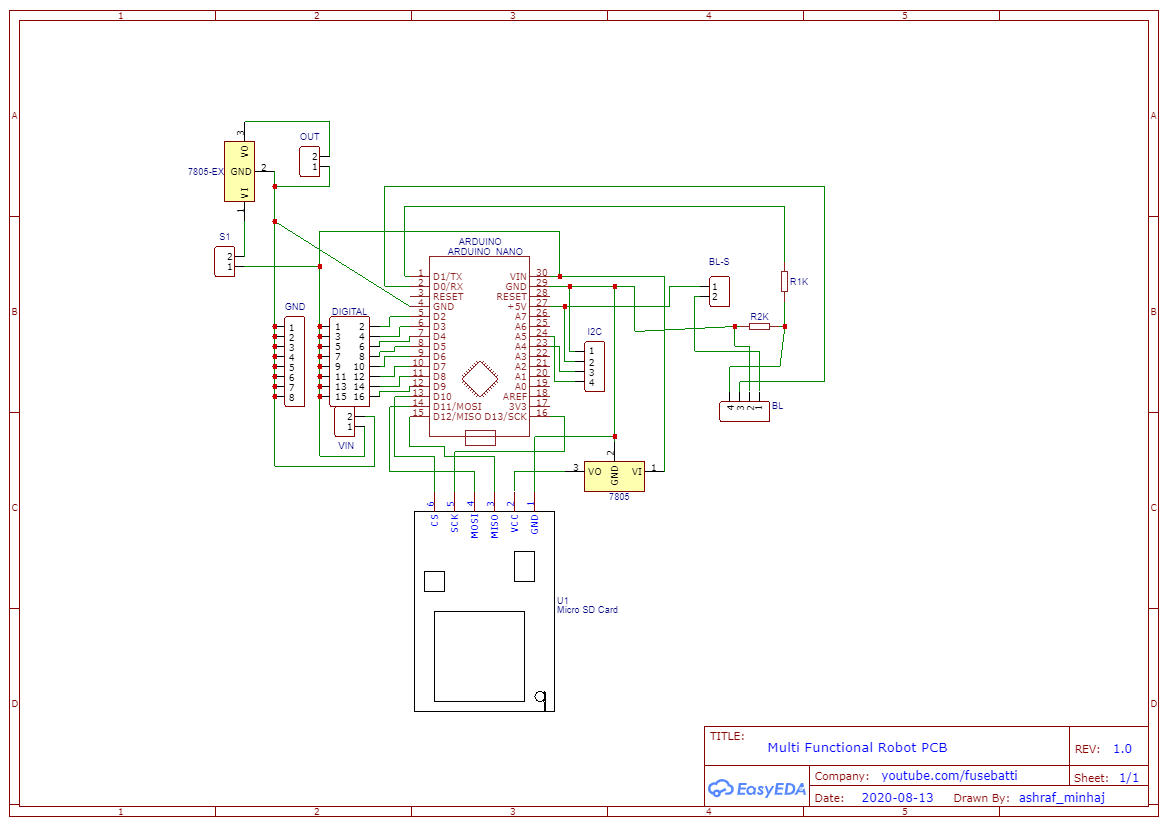
Circuits and electronicsCircuits are the thingsthat annoy most makers. If something goes wrong, you may burn some expensiveparts. For that I designed a PCB board that can be used to make numerousprojects. It has micro SD card slot, Bluetooth module slot, 5v External powersource and the whole thing is powered by Arduino Nano.
I designed a PCB using EasyEDA and printed using PCBWay online service. Their service is amazing. I orderedusing PCB instant quoteand their system automatically did everything for me. Within 3 days I got theboard from all the way from China to Bangladesh. The quality is fantastic, soldermasking is perfect and the lines/traces, finish is as good as it could be.
Anyway, I used.300 mmtraces as it can bear 1Amp current.
You can just download thePCB files from here.
Solder things and test circuit:In this step I solderedeverything. Be very careful not to inhale the fume, it may cause cancer.
I am not using Bluetoothmodule nor TF module, so I left those unsoldered. The good thing is, I used 3servo motors and one sonar sensor, all the things get easily powered from theUSB cable that we connect to program the Arduino. This is great as we don’thave to think of another power source.
However, if you stillwant to use external batteries then go for lipo 2s (7.4V) batteries, more thanthat and the servo burns.
Make the body:I used PVC sheet to makethe body, you can use cardboard too. First, I made a box for the main part, there goes the main board, and servo motors. It is just like making boxes. Imade the head the same way, made two hole for the sensor (as eyes). I haveadded all the pictures you need. I made one hand like a wrench and another onelike a plug. I actually used a plug and added that to one arm using hot glue.
Dimension? Actually thereis not any, cuz it’s your robot, you can make it using some easy tools so makeit as you want, make it of any shape and size.
Be super careful to addall the electronics before closing the body. I painted the body after I put sensorsand all the electronics. Do not do that, I already colored my Arduino yellow.
So, do paint afterfinishing the body, then put all the electronics.
Coding1 (Python):Download Python from thissite, make sure to add pythoninto your path while installing.
After installing Pythonyou will need to run some commands from command prompt/terminal to installlibraries for Speech Recognition, Audio Support, Text to Speech, BrowserAutomation, Serial Communication purposes. Run these commands -
pip installspeechrecognition
pip install pyaudio
pip install pyttsx3
pip install pywhatkit
pip install pyserial
Then download the pythoncode from hereor copy from below. Head for coding2 step.
 """ JAUNDICE: AI Assistant robot with Arduino and Python
author: ashraf minhaj
mail: ashraf_minhaj@yahoo.com
Last Edit: Nov 2020
License: Copyright (C) Ashraf Minhaj.
General Public License (GPL3+)
"""
import speech_recognition as sr   # voice recognition library
import random                     # to choose random words from list
import pyttsx3                    # offline Text to Speech
import datetime                   # to get date and time
import webbrowser                 # to open and perform web tasks
import serial                     # for serial communication
import pywhatkit                  # for more web automation
# Declare robot name (Wake-Up word)
robot_name = 'jaundice'
# random words list
hi_words = ['hi', 'hello', 'yo baby', 'salam']
bye_words = ['bye', 'tata', 'hasta la vista']
r_u_there = ['are you there', 'you there']
# initilize things
engine = pyttsx3.init()                    # init text to speech engine
#voices = engine.getProperty('voices')      #check for voices
#engine.setProperty('voice', voices[1].id)  # female voice
listener = sr.Recognizer()                 # initialize speech recognition API
# connect with NiNi motor driver board over serial communication
try:
   port = serial.Serial("COM15", 9600)
   print("Phycial body, connected.")
except:
   print("Unable to connect to my physical body")
def listen():
	""" listen to what user says"""
	try:
		with sr.Microphone() as source:                         # get input from mic
			print("Talk>>")
			voice = listener.listen(source)                     # listen from microphone
			command = listener.recognize_google(voice).lower()  # use google API
			# all words lowercase- so that we can process easily
			#command = command.lower()
			print(command)
			# look for wake up word in the beginning
			if (command.split(' ')[0] == robot_name):
				# if wake up word found....
				print("[wake-up word found]")
				process(command)                 # call process funtion to take action
	except:
		pass
def process(words):
	""" process what user says and take actions """
	print(words) # check if it received any command
	# break words in
	word_list = words.split(' ')[1:]   # split by space and ignore the wake-up word
	if (len(word_list)==1):
		if (word_list[0] == robot_name):
		    talk("How Can I help you?")
		    #.write(b'l')
		    return
	if word_list[0] == 'play':
		"""if command for playing things, play from youtube"""
		talk("Okay boss, playing")
		extension = ' '.join(word_list[1:])                    # search without the command word
		port.write(b'u')
		pywhatkit.playonyt(extension)
		port.write(b'l')
		return
	elif word_list[0] == 'search':
		"""if command for google search"""
		port.write(b'u')
		talk("Okay boss, searching")
		port.write(b'l')
		extension = ' '.join(word_list[1:])
		pywhatkit.search(extension)
		return
	if (word_list[0] == 'get') and (word_list[1] == 'info'):
		"""if command for getting info"""
		port.write(b'u')
		talk("Okay, I am right on it")
		port.write(b'u')
		extension = ' '.join(word_list[2:])                    # search without the command words
		inf = pywhatkit.info(extension)
		talk(inf)                                              # read from result
		return
	elif word_list[0] == 'open':
		"""if command for opening URLs"""
		port.write(b'l')
		talk("Opening, sir")
		url = f"http://{''.join(word_list[1:])}"   # make the URL
		webbrowser.open(url)
		return
	elif word_list[0] == 'uppercut':
		port.write(b'U')
	elif word_list[0] == 'smash':
		port.write(b's')
	elif word_list[0] == 'punch':
		port.write(b'p')
   # now check for matches
	for word in word_list:
		if word in hi_words:
			""" if user says hi/hello greet him accordingly"""
			port.write(b'h')               # send command to wave hand
			talk(random.choice(hi_words))
		elif word in bye_words:
			""" if user says bye etc"""
			talk(random.choice(bye_words))
def talk(sentence):
	""" talk / respond to the user """
	engine.say(sentence)
	engine.runAndWait()
# run the app
while True:
   listen()  # runs listen one time
This part is easy, nothing to install. Use Arduino.ide to program the board. Download from here if you have never used Arduino before.
As I have mentioned earlier, Arduino program waits for serial data, if it receives any data it checks the byte data. If data is matched to predefined command then it executes a statement. If ‘u’ is sent, it makes both the hand go up, like that.
Download the code from hereof copy from below.
 /** JAUNDICE: AI Assistant robot with Arduino and Python **
*
*  author: ashraf minhaj
*  mail: ashraf_minhaj@yahoo.com
*  Last Edit: Nov 2020
*
*  License: Copyright (C) Ashraf Minhaj.
*  General Public License (GPL3+)
*/
#include<Servo.h>
Servo head;
Servo l_hand;
Servo r_hand;
// define sonar sensor's pins
int trig = 4;
int echo = 5;
// received data
byte val = "";
void setup() {
 // put your setup code here, to run once:
 head.attach(2);
 l_hand.attach(3);
 r_hand.attach(4);
 Serial.begin(9600); // for communicating via serial port with Python
}
void standby(){
 // all motors to these positions
 head.write(90);
 int r_pos = 30;
 int l_pos = map(r_pos, 0, 180, 180, 0);
 l_hand.write(l_pos);
 r_hand.write(r_pos);
}
void hi(){
 // all motors to these positions
 head.write(90);
 int i = 0;
 for(i=30; i<= 170; i++){
   r_hand.write(i);
   delay(5);
 }
 for(i=170; i>= 100; i--){
   r_hand.write(i);
   delay(5);
 }
 for(i=100; i<= 170; i++){
   r_hand.write(i);
   delay(5);
 }
 for(i=170; i>= 30; i--){
   r_hand.write(i);
   delay(5);
 }
 standby();
}
void hands_up(){
 // do this on every command (nothing much just move hands a bit)
 //head.write(150);
 //delay(300);
 //head.write(90);
 int i = 0;
 for(i=30; i<= 170; i++){
   int r_pos = i;
   int l_pos = map(r_pos, 0, 180, 180, 0);
   l_hand.write(l_pos);
   r_hand.write(r_pos);
   delay(5);
 }
 delay(600);
 for(i=170; i>= 30; i--){
   int r_pos = i;
   int l_pos = map(r_pos, 0, 180, 180, 0);
   l_hand.write(l_pos);
   r_hand.write(r_pos);
   delay(5);
 }
}
void weight_lift(){
 // lift weight using both hands
 int i = 0;
 for(i=30; i<= 170; i++){
   int r_pos = i;
   int l_pos = map(r_pos, 0, 180, 180, 0);
   l_hand.write(l_pos);
   r_hand.write(r_pos);
   delay(5);
 }
 for(int count=0; count<=4; count++){
   for(i=170; i>= 60; i--){
     int r_pos = i;
     int l_pos = map(r_pos, 0, 180, 180, 0);
     l_hand.write(l_pos);
     r_hand.write(r_pos);
     delay(5);
     }
   for(i=60; i<= 170; i++){
     int r_pos = i;
     int l_pos = map(r_pos, 0, 180, 180, 0);
     l_hand.write(l_pos);
     r_hand.write(r_pos);
     delay(5);
     }
   }
 for(i=170; i>= 30; i--){
   int r_pos = i;
   int l_pos = map(r_pos, 0, 180, 180, 0);
   l_hand.write(l_pos);
   r_hand.write(r_pos);
   delay(5);
 }
}
void excited(){
 return;
}
void look_left(){
 // rotate hed to left
 head.write(180);
}
void confused(){
 for(int count=0; count<=1; count++){
   head.write(30);
   r_hand.write(170);
   delay(700);
   r_hand.write(30);
   head.write(120);
   l_hand.write(30);
   delay(700);
   l_hand.write(160);
   }
 standby();
}
void double_punch(){
 // do a punch
 int i = 0;
 for(i=30; i>= 0; i--){
     int r_pos = i;
     int l_pos = map(r_pos, 0, 180, 180, 0);
     l_hand.write(l_pos);
     r_hand.write(r_pos);
     delay(5);
     }
 delay(2000);
 int r_pos = 80;
 int l_pos = map(r_pos, 0, 180, 180, 0);
 l_hand.write(l_pos);
 r_hand.write(r_pos);
 delay(500);
 standby();
}
void r_upper_cut(){
 // make right upper-cut
 int i = 0;
 for(i=30; i<= 170; i++){
   int r_pos = i;
   int l_pos = map(r_pos, 0, 180, 180, 0);
   l_hand.write(l_pos);
   r_hand.write(r_pos);
   delay(5);
 }
 for(int count=0; count<=4; count++){
   int i = 0;
   for(i=170; i>= 60; i--){
     r_hand.write(i);
     delay(1);
     }
   for(i=60; i<= 170; i++){
     r_hand.write(i);
     delay(1);
     }
   }
  standby();
  delay(100);
}
void smash(){
 // smash things
 int i = 0;
 for(i=30; i<= 170; i++){
   int r_pos = i;
   int l_pos = map(r_pos, 0, 180, 180, 0);
   l_hand.write(l_pos);
   r_hand.write(r_pos);
   delay(5);
 }
 delay(2000);
 for(i=170; i>= 0; i--){
   int r_pos = i;
   int l_pos = map(r_pos, 0, 180, 180, 0);
   l_hand.write(l_pos);
   r_hand.write(r_pos);
   delay(1);
 }
 delay(300);
 int r_pos = 180;
 int l_pos = map(r_pos, 0, 180, 180, 0);
 l_hand.write(l_pos);
 r_hand.write(r_pos);
 delay(1000);
 standby();
}
void eye_detect(){
 // do something if eye sensor detect motion
 return;
}
void loop() {
 // put your main code here, to run repeatedly:
 standby();
 while(Serial.available() > 0)  //look for serial data available or not
 {
   val = Serial.read();        //read the serial value
   if(val == 'h'){
     // do hi
      hi();
   }
   if(val == 'p'){
     // do hi
      double_punch();
   }
   if(val == 'u'){
     hands_up();
     delay(3000);
   }
   if(val == 'l'){
     standby();
     look_left();
     delay(2000);
   }
   if(val == 'U'){
     // uppercut
     r_upper_cut();
     delay(2000);
   }
   if(val == 's'){
     smash();
     delay(2000);
   }
 }
}
Upload the code.
Putting all together And Done:After completing allthose steps I connected my Arduino to pc using the USB cable and then ran thepython program. While you are using it make sure to add the right port ofArduino in the python code. If you did everything as I have mentioned, the botshould work just like a charm.
Thank You!


Comments
Please log in or sign up to comment.