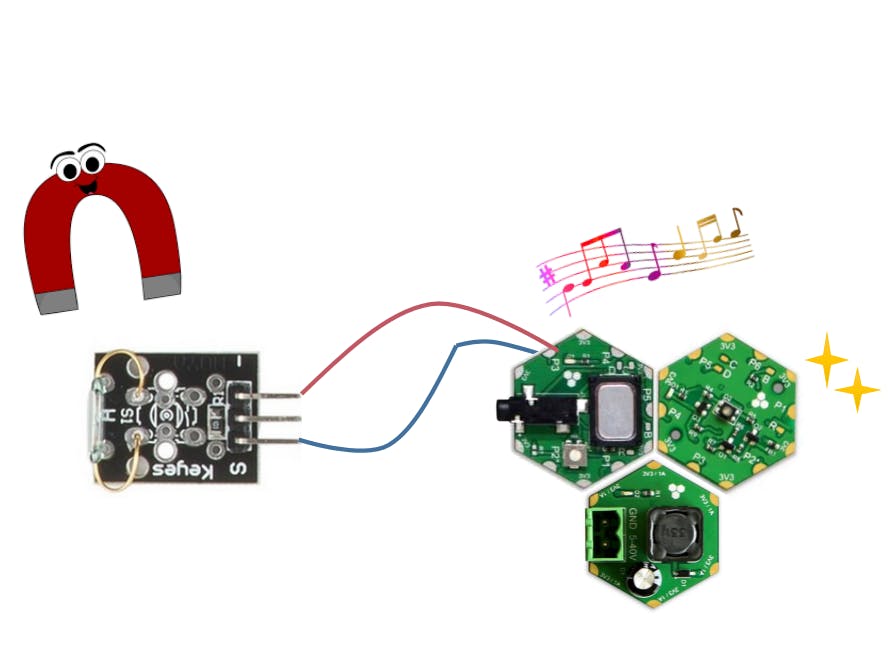
This project creates a Hexabitz Magnetic detector for many applications like games and home automation.
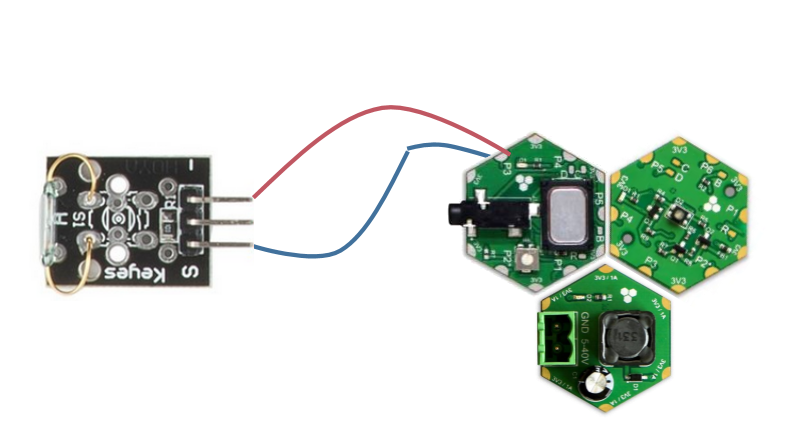
We will see using reed Switch Sensor to activate Audio Speaker Hexabitz Module and RGB Led Hexabitz Module. When magnetic field exists, the Modules will give alarm.
Tools:1. RGB Led Hexabitz Module (H01R01).
2. Reed switch Module.
3. Audio Speaker Module(H07R31)
4. FTDI USB to UART Serial cable.
5. DC-DC power module (H03R0)
Note:
A reed switch is a type of line switch component that realizes control by magnetic signals. It induces by a magnet. The “switch" here means dry reed pipe, which is a kind of contact passive electronic switch component with the advantage of simple structure, small size, and convenient control. The shell of a reed switch is commonly a sealed glass pipe in which two-iron elastic reed electroplates are equipped and inert gases are filled.
Normally, the two reeds made of special materials in the glass tube are separated. However, when a magnetic substance approaches the glass tube, the two reeds in the glass tube are magnetized to attract each other and get touched due to the magnetic force. As a result, the two reeds close the circuit connected with the nodes.
After the external magnetic force disappears, the two reeds will be separated with each other again because their like poles are placed near which intend to repel them apart, thus breaking the circuit. Therefore, as line switch components function by magnetic signals, they can be used to count stuff, restrict positions and so on. At the same time, it is widely used in a variety of communication devices.
Step 1 - Plan the array and assemble the hardware
Be sure to download the firmware on each module before soldering.
We solder the modules together using Hexabitz Fixture.
Step 2 - CLI Connection
1. Install MobaXtrem from here for Windows OS.
2. Connect the FTDI USB to UART Serial cable to the USB hub.
3. Connect the red wire of the FTDI cable to H07R31 module power port top side.
4. Connect the black wire of the FTDI cable to H07R31 module power port bottom side.
5. Connect the yellow wire of the FTDI cable to module port P2 top side.
6. Connect the orange wire of the FTDI cable to module port P2 bottom side.
7. You should see a single red indicator LED blink on the modules.
8. Press enter in the Commands window, you should see BOS CLI welcome message. You can use backspace if you misspell a letter.
9. Type status to view a report on module ports, firmware, etc.
10. Type add-button momentary-no p3.
11. Type status again and you will see the added button.
12. Connect the reed sensor to p3 ports.
Step 3 - Array Exploration:
1. Connect to H07R31 module and type explore, the modules start discovering each other and building their array topology.
2. Type all.ping, both module will ping.
3. The array topology is stored permanently. If you power cycle, the modules keep their topology and show multiple blinks.
Note:
Type default array to remove the topology and restore native firmware when you decided start a new project.
4. Enable array response with:
5. Then try sending command to Modules and seeing the result.
Step 4 - Command Snippets:
Type the following commands each on a separate line followed by pressing enter. You can choose any Alarm tune or RGB colors to activate when the magnetic field is detected like this:
Notes:
· Musical notes are: Cx, Dx, Ex, Fx, Gx, Ax, Bx OR DOx, REx,MIx, FAx, SOLx, LAx, SIx where x is octave number 1 to 9.- Add # after the note to raise it by a semitone (half-step).- Add note time in seconds with [t]. If omitted, default is t = 1.- Add silence with [t] without a note.
· Type snip, to view the list of Command Snippets, then type del-snip 1 to delete Snippet 1. Snippets and button settings are stored permanently. If you power cycle the module, they are still there.
· You can also activate and deactivate (pause) a Snippet without deleting it.
Step 5: Attaching the Battery
· Using DC-DC power module (H03R0) with 9V battery to power your system.
· Note that it's better to write Command Snippets using power from USB cable connection without DC-DC power module (to avoid power confusion and reset states). Once done, you can insert the batteries and then remove the USB cable.
Step 6 – Test the system
Applications:
Use Hexabitz Magnetic detector with reed switch to made Fishing game:
· We can add the Hexabitz system to the game if you have one before, or made a new game.
· The idea is add a reed switch to any fish and you can hidden it. In addition, the player who have this fish win 10 mark. When the game finishes. We can check the Fish and calculating marks.
· You need to compare the player 1 marks and player 2 marks to see who won.
Note:
· Get the template of the fish and place it on construction paper (or paper). Get a pencil (or pen) and trace the fish.
· Repeat this step until you are satisfied on how many fish you want.
· Cut out the fish with your scissors.
· Put the fish and paperclip together.
Put the fishes you made in the container. Then use the fishing rods to catch the fish.
Now play the game to test your system (•_•)


Comments
Please log in or sign up to comment.