Hi!
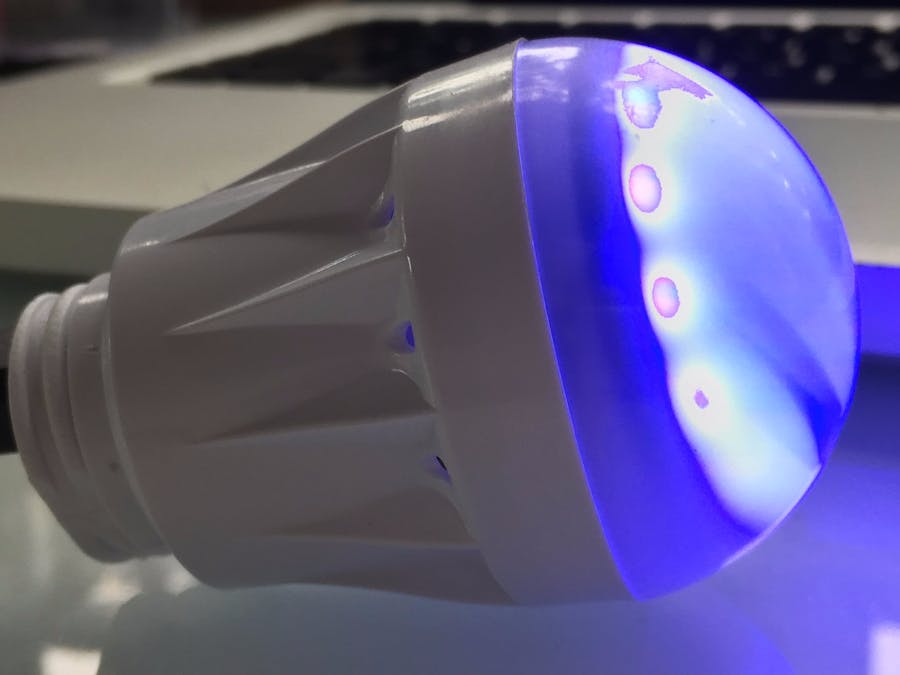
Last week I had an idea about a WiFi Enabled Bulb that can show the weather or a custom RGBW color. Finally I wanted to tell you how to make it.
For this project, we need,
Components:
- 1 x DHT22 Temp/Humidity sensor
- 1 x Particle Photon
- 1 x Piezo Buzzer
- 1 x 12 Pixel RGBW Neopixel Ring
- 1 x 10k Resistor.
Tools:
- Heat Shrink
- Solder / Soldering Iron
- Lighter
- Wire strippers and cutters.
That's all folks!
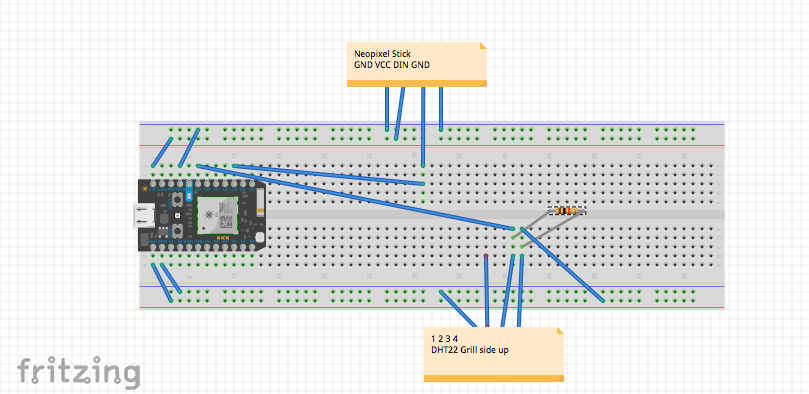
Step 2: Solder the lights to the PhotonStart by preparing (stripping and tinning on both ends) three wires to about 2 inches.
- Solder one wire from PWR on the NeoPixels to 3v3 on the Photon
- Solder one wire from GND on the NeoPixels to GND on the Photon
- Solder one wire from IN on the NeoPixels to D6 on the Photon
Solder a 10K ohm resister between #1 and #2.
Cut pin #3 off the DHT.
- Connect a wire from pin #4 to Photon GND
- Connect a wire from pin #1 (before the resistor) to Photon 3v3 or VIN.
- Connect a wire from pin #2 (before the resistor) to Photon D5.
Upload the attached Test Sketch to your Photon via Particle Build.
The NeoPixels should light up with the temperature.
Step 5: Upload Real SketchUpload the attached sketch to your Photon via Particle Build.
Edit the dweetFeedName to anything you can remember. You dont need to sign up for anything, just choose.
Step 6: EnclosureFor the enclosure, I used a plastic A19 bulb enclosure and cut the metal bottom off to fit the USB power. I cannot find the exact link, but you can use one of many available.
Step 7: Freeboard and The Internet.On your device, head to freeboard.io
Create an account and follow the tutorial, then go to freeboard.io/account
Enter a new dashboard name and click Create New.
Add a datasource from Dweet.io and set the Thing Name to what you set in your Arduino Sketch. Key should not be enabled. Set the name, not the thing name to Photon.
Add a pane with a column width of 2. Add a Sparkline to that pane. Settings shown below.
Add another Sparkline to the same pane. Settings are below:
Add a Clock datasource. Call it "Clock" and set the refresh to 1 second.
In a new pane, add a Pointer and set the settings below.
The Direction field code is:
// Get the current time
var d = new Date();
// Get the current hours
var h = d.getHours();
// The hour is returned in 24 hour time, to make your clock display 12 hour time,
// change hours over 12 back to under 12.
if(h > 12) {
	h = h - 12;
}
// Get the current minutes
var m = d.getMinutes();
// Figure out the angle (in degrees) that displays the current time like an analog
// clock. Each hour is 30 degrees and each minute is 0.5 degrees.
var a = (30 * h) + (0.5 * m);
// Return the angle
return a;
The Value text code is this:
// Custom JS for VALUE TEXT field
//  We need to have a datasource here because the rest of this JavaScript will only be evaluated
// each time the datasource refreshes (every 1 second). If we didn't have this, the time would just
// stay the same and never update.
datasources["Clock"]["time_string_value"]
var d = new Date();
// Get the current hour
var h = d.getHours();
// The hour is returned in 24 hour time, to make your clock display 12 hour time,
// change hours over 12 back to under 12.
if(h > 12) {
	h = h - 12;
}
// Get the current minutes
var m = d.getMinutes();
// The minutes value is treated as a number, so, for example, at 8:03, the minutes will be returned as
// just 3, and the time would be displayed as "8:3". So, if the minutes value is less than ten, add a
// zero to the front.
switch(m) {
case 0:
    m = "00";
    break;
case 1:
    m = "01";
    break;
case 2:
    m = "02";
    break;
case 3:
    m = "03";
    break;
case 4:
    m = "04";
    break;
case 5:
    m = "05";
    break;
case 6:
    m = "06";
    break;
case 7:
    m = "07";
    break;
case 8:
    m = "08";
    break;
case 9:
    m = "09";
    break;
}
// Create a string to display the whole time
var t = h + ":" + m;
// Display the time
return t;
Add a Weather Datasource. Settings:
Add a new pane and add a Gauge.
Settings:
Feel free to add anything else, but that is the basic freeboard you can setup.
Thank you for following along on this adventure of making a WiFi Enabled Weather Bulb.
The dashboard for setting the bulb color can be found at stonedesignlabs.net/wifibulb You can put this icon on your home screen and it will behave like a normal app.


Comments
Please log in or sign up to comment.