


Hardware components | ||||||
 |
| × | 1 | |||
| × | 1 | ||||
| × | 1 | ||||
 |
| × | 1 | |||
 |
| × | 2 | |||
 |
| × | 1 | |||
Software apps and online services | ||||||
 |
| |||||
Hand tools and fabrication machines | ||||||
 |
| |||||
 |
| |||||
Are you annoyed by those cheap RGB LED strips you see advertised online? I am too. That’s why I decided to create an easy-to-use RGB LED strip controller with Bluetooth that you can modify anytime you want. While the strips sold online can sometimes be decent, they’re usually not customizable enough to suit individual tastes. With my project, you get full control.
How to UseIf you’ve recreated my project or made your own version, here’s what to do:
- Check your hardware: Make sure everything is connected and working.
- Download the Dabble app on your smartphone.
- Connect your Bluetooth module to your phone.
- Open the Terminal function in the app, where you can type commands to control your RGB LED strip.
Type any of these to change the color of the strip:
- RED, GREEN, BLUE, YELLOW, MAGENTA, WHITE, ORANGE, PURPLE, GOLD, SKYBLUE, KHAKI, INDIGO, VIOLET, CRIMSON, LIME, TEAL, MAROON, SPRINGGREEN, MIDNIGHTBLUE, FORESTGREEN, PERU, ORCHID.
These commands trigger animations:
- PARTY, CYLON, SEA.
To adjust the brightness, type BRIGHTNESS followed by a number between 0 and 255.
- Example:
BRIGHTNESS 255sets it to maximum brightness, whileBRIGHTNESS 128gives medium brightness.
To turn off the LEDs before starting a new color or animation, just type OFF. After that, you can enter a new command.
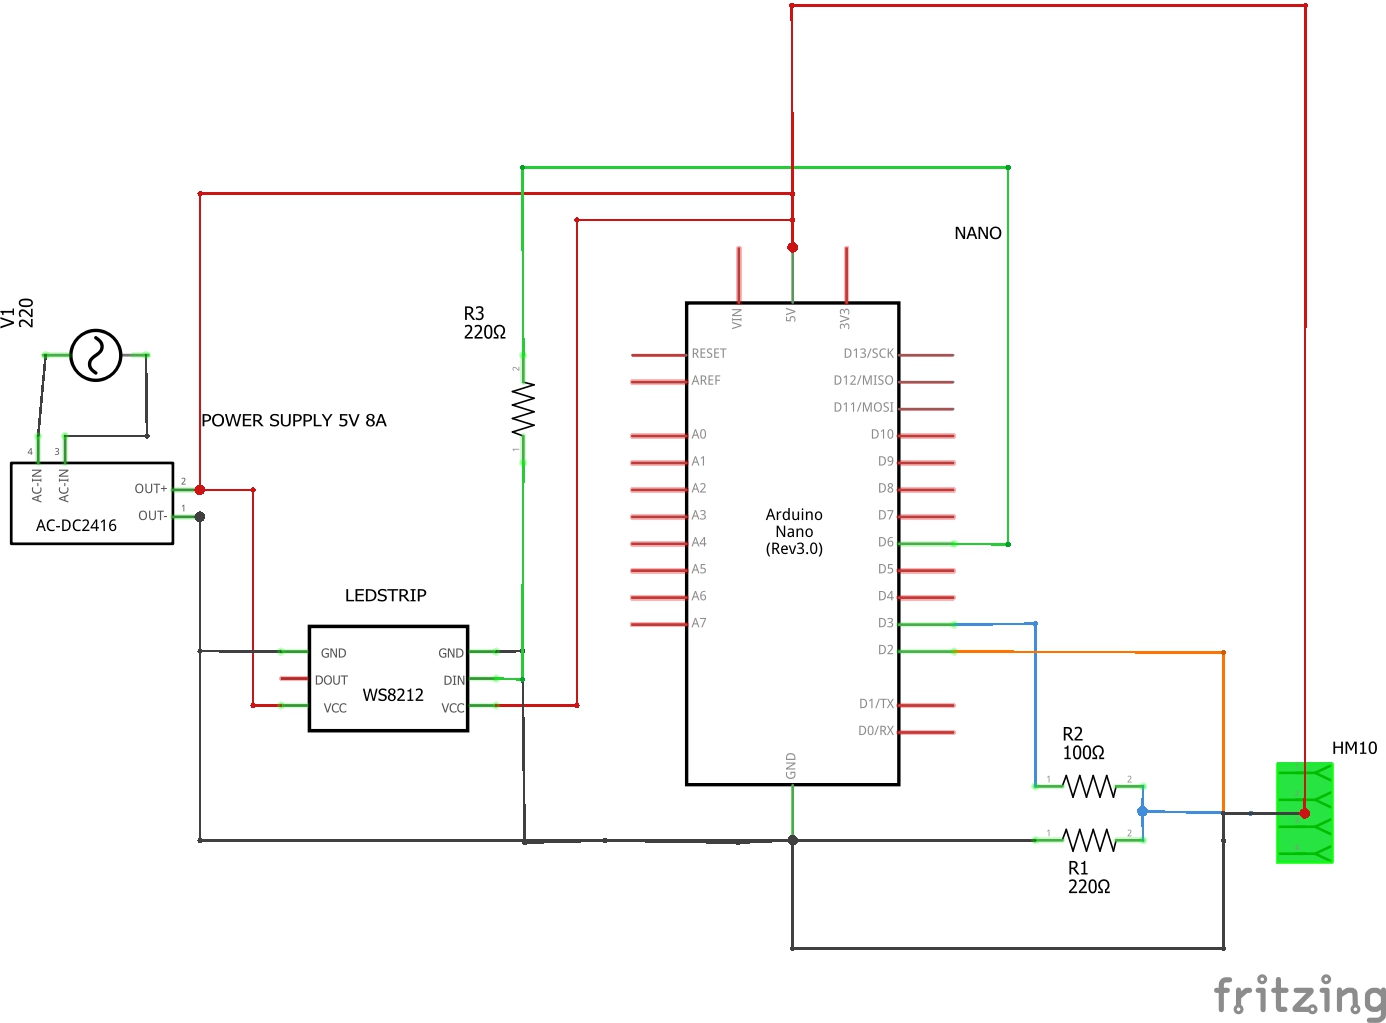
I went with the Nano because it’s cheap and does the job. The only downside is its small SRAM, which fills up quickly with complex animations. My setup, with a few animations and colors, works fine, but if you want to do more advanced stuff, I recommend using an ESP32 instead.
LED StripI chose the WS2812B LED strip because it’s affordable, widely available, and pretty high quality for the price. I used a 5V, 2m, 60 LEDs per meter, IP30 strip.
- If you’re using longer or denser strips, make sure you have a power supply that can handle the extra current.
- Waterproofing (IP65 or higher) isn’t important for me because I’m using it indoors.
This module uses Bluetooth Low Energy (BLE), which works on both iOS and Android. Its best feature is cross-platform compatibility. The only downside is that it communicates using 3.3V logic, so you’ll need a voltage divider (I’ve included it in the schematic).
Power SupplyTo calculate the power needed:
To find the optimal Power supply, you should evaluate how much power will your strip use. For example, my strips has 120 leds in total, while one led consumes around 60mA. Afterwards the math is simple, 60mA * 120 leds = 7, 2A. My strip is using 5V, so for total power, we use the formula: P = I*U. Total power consumed for my strip is 36W. I got a 40W power supply, so that is totally good enough for me (other parts use low levels of power). It’s always better to get a slightly larger power supply than you need. A smaller one could cause issues like dim LEDs or unstable behavior.
Voltage DividerThe HM-10’s RX pin works with 3.3V signals, but the Arduino sends 5V. To fix this, I used a voltage divider with two resistors. The formula for calculating the resistor values is:
Vout=Vin×(R2/R1+R2)
CodeI used the FastLED library, which is easy to work with. To set it up, you just need to tell the library how many LEDs you’re using, which pin they’re connected to, and the type of LED strip.
Customizing Colors and Animations:If you want to add or change colors, you can find a list of predefined colors here. You can also create your own animations by modifying the code.
Adjusting Brightness:The code includes a brightness command so you can change the brightness anytime without touching the hardware.
I won’t bore you with too many code details here, but if you have any questions, feel free to reach out—I’d be happy to help. 😀
Why I Chose DabbleI used the Dabble app because it has a Terminal function where you can send commands directly to the Bluetooth module. It’s much more flexible than other apps that limit you with preset options. Dabble lets you get creative with colors, animations, and brightness.
Final ThoughtsThis is my first published Arduino project, and I think it turned out great! I’m already thinking about upgrading it with an ESP32 for more advanced features, but for now, this version is enough for my needs.
Thanks for reading! If you have suggestions or feedback, I’d love to hear them. 😀
Here are some photos:


Comments