Arduino's IoT service is based on the MQTT Protocol. You might want to look at my writeup introducing MQTT if you aren't familiar with it.
If you're like me, you only one have IoT device. In my case, I'm running an Uno with WiFi 101 Shield. It's currently publishing to Arduino Cloud. The problem? I couldn't tell what I was publishing.
MosquittoThe open source project mosquitto is a MQTT server AND client. When you install the "server" (or broker) you also get mosquitto_pub and mosquitto_sub along with it.
The client utility mosquitto_pub provides a command line method for connecting to a broker, like Arduino Cloud, to see what your IoT device is publishing.
Installing MosquittoI won't go into detail how to install Mosquitto on your system. It's available for every operating system. Mac use Homebrew to install. Linux use your distribution's package manager. Windows, visit mosquitto.org for a binary install.
Things you need to connect with Mosquitto- Certificate Authority File
- Create a "Listener" Device in the Arduino Cloud Things List
- Listener's deviceName (I called my "Listener")
- Listener's deviceId
- Listener's Password
The stuff about your Listener is available from your Thing Dashboard:
This one totally tripped me up. Arduino Cloud uses SSL. In order for mosquitto_pub to connect, you need to give it a certificate authority so it can establish an SSL connection.
There are two ways to get the CA File.
- Use OpenSSL to communicate with mqtt.arduino.cc
- Directly from mqtt.arduino.cc's Cert Provider, GoDaddy
If you know how to use OpeSSL, you can do the first one. The second one is easy, head to GoDaddy's Repository and download "GoDaddy Class 2 Certification Authority Root Certificate - G2"
I kept the creative name "gdroot-g2.crt" for mine.
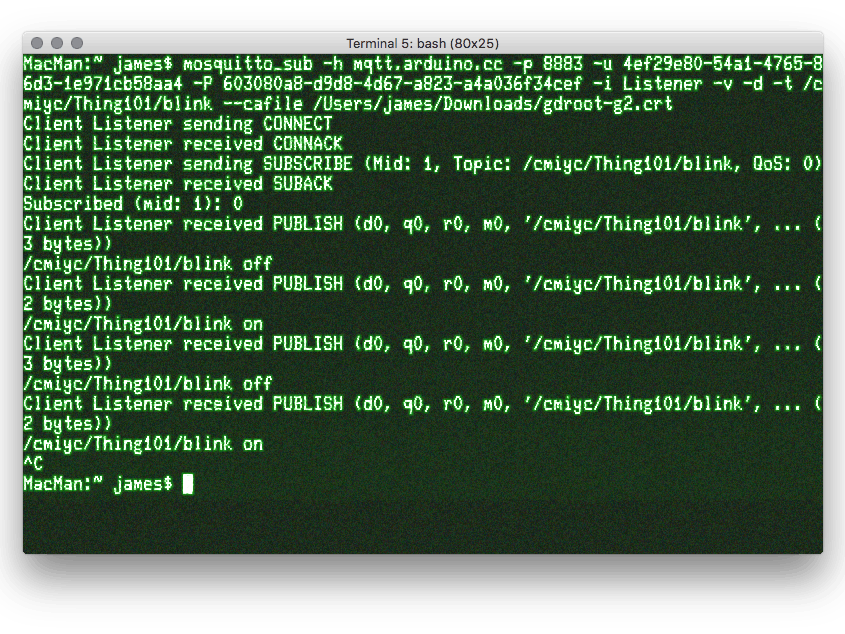
Mosquitto Command LineOkay, you've installed mosquitto, created the device on Arduino Cloud, and you downloaded the CA file. Now it's time to run mosquitto:
mosquitto_sub -h mqtt.arduino.cc -p 8883 -u <listening_device id> -P <listening_device password> -i <listening_device name> -v -d -t /<Arduino Cloud Username>/<publishing_device name>/<publishing topic> --cafile gdroot-g2.crt
Here's a recap of what you need:
- <listening_device id>: HEX string, "DEVICE ID", for your "listening" device
- <listening_device password>: Hex string, "DEVICE PASSWORD", for your "listening" device
- <Arduino Cloud Username>: This is the username you used to log into cloud.arduino.cc
- <publishing_device name>: Your IoT Thing. In my case I called mine Thing101
- <publishing topic>: The topic your IoT Thing publishes to, in my case I used the default "blink" that the initial system example uses.
- cafile: The CA file you downloaded from GoDaddy
- -v: verbose messages
- -d: debugging messages
If you do all of that correctly, you'll see something like this appear when you connect, followed by the messages your IoT device is publishing:
Client Listener sending CONNECT
Client Listener received CONNACK
Client Listener sending SUBSCRIBE (Mid: 1, Topic: /cmiyc/Thing101/blink, QoS: 0)


_ztBMuBhMHo.jpg?auto=compress%2Cformat&w=48&h=48&fit=fill&bg=ffffff)

Comments
Please log in or sign up to comment.