

Hardware components | ||||||
 |
| × | 1 | |||
 |
| × | 1 | |||
| × | 1 | ||||
| × | 1 | ||||
| × | 1 | ||||
| × | 1 | ||||
| × | 1 | ||||
| × | 1 | ||||
 |
| × | 1 | |||
 |
| × | 1 | |||
Software apps and online services | ||||||
| ||||||
Hand tools and fabrication machines | ||||||
| ||||||
| ||||||
| ||||||
*UPDATE*
Trying to do some cool stuff with Capacitive touch and proximity on an Arduino platform? You should check out our Touch Board.
The Touch Board comes preinstalled with 12 capacitive sensors that are more powerful and more reliable than the sensors you’ll create through this tutorial. The Touch Board is based on an Arduino Leonardo so its easy to use. It also has some cool built in features like MP3/MIDI capability and a lipo charger. Find the Touch Board here.
*UPDATE*
In this tutorial, we are going to make a simple capacitance sensor using a pad of Electric Paint, an Arduino and a resistor. When correctly constructed, this sensor can detect the presence of a person from up to 300 mm and can work behind any non-conductive material (glass, wood, plastic, etc).
By the end of the tutorial you’ll have a pad of Paint connected to the Arduino, sending a stream of numbers to your computer’s serial port. In later tutorials we’ll take a look at what you can do with these numbers. This tutorial is based on the CapSense library and code that can be found here.
All credit for the code goes to Paul Badger for making this so easy to implement!
Materials: To begin you will need:
1 x Electric Paint 50ml
-
Paintbrush
Paper
Arduino
USB Cable
Bread Board
Jump Wires
Resistors
Aligator Clip
Paper Clip
Step 1: Gather your Materials
The first step is to gather the appropriate materials, listed above
To make a capacitance sensor using Electric Paint, you’ll need:
A jar of Electric Paint
Small selection of resistors, between 100k ohm and 20M ohm (specific size is not important)
An Arduino, preferably Uno, Duemillonove or equivalent
Solderless breadboard and some jump wires
Some general prototyping materials to connect the pad of Paint to the Arduino, like wire, alligator clips etc
A USB cable to connect the Arduino to you computer
Links
Step 2: Sensor Pad and Circuit
Now that you have your materials together, it’s time to start building the sensor and the circuit. First you need to paint a pad of Electric Paint onto any non conductive surface. In the video above we’ve just painted a piece of paper. The shape isn’t important and the size should be around 100mm x 100mm (4″ x 4″).
The size of the pad can impact the sensitivity of the sensor, so try a few different sizes if you want and see how this changes the way that the sensor reacts. Leave your sensor pad to dry.
Links
Step 3: Build the Circuit
The next step is to build a simple circuit containing a resistor between pin 2 (orange wire connecting to the breadboard) and pin 4 (red wire connecting to the breadboard) of the Arduino board. Pin 4 is referred to as the “Sensor Pin” and Pin 2 is referred to as the “Receive Pin”. An easy way to create this circuit is via a solder less breadboard.
Links
Step 4: Connecting to Electric Paint
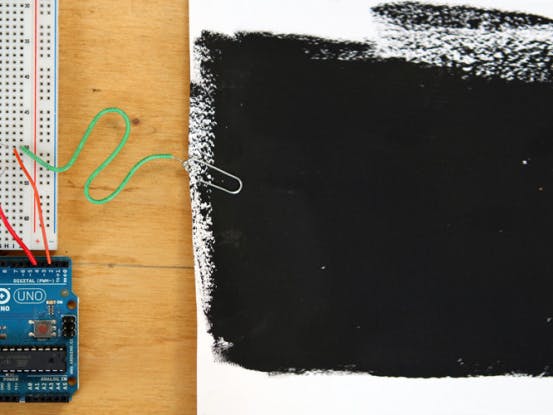
Once you have your circuit built you can connect it to the pad of Paint. Take a look at our connecting tutorial for cool ways to connect to the Paint, but for now, we’re just going to use a paperclip soldered to a wire. Whatever the connection type is, the Paint needs to be connected electrically to pin 2 on the Arduino.
In the image below, you can see that the green wire is connected to the same row on the breadboard as the orange wire. For further explanation, including a wiring diagram, check out the Arduino playground link below.
Links
Step 5: Setting up the Arduino
Great! Now all of the physical work is done and we’re off to the code. Make sure that you’ve downloaded and installed the Arduino programming environment (link below)
Then, you’ll want to download and install the CapSense library.
When you unzip the files make sure to put the folder titled “CapSense” into Documents/Arduino/libraries as shown below.
Links
Step 6: Troubleshooting
You will know that you’ve installed the library correctly when upon restarting Arduino you are able to select it from the Sketch / Import Library… menu, as seen below.
Links
Step 7: Download the Sketch
Now that the library is installed, you can download the Arduino sketch.
Unzip it, open it in the Arduino application and load the code onto your board. For more information about loading software onto the Arduino the Arduino site.
Links
Step 8: Let's see if it works
Now we are ready to test your sensor! Make sure that your computer is plugged into the wall, or the Arduino is connected to ground as this improves the stability of the sensor. To check the output of the sensor, open the Serial monitor in the Arduino programming environment (make sure the monitor is set to 9600 baud as that is what is specified in the code).
If it is working correctly, you will see a stream of numbers like in the image below. Moving your hand closer and farther from the pad of Paint should change the outputted number. Try swapping out the resistor and test how it changes the sensitivity. Larger resistors tend to make the sensor more sensitive and as such it will work from farther away.
Links
Step 9: Hurray!
Hey, it works! As we move our hand up and down the numbers on the serial port monitor change. It’s now time to start experimenting. Try swapping the resistor, the pad of Paint or try covering the sensor with another non conductive material.
This type of sensor can work on a lot of different surfaces and materials. In later tutorials we’ll look at how we can use this sensor to control lights and sound.
We want to see what you do with the tutorial, so make sure to upload your project!
Links
Step 10: Code
If you don’t already have it, make sure to download the Arduino programming environment.


Comments
Please log in or sign up to comment.