


Hardware components | ||||||
 |
| × | 1 | |||
 |
| × | 1 | |||
Software apps and online services | ||||||
_4YUDWziWQ8.png?auto=compress%2Cformat&w=48&h=48&fit=fill&bg=ffffff) |
| |||||
 |
| |||||
 |
| |||||
Hand tools and fabrication machines | ||||||
 |
| |||||
 |
| |||||
A couple of months ago PCBWay contacted me and offered to provide manufacturing services for my next project. I used their PCB manufacturing services before, and I also wanted to try their other services like 3D printing, CNC machining and PCB assembly.
The festive season was approaching, so I asked them if they would like to sponsor a 3D Snowflake Ornament project. 🙂 They agreed and this is what we ended up with:
The main idea of the project was to have some kind of festive ornament 3D printed in clear / transparent resin, with some embedded electronics providing RGB lighting. The electronics meant to be battery powered, with BLE connectivity for controls.
As the design I wanted to go with some kind of 3D snowflake shape. As I did not found anything I liked online, I stated to play around in FreeCAD 1.0 (RC at that point). After about an hour or two this came out:
The base sketch I started from is quite simple:
The base sketch was first extruded to get a solid body. After this 3 polar pattern operations were applied on various axes and with various number of copies. This gave the base of the 3D snowflake shape.
To make space for the electronics a solid sphere like part was added to the middle, with a slot wide enough to house the PCB:
The model is around 10 cm in height and width, and the slot in it is just enough to host a CR2032 battery and a PCB.
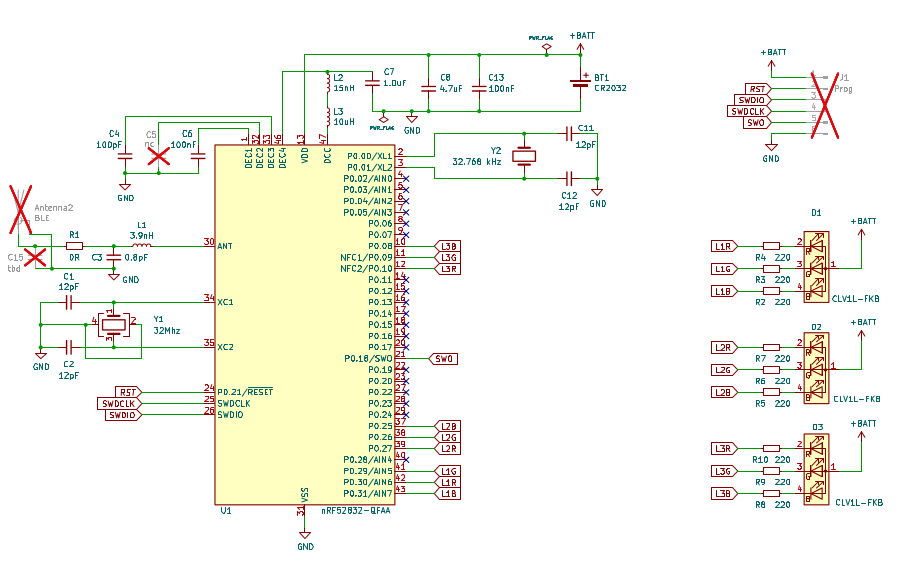
Electrical & PCB DesignIn terms of electronics I went with a design based on the nRF52832 SoC from Nordic. I already used this chip in my Scan me! badge project, so coming up with a simple design for the 3D Snowflake Ornament went relatively quickly.
The schematics of the project is quite simple. It is basically the DC-DC converter enabled reference design from the nRF82 datasheet. Over that 3 RGB LEDs, a CR2032 battery holder and a programming connector is added:
For the PCB the main design concern was the size, as it needs to fit in the middle of the ornament. To deal with this, I first searched for smallest CR2032 battery holder I could find (a Keystone 3034), then I designed a PCB around it. The result was circle shaped PCB with a diameter of 26 mm, with a small overhang on one side hosting the PCB antenna.
Being a really small board with RF functionality involved it, I decided to go with a 4 layer PCB. This allows easy routing, while dedicating two layers for solid ground planes:
The RGB LED-s are placed two on the top and one in the bottom of the PCB, on the opposite "corner" along the battery holder. The nRF52 SoC is placed on the middle of the top layer:
I also exported a STEP model of the PCB, which was later used to check the fit with ornament in FreeCAD.
Manufacturing and AssemblyPCBWay offered to provide their manufacturing services for free for this project. These included 3D Printing, PCB manufacturing and turnkey PCB assembly.
The body of the 3D Snowflake ornament was made using SLA resin printing. We decided to try two material / finishes:
- UTR-8100 - transparent, Spray varnish - a bit more expensive, but looks super cool in my opinion 😬
- UTR-8100 - translucent - same material, but translucent finish
In my opinion the 3D prints came out near perfect. The details are clear and there aren't any printing artifacts visible on them.
For the PCB I choose white finish and 1 mm thickness. In total there were 7 PCB-s made, 3 of which were used for assembly:
For the PCB assembly I opted for the Turnkey PCB Assembly option. This means PCBWay both sources the parts based on a BOM we provide, and then fully assembles the boards:
I was quite impressed by the assembly service. The 3 boards all came out in perfect working condition. During the manufacturing PCBWay contacted me a couple of times for clarification and confirmations of various aspects. They clearly want to make sure boards are manufactured as intended.
For example, with the battery holder there was a slight issue with the footprint I used, so the holder did not fit perfectly on the pads. They sent me photos and asked what to do. They even offered to solder holder on the slightly small pads, but in the end we just agreed that I will figure that issue out for myself, and they just include the holders along the order.
The cost for 3 x 3D Prints, 3 x Assembled PCB-s and 5 x PCB-s (they made 7 in total) was $119 + shipping. This also includes around $25 for electronics parts they sourced for the PCB assembly:
The order took a total of 20 days to complete, starting from the moment of placing it, to when it was delivered to my home. This is quite good from PCBWay, considering it also includes sourcing parts for the PCB assembly and waiting for me to answer clarification questions in a couple of rounds.
Overall, I'm quite satisfied with PCBWay's services. The only things that could be slightly cheaper are 4-layer PCB-s and that transparent SLA resin material (their prices for SLA resin printing for less exotic materials are quite good).
The 3D print (link), PCB and assembly (link) for this project can be ordered directly from PCBWay.
FirmwareAfter I received the boards, I started to write the firmware for it. For this is used Arduino IDE with the nRF5x core from sandeepmistry:
After checking that all the RGB-s LED work, I started playing around with Bluetooth Low Energy (BLE). For this I used the BLEPeripheral library and the S132 SoftDevice (need to be v2.x) from Nordic. Thankfully, I didn't messed up anything in the hardware design 😬, and everything worked.
The firmware is capable to play various light patterns on the RGB LED-s. A defined a couple of Patterns, Color Palettes and Presets, which can be combined in order to achieve various effects.
Over this a Bluetooth Low Energy (BLE) interface was implemented, designed to allow remove control of the ornaments light's. There are BLE exposed:
- a custom Snowflake LED service with a couple of custom attributes
- Nordic's UART service, implementing Serial communication over BLE
The Snowflake LED service is a BLE service designed to offer simple controls. It has custom attributes for setting Speed, Intensity and as well for selecting Presets, Patterns, Color Palettes or Colors.
The intention with the Snowflake LED service is to allow controlling the ornament from Nordic's nRF Connect app. It's a bit "raw" in terms of user friendliness, but I had no time to build a mobile app for it 😛.
The BLE Serial (UART) service has a full-blown "GCode style" API designed to be used from scripts (running on a Raspberry Pi for ex). It offers a fairly complete set of commands, "in theory" it can be used to implement whatever effects we want without the need of a firmware upgrade.
The BLE Serial implements the following commands:
INT,SPD- used to set the Intensity and SpeedCLP,PAT,PRS- used to select the Color Palette, Pattern and PresetCOLC,CLPC,CLPA,PATC,PATA,PRSC- allows creating new Colors, Color Palettes, Patterns and PresetsGINT,GSPD,GCOL,GCLP,GPAT,GPRS- offers information about settings and objectsRST,TSNC,SLP- Reset, Time Sync and Sleep operations
In order to save power, I implemented a Sleep mode with BLE advertising. In this mode the board consumes around 400 uA of current, which should give about a month of standby battery life with a CR2032 battery.
In operation the board, with BLE and the DC-DC converter enabled, consumes anywhere from 3 to 20mA, depending on the intensity and pattern played. That should be roughly 10-30 hours of battery life with a 230mA CR2032 battery.
For programming the PCB has a SWD based programming port (quite a poorly designed one 😬). To program the board, I solder a ribbon cable to the programming pads, breaking out the SWD pins to a SWD / JTAG programmer:
The programming port has standard 2.54 pitch, so at some point I may design a fixture with pogo pins to allow easier programming.
The 3D models, KiCad project and firmware can be found in the attached GitHub repository.
Photos with the 3D Snowflake Ornament on the Christmas tree 🎄 in a couple of days.
Hope you enjoyed this project! 😎


_Ujn5WoVOOu.png?auto=compress%2Cformat&w=40&h=40&fit=fillmax&bg=fff&dpr=2)


Comments