In this project I will show a proof of concept implementation of a Particle & SigFoxbased Air Quality Monitoring network.
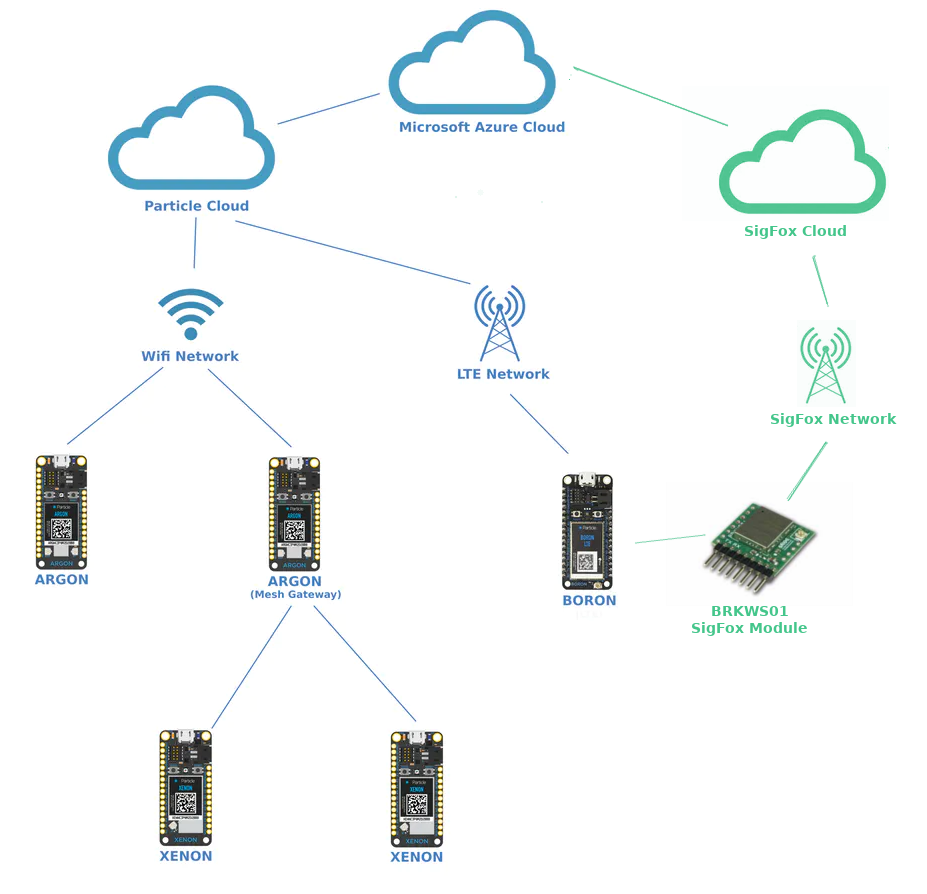
The concept is to have a high number of relatively low cost air quality monitoring devices around the city. The devices would be based on a Particle Argon, Boron or Xenon micro-controller board and a PMS7003 air quality sensor.
The device will connect to a WiFi, LTE or Meshnetwork, depending on the Particle device used, or using a SigFox module could use the SigFox network for communication.
The device then will upload the sensor data to the Particle or SigFoxCloud from which will be routed to the Azure IoT service or an another cloud service.
Getting StartedTo set up the Particle Argon device used in this project, we can follow the Getting Started guide.
First we need to download the Particle mobile app, the there are a couple off steps to follow:
1. Account creation:
2. Add device:
3. Update device firmware:
4. Wifi setup:
5. Device set up:
6. Hello world application:
We well use the following hardware components:
Particle Argon
The main component of the project is a Particle micro-controller. This can be either a Particle Argon (Wifi + Mesh), a Particle Boron (LTE) or Particle Xenon (Mesh).
Plantower PMS7003 Air Quality Sensor
The Plantower PMS7003 is an air quality sensor, which measures the amount of dust particles of different sizes in the air.
The sensor measures particles with a diameter between 0.3um and 10um.
The device communicates over serial (UART) interface.
Product page: http://www.plantower.com/en/content/?110.html
BRKWS01 SigFox Module
The BRKWS01 is an easy to use Sigfox module, which comes with an antenna and a 1 year Sigfox subscription:
The module uses UART and AT$ commands for communication.
Note: as both the BRKWS01 and PMS7003 uses UART, and the Particle Argon has just a one available hardware serial module, we need to use the same serial lines (TX, RX) for both modules. We can do this if wealways keep one module active and one in sleep mode.
Solar Panels
To power the device we will use solar panels and Li batteries.
The Particle Argon already has a charging circuit that can be used with 6V solar panels.
I used the following 6V, 330mA / 2W solar panel.
Product page:
Lithium Batteries
The battery I used is a one cell 1050mAhbattery from Seeed.
Note: the battery had the wrong connector, and I realized this in the last moment. Finally, I ended up fabricating a DIY adaptor.
BMP180 Sensor
For this project, we will also use the BMP180 sensor module. The BMP180 sensor is capable of accurately measuring barometric pressure and temperature.
The module communicates over a I2C interface.
The sensor can measure:
- temperature
- absolute pressure
But knowing our altitude we can also calculate the so called
- normalized / sea-level pressure
This is the barometric pressure normally used for weather forecasts.
-----
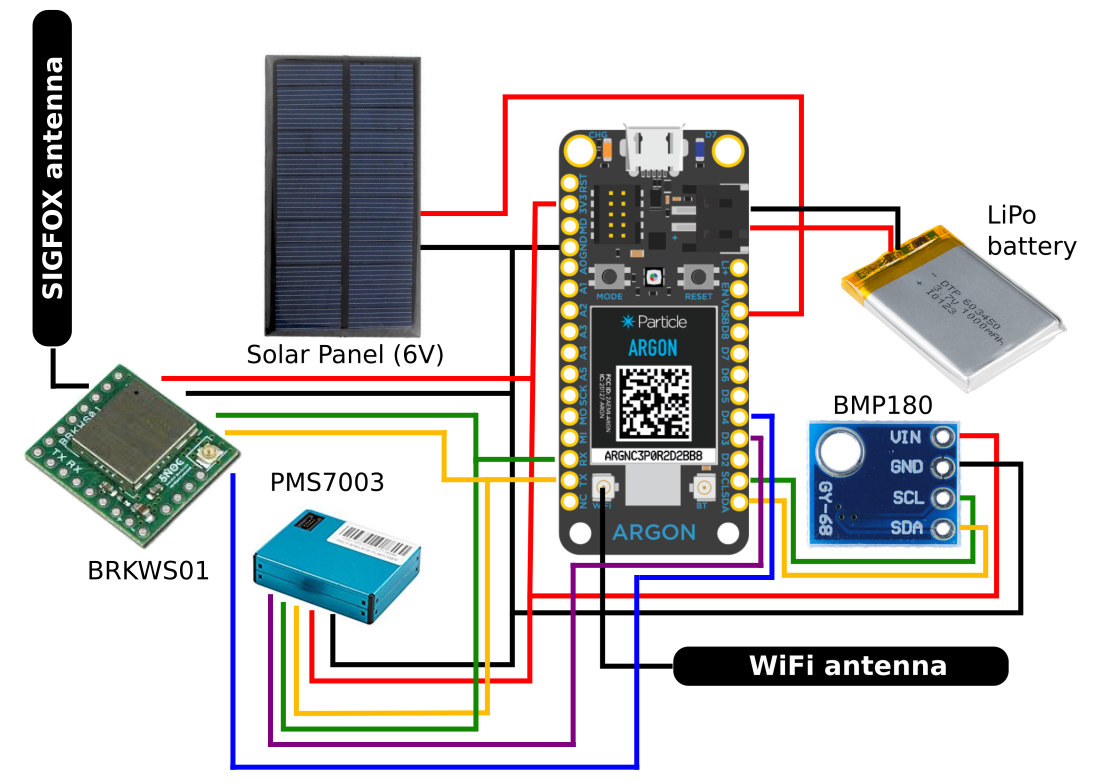
The hardware components should be connected as follows:
This is my test setup, in bright sunlight:
We can observe that charging LED in light up, showing that the battery is being charged by the solar panel.
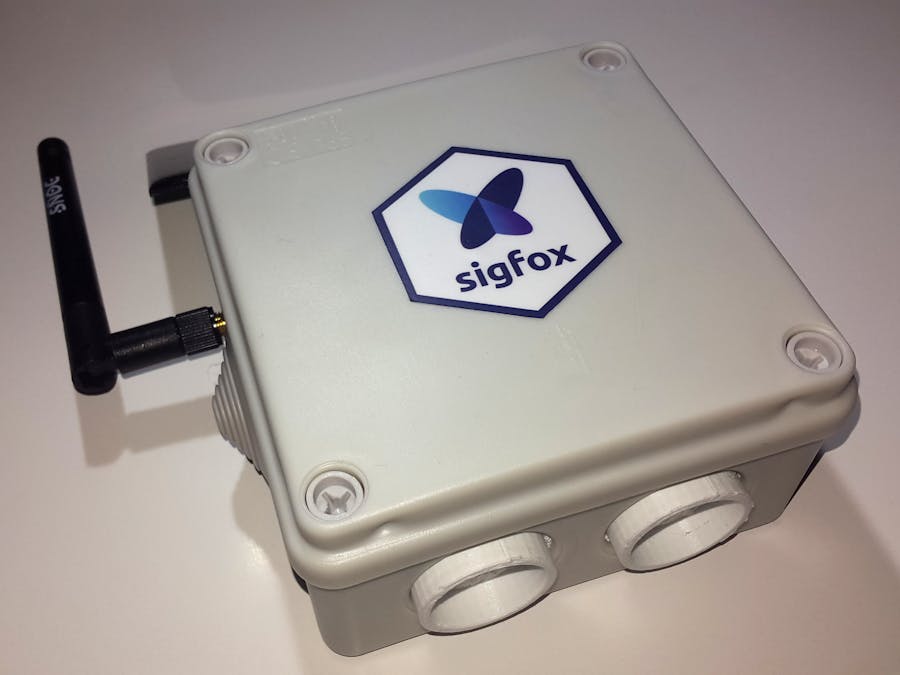
EnclosureThe enclosure consists from a standard junction box(IP65), and a 3D printed fitting for the PMS7003 sensor.
The software running on Particle Argon, is an Arduino sketch written in the Particle Web IDE.
The code is relatively simple. It just reads the sensor values from the PMS7003 and BMP180sensors, then publishes the data to the Particle Could and to SigFox network.
Note: the source code can be found on the linked GitHub repository.
Particle Cloud / Integration with Azure IoT HubThe first step login to the Azure Portal, and create a new IoT Hub. This can be done by selecting + Create a resource / Internet of Things / IoT Hub.
Here we need to give some details:
When we hit Create the IoT hub will be deployed.
And here is how our IoT Hub looks like after it has been successfully created.
We will also need to create a Shared Access Policy as the following:
Having these, we can go to the Particle Console and create a new Integration:
On the next page we need to specify and Event Name, and the name of the IoT Hub and Shared Policy:
Here is how the newly created Integration looks:
Now we should be able to use Particle.publish() to publish data in the IoT Hub:
void loop() {
    // Get some data
    String data = String(10);
    // Trigger the integration
    Particle.publish("air-quality", data, PRIVATE);
   // Wait 60 seconds  delay(60000);
}The BRKWS01 is a SigFox module that uses AT commands sent over UART for communication.
Note: to be able to use the BRKWS01 device, we first need to register it on the SigFox network. This can be done either from activate dev kit page, or by contacting your local SigFox provider.
To send a message we need to use the following AT command:
AT$SF=<PAYLOAD_IN_HEX>To send a message with a down link data we need to add an additional parameter:
AT$SF=<PAYLOAD_IN_HEX>,1The payload size can be maximum 12 bytes. I used these to pack 6 xuint16_tvalues, representing the concentration / count of different particle sizes:
typedef struct SigFoxMessage {
    uint16_t pm_1_0;
    uint16_t pm_2_5;
    uint16_t pm_10_0;
    uint16_t cnt_0_3;
    uint16_t cnt_0_5;
    uint16_t cnt_1_0;
} SigFoxMessage __attribute__((packed));
Having this, the device should be able to send data over the SigFox network.
The next step is to enter backend.sigfox.com, select you device type
and do some configuration:
- set a custom grammar payloadparser, so that SigFox backend will understand or payload
pm_1_0::uint:16:little-endian pm_2_5::uint:16:little-endian pm_10_0::uint:16:little-endian cnt_0_3::uint:16:little-endian cnt_0_5::uint:16:little-endian cnt_1_0::uint:16:little-endian- add a callback to export data to a IoT platform - a choose Azure IoT this time. All it needs is a Azure IoT Hubconnection string, and it will export a JSON with the fields we want:
If we set up everything correctly, under Device / <ID> / Messages we should be able to see the received messages and the callback results:
In callback should publish messages to our Azure IoT Hub. A IoT device with the SigFox ID is automatically created:
and using the Azure plugin from the Visual Studio Code we can even see the messages we receive:
Possible future enhancements would include:
- a web interface
- saving historical data into a time series database
- water quality monitoring
Cheers!


_zhWsCcSEcl.jpg?auto=compress%2Cformat&w=48&h=48&fit=fill&bg=ffffff)


Comments
Please log in or sign up to comment.