[Update, 5 May]
Created the "3D Printer with Walabot support" Android app for the project. The app supports all the existing features (Walabot gesture control, power on / off, preheat abs / pla, auto-home, start printing) and additionally has a nice visualization for the Walabot gesture control feature.
The Raspberry Pi client was updated to provide a communication interface (TCP in the local network) for the Android app.
The code (Android app + updated Raspberry Pi client) and the APK are attached to the project.
[Update, 16 April]
The 3D Printer with Walabot support skill is now LIVE in the Alexa skill store :) Bellow are steps to get started using it.
Hardware setup
- Connect the Walabot to the Raspberry Pi with a micro USB cable
- Connect your (RepRap based)3D printer to the the Raspberry Pi using an USB cable (optionally, to avoid powering the 3D printer from the RPi, youcancutthe 5V wire of the USB cable)
- (optional & dangerous) Attach a relay module to the printer's power supply / cable. Connect the relaymodule to the Raspberry Pi's pin 7,VCC and GND
Software setup
- Download and extract the attached client code(Alexa-3D-Printer.zip) to your Raspberry Pi. Copy the downloaded certificates in this folder.
- Link your Amazon account with the skill. To do this open the skill (say: Alexa,open three d. printer). It will ask you to link your account. Open the Alexa app, find the Link account card, click on the Link account link and follow the steps
- Get your 3D_Printer IoT thing created. To do this try using the skill (for ex say: "Alexa, ask three d. printer to turn on"). A new 3D_Printer IoT will be automatically created for you. You will receive a welcome email like bellow. Note down the thing name and download the attached certificates into the
Alexa-3D-Printerfolder
- Start the client by executing the following command on the Raspberry Pi(replace YOUR_ID with id from the welcome e-mail):
pi@raspberrypi:~ $ cd Alexa-3D-Printer
pi@raspberrypi:~/Alexa-3D-Printer $ python3 Smart3DPrinterClient.py -e a3355xl7xsoxw7.iot.us-east-1.amazonaws.com -r VeriSign-Class-3-Public-Primary-Certification-Authority-G5.pem -c 3D_Printer-amzn1-account-YOUR_ID...-certificate.pem.crt -k 3D_Printer-amzn1-account-YOUR_ID...-private.pem.key -n '3D_Printer-amzn1-account-YOUR_ID...' -id '3D_Printer-amzn1-account-YOUR_ID...'
You are now ready to use the skill :)
__________
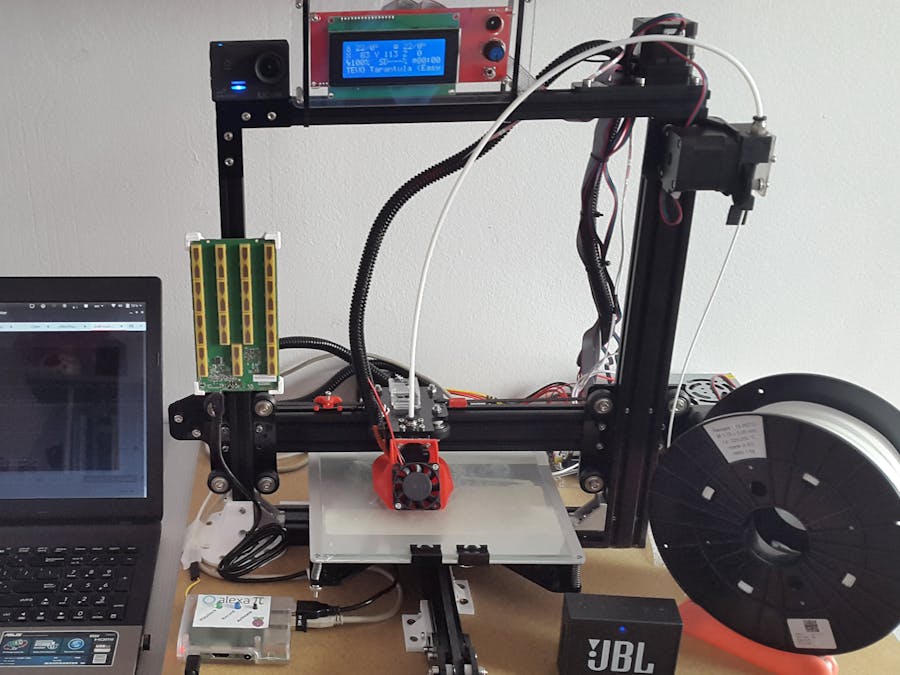
The goal of this project was to add some smart features to my 3D printer.
Alexa provides voice control, while a Walabot Maker is used for gesture control.
FeaturesVoice Control - powered by Alexa
- turn the printer ON / OFF
- auto home axes
- preheat the heaters before printing
- start a print from SD card
Gesture Control - powered by Walabot
- control the axes
- navigate in the menu (under development)
Walabot Case / Holder
The Walabot is mounted on 20x20 aluminium profile with a custom designed and 3D printed case / holder:
Alexa Pi
The 3D Printer(a TEVO Tarantula) and the Walabot is connected to a Raspberry Pi 3 using USBcables. In order to avoid powering the 3D Printer's motherboard (as has it's own power supply), I am using a USB cable with a the 5V wire cut.
The Raspberry Pi also runs Alexa Voice Service by using the Alexa Pi project:
The Bluetooth speaker (JBL Go!) is used as the sound device(both for playback and recording)
Relay Module
The printer is turned on / off using a generic relay module. The mains cable is connected COM and NO pins of the relay, while the GND, VCC and IN1 pins are connected to the Raspberry Pi's GND, 3.3V and GPIO 4 pins.
(Note: Working with mains is dangerous. Please implement this at your own risk!)
The 3D Printing Alexa Skill(Skill ID: amzn1.ask.skill.158f25b1-4df4-4421-aacd-35b28e175505,now LIVE in the skill store)
The first step to controlthe3Dprinterbyvoice is to create a AlexacustomSkill. Here is mine:
After setting the Skill Invocation Name to "three d. printer" (digits are not allowedhere) we need to add some Intents, each with zero or more Slots and a list of Sample Utterances.
My Intents are:
- TurnOnIntent / TurnOffIntent - "Turn on the printer" / "Turn off the printer"
- EnableWalabotIntent / DisableWalabotIntent - "Enable Walabot gesture control" / "Disable Walabot gesture control"
- AutoHomeIntent - "Auto home all axes"
- PreheatIntent- "Prepare for {Material} printing"- Material is a slot withacustom type with the values: PLA / ABS / PETG
- StartPrintingIntent-"Start printing from SD card"
After configuring the skill's endpoint to an AWS Lambdafunction(see bellow) and saving/building themodel the skill should be ready to used. It can be invoked the "Open/Load threed.printer" phrase and then using the one of the defined intents.
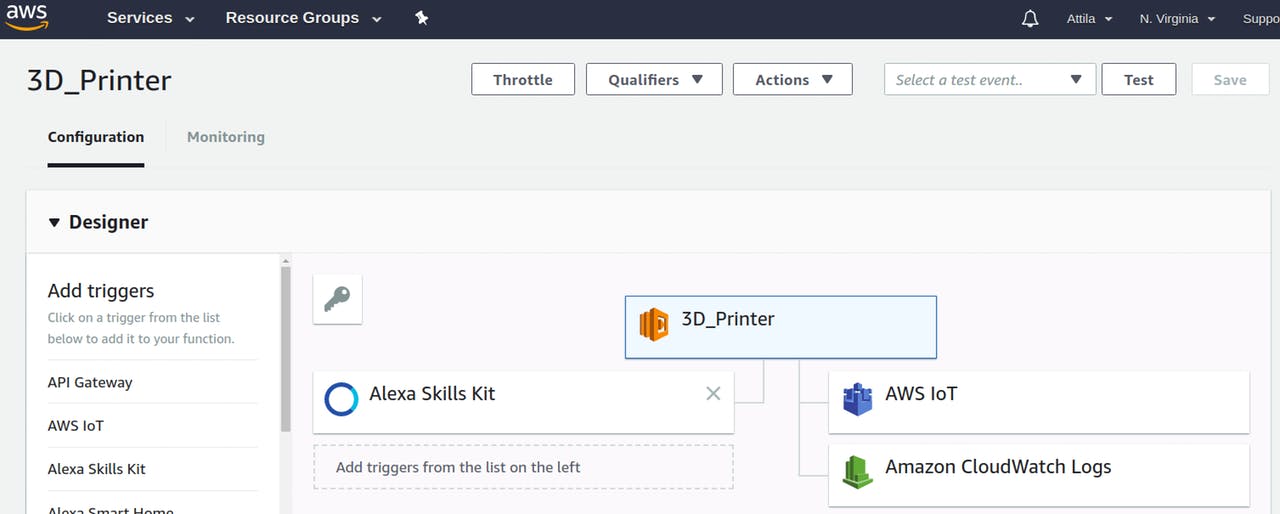
AWS Lambda EndpointNow, to be able to do something useful with our skill we must have an endpoint / handler configured. The simplest / recommended way is to create an AWS lambda function for this purpose, using one of the predefined templates.
The AWS Lambda function will contain the logic for each intent.
My function is written in Python 3.6 and based on the received intents updates an AWS IoT thing's shadow (see bellow for details).CloudWatch Logs is used for logging:
AWS IoT
The state of our skill is kept in an AWS IoT Thing named 3D_Printer.
Our lambda function publishes updates to this AWS IoT thing's shadow:
The shadow state looks like:
{
 "desired": {
   "power": "on",
   "hotendTemp": 0,
   "bedTemp": 0,
   "walabot": "on",
   "command": "AutoHome",
   "material": "abs"
 },
 "reported": {
   "on": 0,
   "power": "on",
   "command": "",
   "bedTemp": 0,
   "material": "abs",
   "walabot": "on",
   "hotendTemp": 0,
   "lastUpdated": "2018-03-25 14:41:04.824470"
 }
}
The Raspberry Pi listens for updates on this thing and controls the 3D Printer and Walabot based on these. The thing also has a certificate and a policy attached to it. These are used in the Raspberry Pi to authenticate itself.
Multi-user supportSo far, we have a single AWS IoT thing and this IoT thing controls our 3D printer / Walabot. This means our skill supports just a single user (we) now.
If we want to publish our skill in the Alexa Skill Store, first to support multiple users we need to make some adjustments in our AWS Lambda / AWS IoT setup.
In our AWS Lambda function we need to implement account linking and on-the-fly IoT thing creation for new users. Then we need to change our code to use the IoT thing associated with the current user.
On the AWS IoT side we need to create new thing type to allow looking up things based on the current user's Amazon User IDs. We also need to implement a more restrictive policy, so that the users will be able to access just their own IoT thing.
I documented the necessary steps in more detail in a separate project:
Secure multi-user support for AWS IoT based Alexa Skills
Raspberry Pi ClientHaving this we can start implementing the features on the Raspberry Pi. The features are implemented in a Python app which subscribes for the AWS IoT Shadow updates and takes actions based on what receives.
Turning the printer ON and OFF
This is implemented by controlling our relay module using the GPIO pin.
More advanced features using GCode sent to the printer
The rest of the features (Auto-Home, Preheat, StartPrinting) are implemented using GCode sent to the printer over a serial connection. The printer is connected to the Raspbery Pi using an USB cable. The commands are sent from the Python code using the pySerial library.
For example the bed and the hotendtemperature are set with the following two commands:
# set the heated bed's temperature to 60°C
M140 S60
# set the hot end temperature to 210°C
M104 S210
the auto-home is done by sending the G28 command, while the print is started with the M20(list SD card), M23 file.gco(select file, with file.gco is latest .gcofile found on the SD card),M24 (start printing) Gcode command sequence.
Walabot Gesture Control
The Walabot Gesture Control allows the controlling the 3D Printer's X, Y and Zaxes by our hand.
The feature is implemented in a separate Python module as follows:
First the Sensor Mode with Filter Type = NONE is set. The arena parameters are defined as R = 20...60 / 5 cm, Phi = -30..30 / 5°, Theta = -60..60 / 5°. Additionally, known static objects (parts of the printer, the Raspberry Pi, etc.) detected as targets by the Walabot, are explicitly filtered out in the Python code.
The calibration is ran, then we can start searching for targets.
The Walabot Gesture Control by default start idle and in order to activate itself it needs a steady target(your hand) for 5 seconds. This allows keeping the feature enabled and doing other stuff in the front of the printer in the same time.
When activated, your target's initial position and the printer'saxes initial position are stored.
When the target moves, the target's (your hand)relative movement in X, Y, Z directions is translated to the move in the printer's X, Z and Y axes. In order to move the axes the G1 GCode command is sent with the new X, Y and Z coordinates.
The gesture control can be deactivated by holding your hand steady for an another 5 seconds.
More about RepRap based printers and the Marlin FirmwareMost of the DIY 3D printers are based on the RepRap design, which uses Arduino Mega 2560 based hardware.
Some of the printers have the electronics (heater control, stepper drivers, etc.) on a separate shield connected to the Arduino Mega 2560, like:
while other printers, like my Tevo Tarantula, have all this integrated in a single board:
Both the hardware and the software are open source. There are multiple firmware-s available for the board. I'm using the Marlinfirmware:
Enjoy!


_copy_P5AWOdT4dX.png?auto=compress%2Cformat&w=48&h=48&fit=fill&bg=ffffff)


Comments
Please log in or sign up to comment.