Valuable objects, like art in museums or various equipment from public spaces need to protected from theft. This is traditionally done by dedicated security personnel.
In this project I will show an Internet Connected Anti Theft Device that can be used as an alternative, or in complement for security personnel.
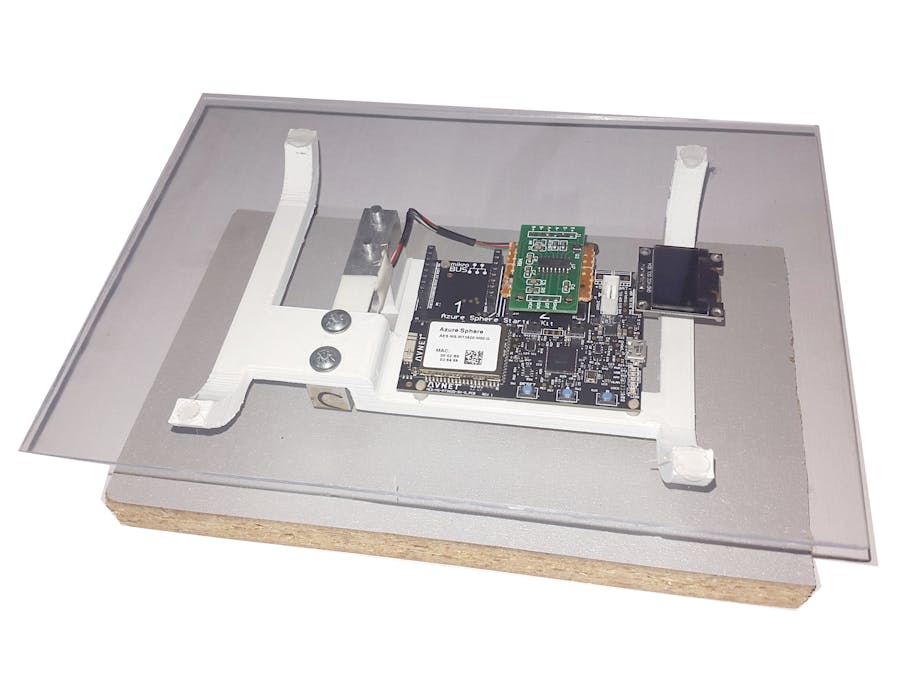
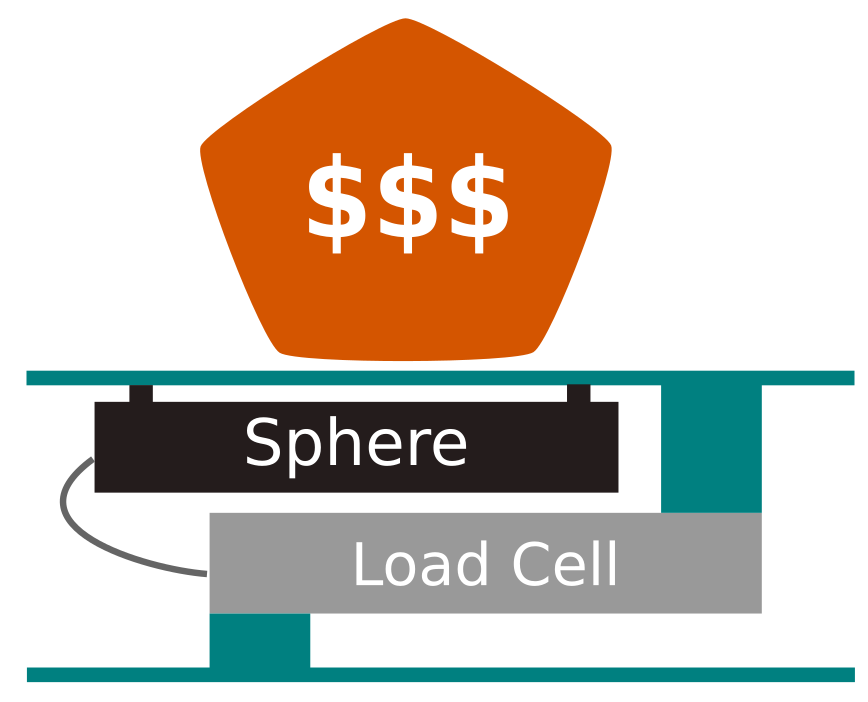
The device is like a stand, but the top plate is mounted on a load cell. This way the weight placed on the stand can be monitored with high precision, and any change can be quickly detected.
In addition to the weight sensor, secondary sensors like an accelerometer and optical sensor can be used to detect vibration or other suspicious activity.
The proof of concept device I built is based on the Avnet's Azure Sphere MT3620 Starter Kit, and uses a 3 Kg Load Cell as its main sensor, and as well the built in accelerometer of the Sphere Kit:
The device is internet connected, and can be easily monitored remotely trough an Azure Central IoT application. Automatic rules are used detect theft and take action.
The innovative security infrastructure provided by the Azure Sphere platform the device software can not be tampered.
2. Azure SphereAzure Sphere is Microsoft's secured, high-level application platform for Internet of Things solutions.
It consist's of 3 main parts:
- a secure Azure Sphere MCU micro-controller unit (MCU) - right now the MediaTek MT3620 is supported
- the Azure Sphere OS, a Linux-based operating system maintained by Microsoft
- the cloud based Azure Sphere Security Service (AS3)
Currently there are 3 official development kits that we can use to experiment with the Azure Sphere platform:
All of these are based on the MediaTek MT3620 MCU which was designed by MediaTek in collaboration with Microsoft.
The MCU has the following main features:
- 1 x ARM Cortex A7 core for high-level applications
- 2 x ARM Cortex M4 cores for real-time control
- Wifi Subsystem with dual band, 2.4 + 5 GHz, support
- I/O: 76 x GPIO, 12 x PWM, 5 x I2C / SPI / UART, 8 x 12-bit ADC, etc
Standard MCU stuff. Nothing too interesting so far.. :)
What makes the MT3260 interesting is the Microsoft Pluton Security Subsystem built in it, which features:
- a dedicated own M4F processor
- a true random number generator
- accelerators for different cryptographic tasks (SHA, AES, EEC)
- two EEC private/public key-pairs generated in-chip during the manufacturing
Pluton also implements a secure boot system with remote attestation. This means the authenticity of the loaded boot image (OS + application) is verified with the Azure Sphere Security Service (AS3). If the loaded image is valid / up to date, the AS3 issues short living client certificates (~1 day validity) for the device, which then can be used to connect to other online services. If the loaded image in not valid / up to date, a client certificate is not issued, forcing the devices to do an update.
In this project we will use the Avnet MT3620 Starter Kit, a development kit based Azure Sphere module AES-MS-MT3620-M-G:
To get started with the Avnet Azure Sphere MT3620 Starter Kit we will need the following thinks:
- a PC running Windows 10 (Anniversary Update or later)
- Visual Studio 2017 (Community edition works)
Now we need to download and install the Azure Sphere SDK for Visual Studio Preview software:
This will install the drivers and tools that are necessary to communicate with the Azure Sphere module.
> Claiming the DeviceAfter this we can follow the steps from from the Azure Sphere Documentation's Getting Started page.
To use Azure Sphere, we will need a Azure Active Directory Work / School Account. This can be created from the Azure Portal from the Azure Active Directory / Users section.The newly created account should look something like:
The next step is to claim you device. This will permanently link your device to the account we created previously (!), locking the access to the device to your tenant. To claim a device the following commands should be executed from a Azure Sphere Developer Command Prompt
### Sign in to Azure Sphere with previously created account
$ azsphere login

### Create a new Azure Sphere tenant
$ azsphere tenant create --name sphere

### Claim you device
$ azsphere device claimNow we can configure a Wifi network to be used by the Sphere module. From a Azure Sphere Developer Command Prompt execute the following commands:
### Add a new Wifi network
$ azsphere device wifi add --ssid <Wifi_SSID> --key <Wifi_Password>

### Check that the Sphere module is connected to the Wifi network
$ azsphere device wifi show-statusThe last thing we can do is to update the Azure Sphere OS of the device:
### Check if any update are available:
$ azsphere device show-ota-status

### Download and install the update:
$ azsphere device recoverAfter this we can try to build and run the Blink application:
- To be able to run / debug applications from an IDE like Visual Studio, we need to enable debugging in the Azure Sphere device.This is done by executing the following command from an Azure Sphere Developer Command Prompt:
### Enable debugging
$ azsphere device prep-debug- We can also enable debugging for the RT Core applications:
### Enable debugging
$ azsphere device prep-debug --enablertcoredebuggingThen, from Visual Studio we can create new project using the Azure Sphere Blink template:
If we run the project using the Remote GDB Debugger, the user LED of the Azure Sphere Starter Kit should start blinking.
> On-board Sensors, OLED DisplayNext we can follow two Azure Sphere Started-Kit tutorials created by Avnet employees:
- Avnet's Azure Sphere Starter-Kit (Out of Box Demo), a 3 part series by Brian Willess
- Avnet Azure Sphere Starter-Kit: Advanced Tutorial by Peter Fenn
The first tutorial presents the Azure Sphere Starter Kit Reference Design. The Part 1 covers the following functionality:
- read the on-board sensors, and print the readings in the Visual Studio's debug console (part 1)
The GitHub repository for this tutorial is: Avnet/AvnetAzureSphereStarterKitReferenceDesign
The second tutorial is partially based on the first one, adds the following extra functionality:
- display several information an 128x64 pixel OLED Display
- add a Cortex-M4 (real-time) application
- control a MiroE Relay Click board
- add more functionality to the IoT Central application
The GitHub repository for this second tutorial is: CloudConnectKits/Azure_Sphere_SK_ADC_RTApp
We can learn multiple things from these tutorials, and also as they are licensed under MIT, we can use their code base as the starting point of new projects.
Real Time and High Level Applications
As I previously mentioned, the MT3620 SoC includes:
- an ARM Cortex-A7 core - this runs the Linux based Sphere OS and also can run high level applications,
- two ARM Cortex-M4F cores - these can be used to perform tasks with real-time requirements
- the cores can communicate with each-other
The code repository for the advanced tutorial includes two Visual Studio projects: one for the A7 application core and one for the M4F real-time core. It also shows how the two cores can communicate.
> Cloud ConnectivityThe 2nd and 3rd parts of the tutorial covers the following functionality:
- configure an IoT Hub, upload the sensor data, manipulate the device twin, visualize data in Time Series Insight (part 2)
- configure an IoT Central application with custom visualization and control (part 3)
IoT Hubs
IoT Hubs are one of the IoT solutions available in the Azure Cloud.
To use the tutorial application with the IoT Hubs, the first step is to create an IoT hub from the Azure Portal:
Then we need to add a new device:
and copy the Primary Connection String from its configuration:
The connection string need to placed in the connection_strings.h.
Now, if we run the application in IoT Hub application mode:
// If your application is going to connect straight to a IoT Hub, then enable this define.
#define IOT_HUB_APPLICATION
we should be able to see the Device Twin updated with our sensor data
IoT Central
An another option is to run the in IoT Central application mode
// If your application is going to connect to an IoT Central Application, then enable this define.  When
// enabled Device Twin JSON updates will conform to what IoT Central expects to confirm Device Twin settings
#define IOT_CENTRAL_APPLICATION
IoT Central is an another IoT solution available in the the Azure Cloud, which enables creating ready to use IoT based cloud applications easily, without writing too much code.
I will explain a little bit later how to do this, in the Azure IoT Central Application section.
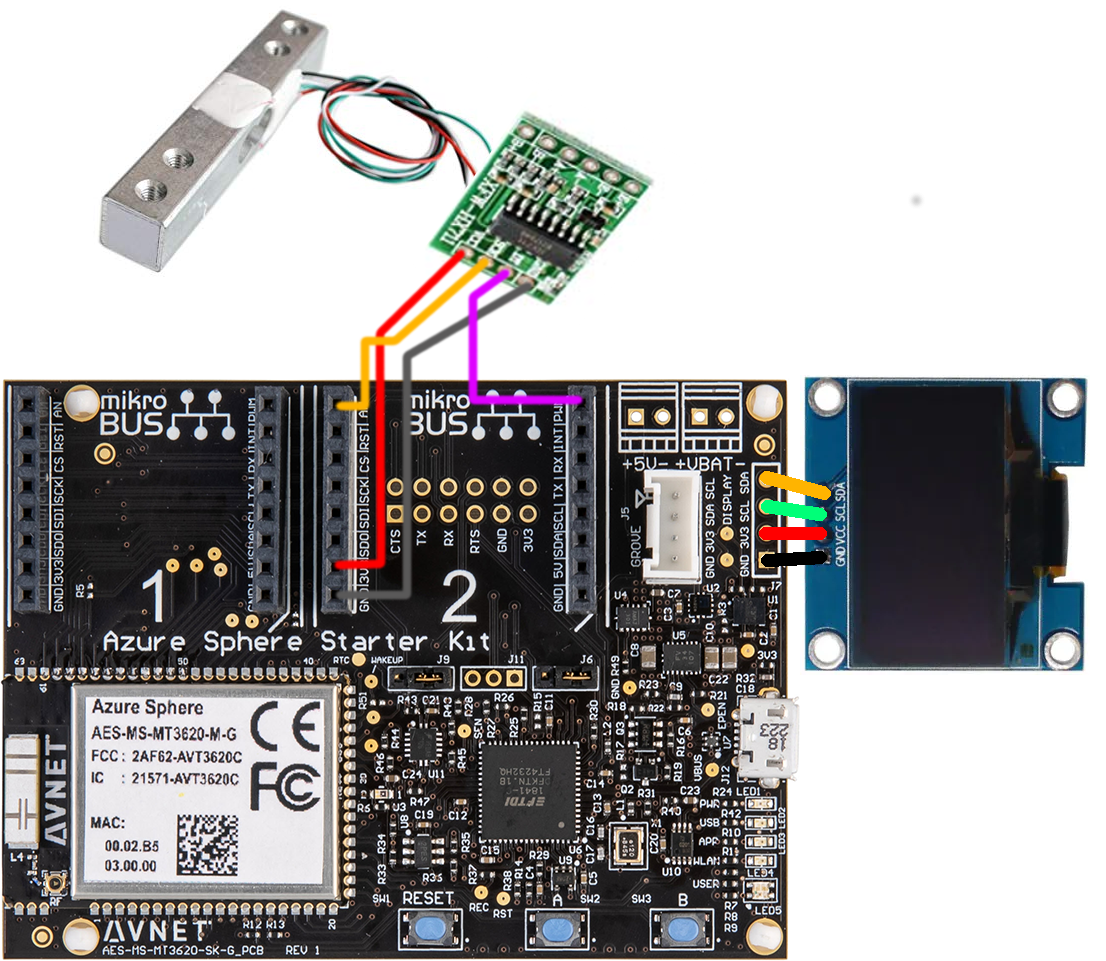
5. HardwareThe device is build with with the following electronic components:
- an Azure Sphere MT3620 Starter Kit
- a 3 Kg Load Cell connected to a HX711 24-bit ADC
- a DIY Click adapter for the HX711
The hardware part was modeled in FreeCAD, and it consists of the following parts:
- a base made from a piece of scrap low-density fiber board
- a 3D printed part that connects the load cell to the base
- a 3D printed part mounted on the load cell. This supports both the top plthe Sphere started kit
- a top plate made from 2mm acrylic glass
- 2 x M5 and 2 x M4 screws
As everything was modeled in 3D, the assembly went pretty easily:
As a base for the software running on Azure Sphere Kit I used the code base of the Avnet Azure Sphere Starter-Kit: Advanced Tutorial by Peter Fenn.
The software running of the Azure Sphere Kit has two parts:
- a high level application running on the A7 application processor
- a real time capable application running on one of the M4 processors
The applications on the two cores connected using inter-core communication.
The main idea would that timing sensitive tasks, like sensor handling, to be run the M4 real-time cores. Then, a high-level application responsible for tasks like cloud connectivity can be run on the A7 application processor.
> A7 High Level ApplicationThe high level application running on the A7 application processors is responsible with:
- reading the HX711 + load cell sensor
- reading values from the accelerometer
- handling the OLED display
- handling the buttons / LED
- cloud communication with the Azure IoT Central
- inter-core communication with the M4 cores
The code parts responsible to send data to Azure IoT Central, and the one that displays data on the OLED screen, were updated to include the data from newly added HX711 Load Cell data.
> HX711 DriverThe project uses the HX711 chip, a 24-bit ADC to measure the small voltages generated load cell sensor.
As there was no readily available C driver with support for the MT3260, I decided to port an existing Arduino HX711 library: https://github.com/bogde/HX711
The step involved in migrating the library from Arduino to work with the MT3620 were:
- migrated the code from C++ to C
- migrated the GPIO part to use the MT3620 GPIO libraries
The HX711 turned out to be a little bit timing sensitive. I had some trouble till I got it work with the A7 High Level code. The clock for the HX711 need to be provided externally, and the GPIO operations on the A7 were a little bit slow (3-7 us). With some unnecessary code the clock period exceeded 60us and the HX711 went to sleep mode.
For this reason I decided to try offload the HX711 driver code to the one of the M4 Real Time capable cores of the MT3260. The sensor data is then transmitted using inter-core communication between the A7 and M4 cores of the MT3260 MCU.
Note: the code for the real-time app part is done, but I did not managed to test it yet. The Azure Sphere SDK on my PC got corrupted, and did not managed to fix it yet.
7. Azure IoT Central ApplicationThe UI of the project is done using Azure IoT Central.
To get started with Azure IoT Cental, we first need to go to apps.azureiotcentral.com and create a new application.
> Device TemplateThe first thing to do is define the measurements for the fields we send form the device.
These are the following:
- weight measured by the load cell
- X, Y, Z acceleration (G force)
- X, Y, Z angular rate
Next we can add our device:
and create a connection for it:
Having this we can generate a connection string using the dps-keygen utility:
$ dps-keygen -si:<scopeID> -di:<deviceID> -dk:<privateKey>

Azure IoT DPS Symetric Key Generator v0.3.3
Connection String:

HostName=iotc-2e2dxxxx-xxxx-xxxx-xxxxxxxxxxxxxxx.azure-devices.net;DeviceId=xxxxxxx-xxxx-xxxx-xxxx-xxxxxxxxxxxx;SharedAccessKey=xxxxxxxxxxxxxxxxxxxxxxxxxxxxxxxxxxxxxxxxxxx=
The resulting connection string need to be placed in the connection_strings.h file.
After this the device should be able to send data to the Azure cloud and we should be able to visualize it:
We can also configure dashboards, like the bellow one
Azure IoT central also allows to define different rules with action assigned to them.
For example we can create rules to detect things like:
- the weight measured by the load cell falls (someone took our valuable object)
- the vibration is higher then usual
Bellow is an example for a rule the sends an email if the vibrations get two high:
Note: normally I would have configured this as a weight based rule, but at that point the HX711 driver code was not yet fully functional. Unfortunately, today (on 30th November) the Azure Sphere SDK on my PC got somehow corrupted, and did not managed to fix it yet. For this reason the above and some other screenshots may be out of date.
8. Future WorkThere are many ideas / areas this project could be improved. Some of the ones I plan to do are:
- migrate the handling of the MEMS and other sensors to the ARM M4 real time cores
- implement real time interrupt based vibration detection
- experiment with automated device provisioning
An other interesting topic would be to deep dive in to the security infrastructure provided by the Azure Sphere platform, and see how exactly each components works.
9. ResourcesThe source code, 3D model / CAD files, and other resources of the project can be found in the linked GitHub repository.
Check out my submission to the Sensing the World Challenge on Element14: Azure Sphere based Secure IoT Air Quality Sensing Station
Here are some useful articles about Azure Sphere:
- Get started with Azure Sphere by Microsoft
- Azure Sphere Documentation by Microsoft
- Avnet's Azure Sphere Starter-Kit (Out of Box Demo) Part 1,Part 2,Part 3 by Brian Willess
- Avnet Azure Sphere Starter-Kit: Advanced Tutorial by Peter Fenn
- MediaTek MT3620 Product Brief by MediaTek
- The Hardware Security Platform Behind Azure Sphere by Microsoft
- Provisioning devices with Azure IoT Hub Device Provisioning Service by Microsoft
- Anatomy of a secured MCU by Microsoft
- Microsoft trademarks Pluton, their IoT security subsystem for Azure Sphere by @mspoweruser
- Securing the Billions of Devices Around Us by Dr. Galen Hunt, Microsoft
One of the contest requirements was to register our Azure Sphere Kits for 30 (or 15) consecutive days in the Avnet Contest App.
Now, this 30 consecutive days requirement can bit a little bit tricky. Especially summer, if you are going to vacation and you don't want to bring a laptop with you, or simply you are going to a remote place with no internet.
My solution to this problem was to automate the process using Macro Toolworks, Windows Task Scheduler and some shell scripts. It works as follows:
- I opened the Starter Kit Registration application manually and completed all the input fields
- the Azure Sphere Started Kit is connected to an USB port
- using Windows Task Scheduler, a task is scheduled to run twice each day. The task wakes up the PC and executions a set of actions:
- the Azure Sphere Service is restarted, as it sometimes becomes unresponsive after the computer wakes up from sleep
- a Macro Toolworks script in ran. The script simulates mouse movement and click. It executes the following actions:
- the Read Device button is clicked, so the application will connect the the Azure Sphere module and reads its state
- after some wait, the Send to Server button is clicked. The confirmation dialog will appear
- a shell script that takes screenshot is executed. The screenshot is saved in a folder with automatic sync to Google Drive
- the OK button pressed
- after this, the Macro Toolsworks script exists and the computer goes again to sleep
The process worked for about 42 consecutive days, till 14 September when I think there was some problem with the contest registration servers and the application got stuck. I decided to stop the process then.
However, the Azure Sphere Started Kit was kept powered from USB for over 2 months, and still works without any problems.
Enjoy ! :)


_3u05Tpwasz.png?auto=compress%2Cformat&w=40&h=40&fit=fillmax&bg=fff&dpr=2)

Comments
Please log in or sign up to comment.