ere are many flight controllers available for multi-rotor aircraft, but most of them allows only manual radio controlled flight. Others allow some sort of automation, like creating flight plans with a path of predefined GPS locations, but the are not designed to be used by truly autonomous artificial intelligence controlled drones.
My idea is to design a powerful, flexible and easy-to-use flight controller that is also smart enough to protect the drone. The flight controller will use a flexible software with powerful features the can be easily used by the drone's artificial intelligence software. The flight controller will also ensure the safety of the drone, preventing the drone to be crashed by buggy higher level code. (more details about idea can be found here)
This is an experimental project, a proof of concept implementing the idea.
The project is implemented using the Kinetis Freedom FRDM-K82F board. The Kinetis MK82FN256VLL15 MCU is the brain of the flight controller. The FXOS8700CQ accelerometer and magnetometer from the board and a FXAS21002C gyroscope from a FRDM-STBC-AGM01 board is used to stabilize the drone. FlexTimer-s are used to read/write the PWM inputs and outputs. The accelerometer, magnetometer, gyroscope, GPS and barometer sensors are connected through FlexIO based I2C and SPI interfaces.
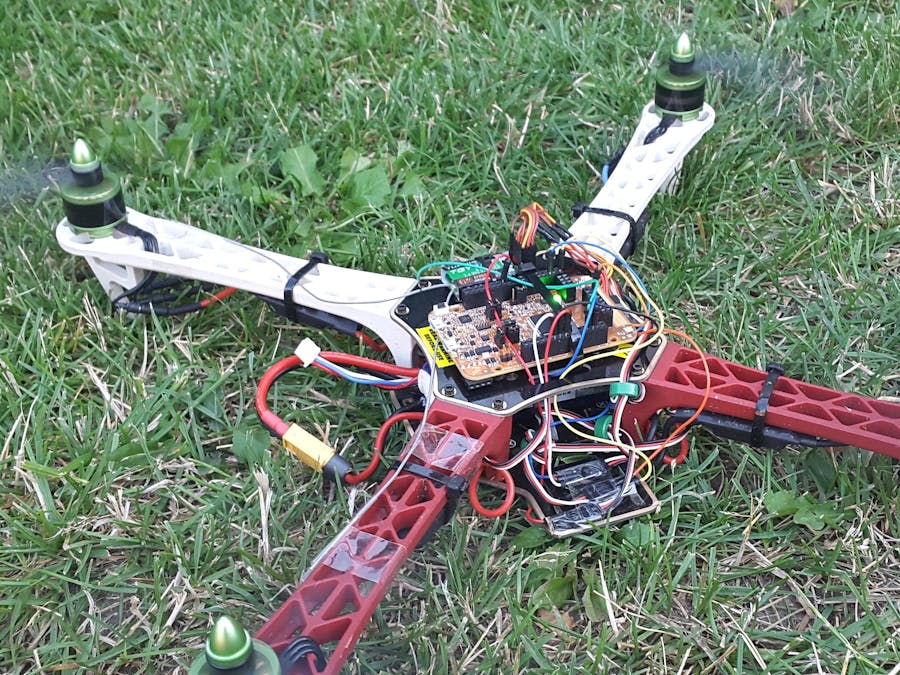
For the project, I used my existing quad-copter: I removed the controller board and replaced it with the Kinetis Freedom FRDM-K82F board.
The components are the following:
- Kinetis FRDM-K82F used as the flight controller
- a receiver used for safety inputs
- 4 motors (2 with CW blades and 2 with CCW blades)
- 4 ESC controlling the motors based on the input from Kinetis FRDM-K82F
- a 3S, 2300mAh LiPo battery
- the frame
The safety in drone development is crucial. We have motors and blades rotating at high speed, a LiPo battery and furthermore the whole thing can crash or fly away if gets out of control. It's obvious that we need some mechanism to keep our drone under control.
For this I used two inputs from my radio transmitter (a Turnigy TGY-i6):
- Switch B - used as kill/safety switch
- Throttle Stick - used to limit the maximum throttle that our controller is allowed to use
Reading the input signals
On the receiver side, the outputs are 50Hz PWM signals. The pulse width is in the 1-2ms range and is directly proportional to the position of the sticks / switches on the transmitter.
The Kinetis MK82FN256VLL15 MCU from the FRDM-K82F board has four FlexTimer (FTM) modules built in. These timers can be used both for measuring and generating PWM signals.
To measure the pulse width of the input signals we can use the dual-edge capture feature of the FlexTimer. The input is connected to a pair of channels (2 channels from a total of 8), used to detect the rising and falling edges of the signal. The timer's count is read and stored in internal registers at the two edges. The difference of the values will give the pulse width in "timer counts". (Note: from the system clock frequency and the pre-scale setting, the exact time duration can be calculated too, but it's easier to find out experimentally what are the minimum and maximum values of the signal)
We can configure the FTM module to generate interrupts when the two edges of the pulses are detected. On the falling edge we can read the counter values from the channel registers and we can calculate the pulse width from them.
We also need to detect when the signal is lost / missing. This can be done enabling the timer overflow interrupt for the FTM. As the overflow can occur between the two edges of the pulse too, we can consider the signal lost after two consecutive overflows.
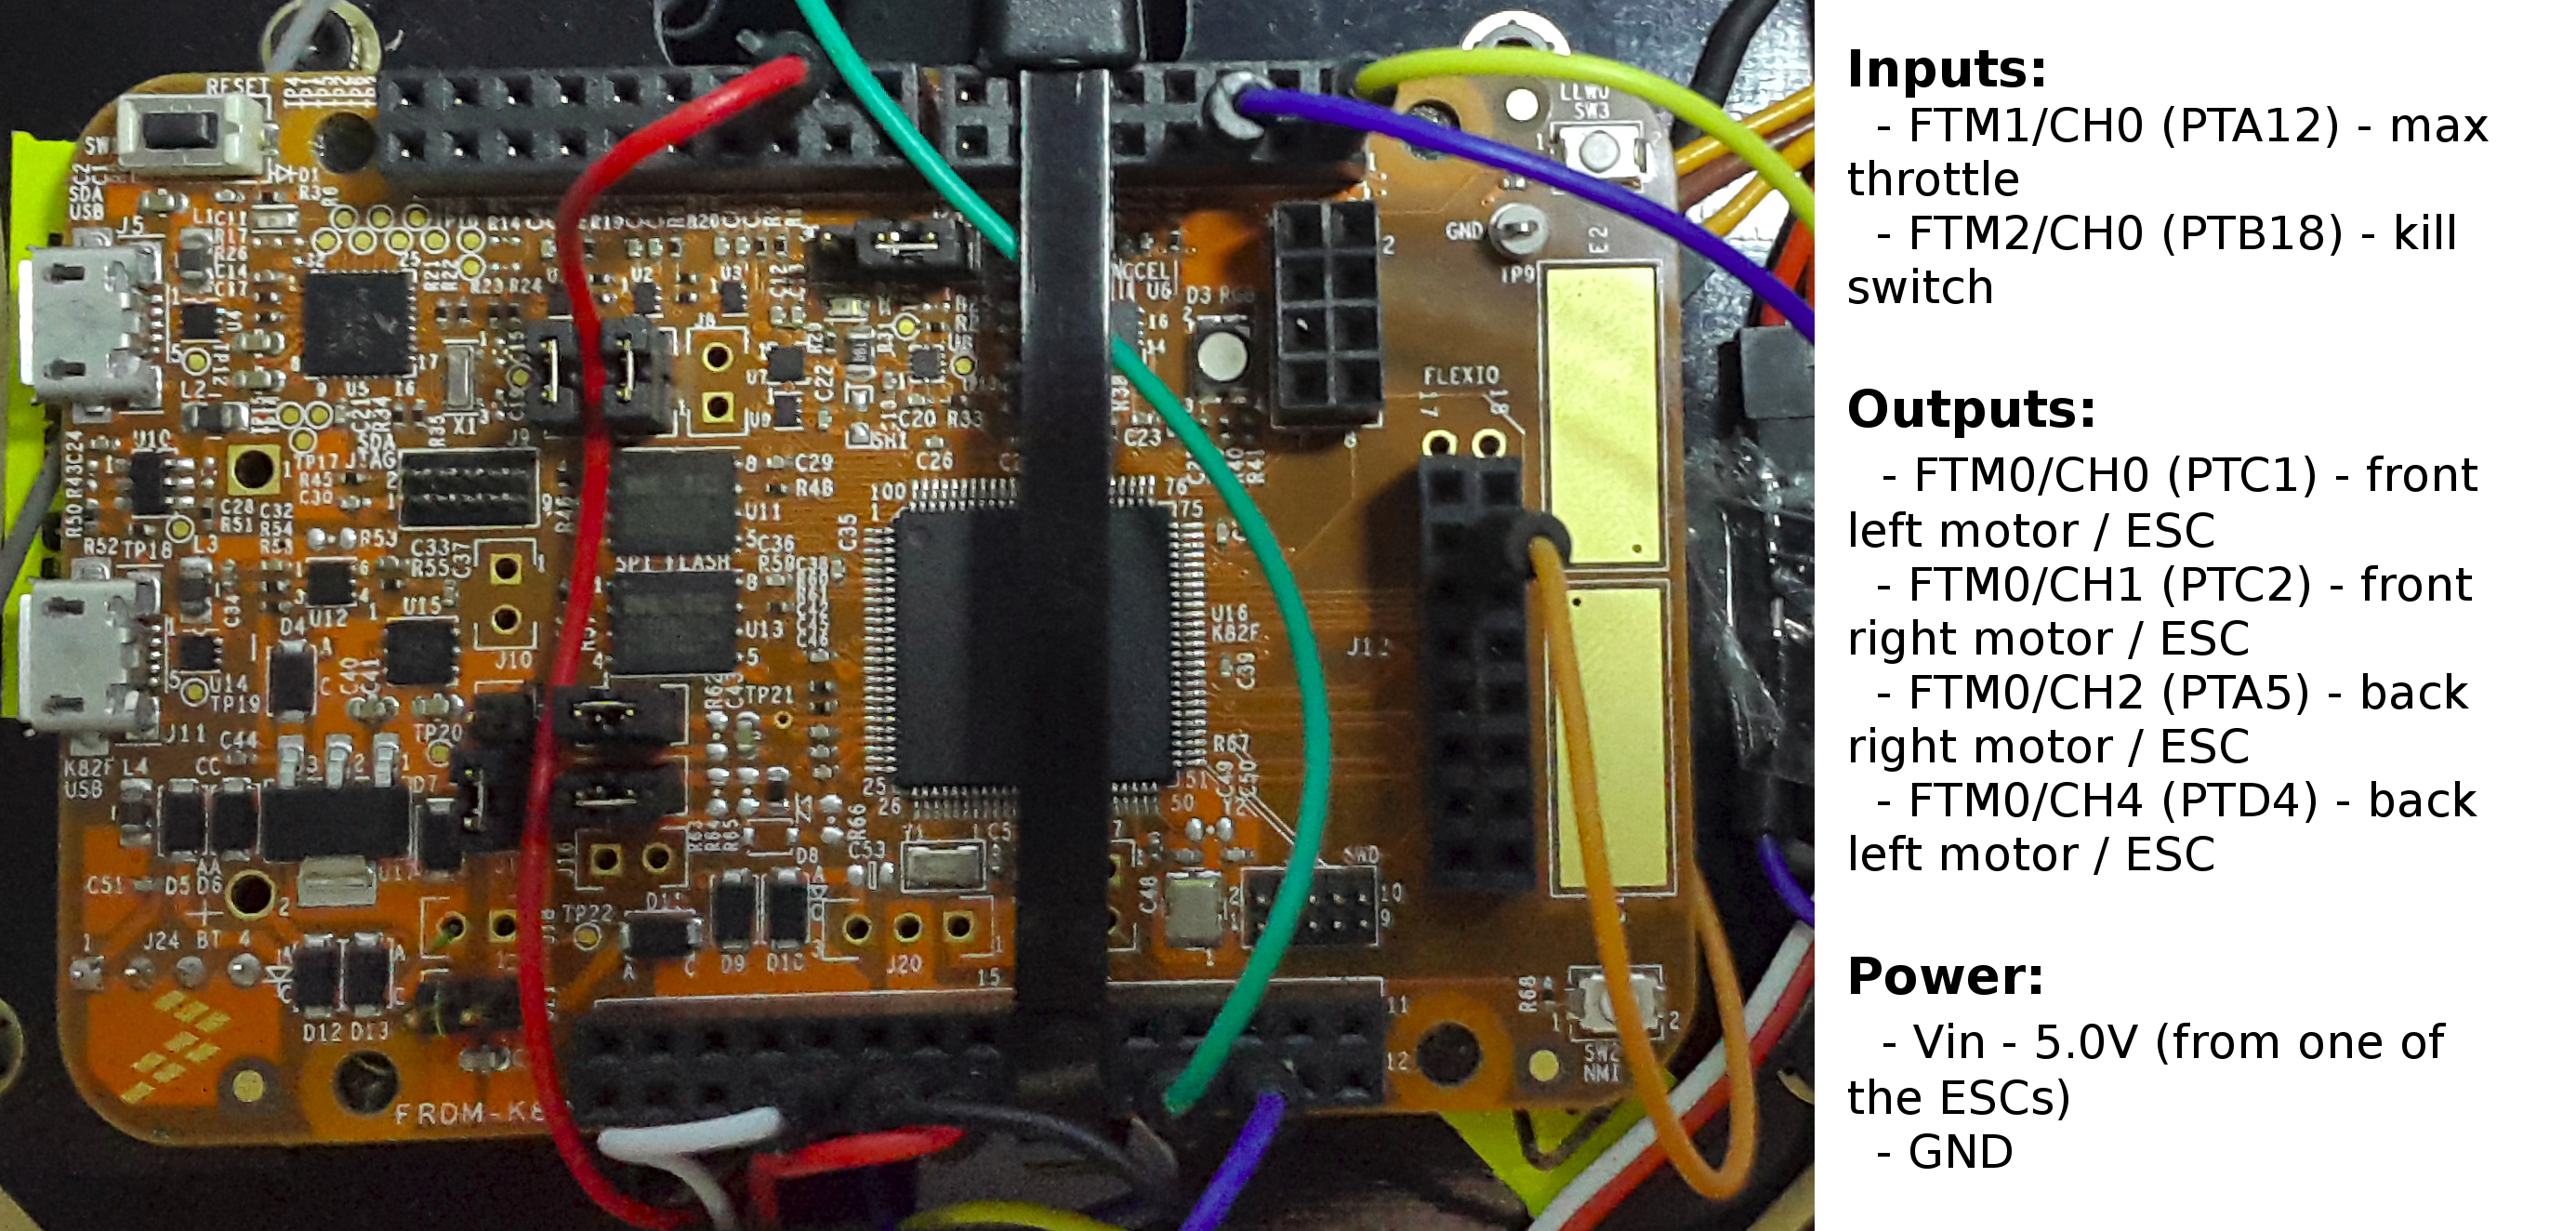
I used FTM1 and FTM2 modules to measure the two inputs. (Note: I used two separate FlexTimer modules because of availability of the FTM channels on the board pins. FTM0 has 5 pin available so I decided to use it for the motor outputs, FTM3 is used drive the RGB led. FTM1 and FTM2 both have only one of the even channels (channel 0) needed available, so I used them.)
Generating the motor outputsThe four brushless motors are controlled by ESCs (Electronic Speed Controller). The inputs needed by them are similar to the RC input signals: a PWM with pulse width in the 1-2ms range. The frequency can go as high as 500Hz (2.5 ms period). I used 400Hz because it's allows a smooth motor control and also has an idle time of 0.5 ms at full throttle.
The PWM signals can be easily generated with a FlexTimer module. I used the FTM0 from the MCU for this purpose.
Setting up the PWM is just as easy as in the SDK examples. Generating a PWM with constantly changing duty cycle is not as trivial. As our PWM frequency is relatively low (400Hz), if we would call FTM_SetSoftwareTrigger after each FTM_UpdatePwmDutycycle call we would get nothing but a smooth PWM signal. This happens because FTM_SetSoftwareTrigger basically resets the PWM signal, so calling it often will constantly reset our PWM signal.
The solution is to update the duty cycle using FTM_UpdatePwmDutycycle, but call the FTM_SetSoftwareTrigger only at the end of the PWM periods. This can be done by enabling the overflow interrupt, and calling FTM_SetSoftwareTrigger in the interrupt handler.
Tip: DO NOT print messages in the debug console from code inside any interrupt handler. Writing into the debug console is a blocking operation, so the code in the interrupt handler will take longer to execute. This can delay the handling of other interrupts, which can lead to all kind of weird behaviour. For example, I ended up all kind of strange errors PWM signal, like this:
Testing the motor output
Testing the PWM output directly on motors with blades mounted it's not the best idea, so first used a breadboard and I connected the PWM output to some LED:
After I ensured that the safety functions (the kill switch and the max throttle input) are working properly, I tested motor outputs one-by-one.
The principles of controlling a drone are simple:
- there are 4 motor with blades generating thrust - 2 of them rotates clockwise, 2 counter clockwise
- when the drone is hovering the throttle is applied equally on all the motors
- to move drone, we need tilt it around one of it's axes (picth, roll or yaw) - this is done by changing the distribution of the throttle between the motors
Stabilizing the drone
The problem is that the motors are not built perfectly equally. Their speed will differ a little bit. From this cause just applying the same amount of throttle on the motors isn't enough. The drone will quickly get unstable and will crash.
So we need to measure the roll and the pitch of the drone and adjust the motor speeds in a such way that keeps the drone horizontal.
There are two methods to stabilize the drone:
- simple control based current value of the sensor
- a PID (proportional–integral–derivative) which along the current value of the sensor (P) takes into consideration the past (I) and the possible future values of the sensor
Measuring the pitch and roll angles
To measure the pitch and roll angles we can use the 3-axis accelerometer from the board. We can start from the pre-loaded bubble example, that calculates the rotation around X and Y angles with the following formulas:
		xAngle = (int16_t) floor((double) xData * 0.011);
		yAngle = (int16_t) floor((double) yData * 0.011);
this uses only acceleration data from two axes.
I found a better formula here, that uses the data from all 3-axes:
		yAngle = atan2(yData, zData) * 180/M_PI;
		xAngle = atan2(-xData, sqrt(yData*yData + zData*zData)) * 180/M_PI;
I tested the angle calculation code with flying the drone near the ground while sending the data over a serial connection. I used minicom to dump the incoming data to a file, then I plotted the data in real time in Kst:
Vibrations / Noise
The accelerometer is sensitive to the vibrations, and the spinning motors will generate a lot vibrations.
The data in this form is unusable, so we need to reduce or eliminate the vibrations in some way. We can do this either in software by applying a moving average function or a low pass filter, or by isolating the source of vibrations from the Freedom board.
I used an anti vibration foam like this:
The results was pretty good:
but the problem is that the board does not stays to stable on the foam when the drone start to move.
Gyroscope
I realized that stabilizing the drone just with an accelerometer is pretty hard, if not impossible. Using a gyroscope sensor along with the accelerometer will give much better result.
I will use an FRDM-STBC-AGM01 board with has an FXOS8700CQ accelerometer (the same as on the FRDM-K82F board) and an FXAS21002C gyroscope.
I'm currently waiting for the gyro to arrive.
FlexIO peripheralsThese are not implemented yet, but would be following:
- a gyro sensor connected over I2C or SPI - this would help to make the drone more stable
- I2C or SPI controll interface that will allow the control of the drone from other devices - like a Raspberry Pi 2 for example
- a GPS sensor - an NEO6MV2 is on it's way
- etc.
The project is still in progress. More details will follow...


_ztBMuBhMHo.jpg?auto=compress%2Cformat&w=48&h=48&fit=fill&bg=ffffff)


Comments