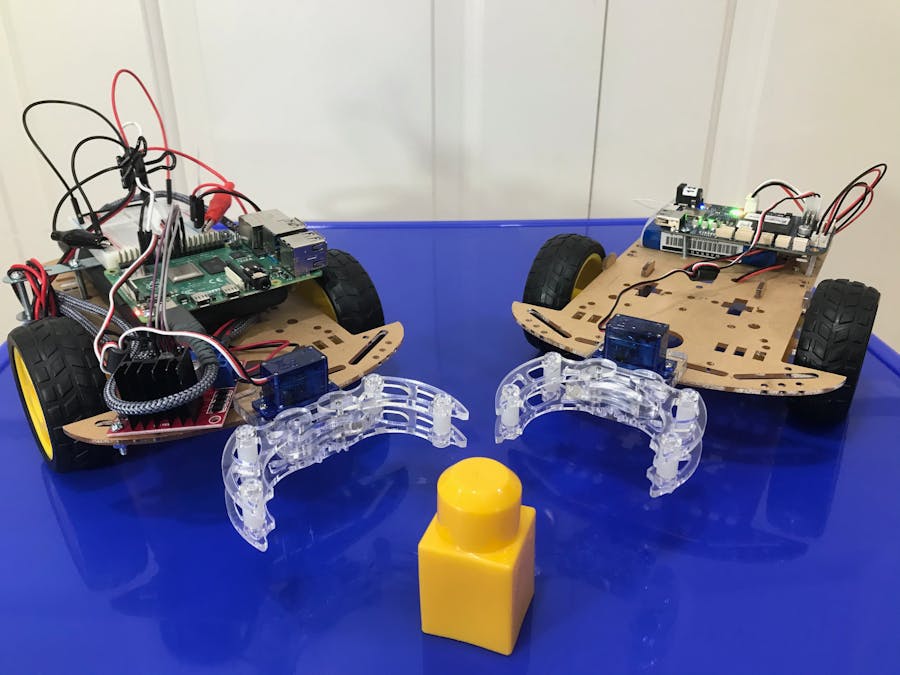
This tutorial shows how to add a claw gripper to a basic (MVP) BluPants robot. If you don't have your basic robot yet, please visit our previous tutorials to get one working:
After adding the claw to your basic robot, you should be able to write code to pick-up, transport and deliver objects with BluPants Studio IDE. The final result should be similar to this:
We have a couple of challenges you can do with your claw bot. Find them at our lessons page. Other than the basic drag and drop coding blocks shown, it also natively supports Python for more advanced students. For more information about BluPants visit www.blupants.com or watch our Intro to BluPants video.
Parts (Claw Robot)For the basic Claw robot, we are going to need the parts bellow:
The Beaglebone does not require any additional jumpers. The Raspberry Pi requires 2 male-to-male (red and black) jumpers, and 1 male-to-female (white) jumper.
Beaglebone Claw RobotAll you need to do, is to connect the servo to the Beaglebone at the servo output number 8 and fix the claw to the chassis. If you pick a different servo output, make sure you also change it in your blupants.json file. Please refer to the "Tuning" section for more details.
Connect the servo as shown in the picture. Make sure you connect the GND (black), VCC (red) and signal (white) to the correct pins so you do not damage your servo:
After connecting the servo, fix the claw to the front of the chassis.
The servo was attached upside down on purpose. For the next tutorial, I will add a HC-SR04 distance sensor to the bot, and the servo "body" will be used to fix the sensor board to it.
And that is it! You have jus finished adding a claw to your Beaglebone MVP robot. You now can use the claw commands from the command blocks or from the BluPants Python module to pick-up and drop objects with your robot.
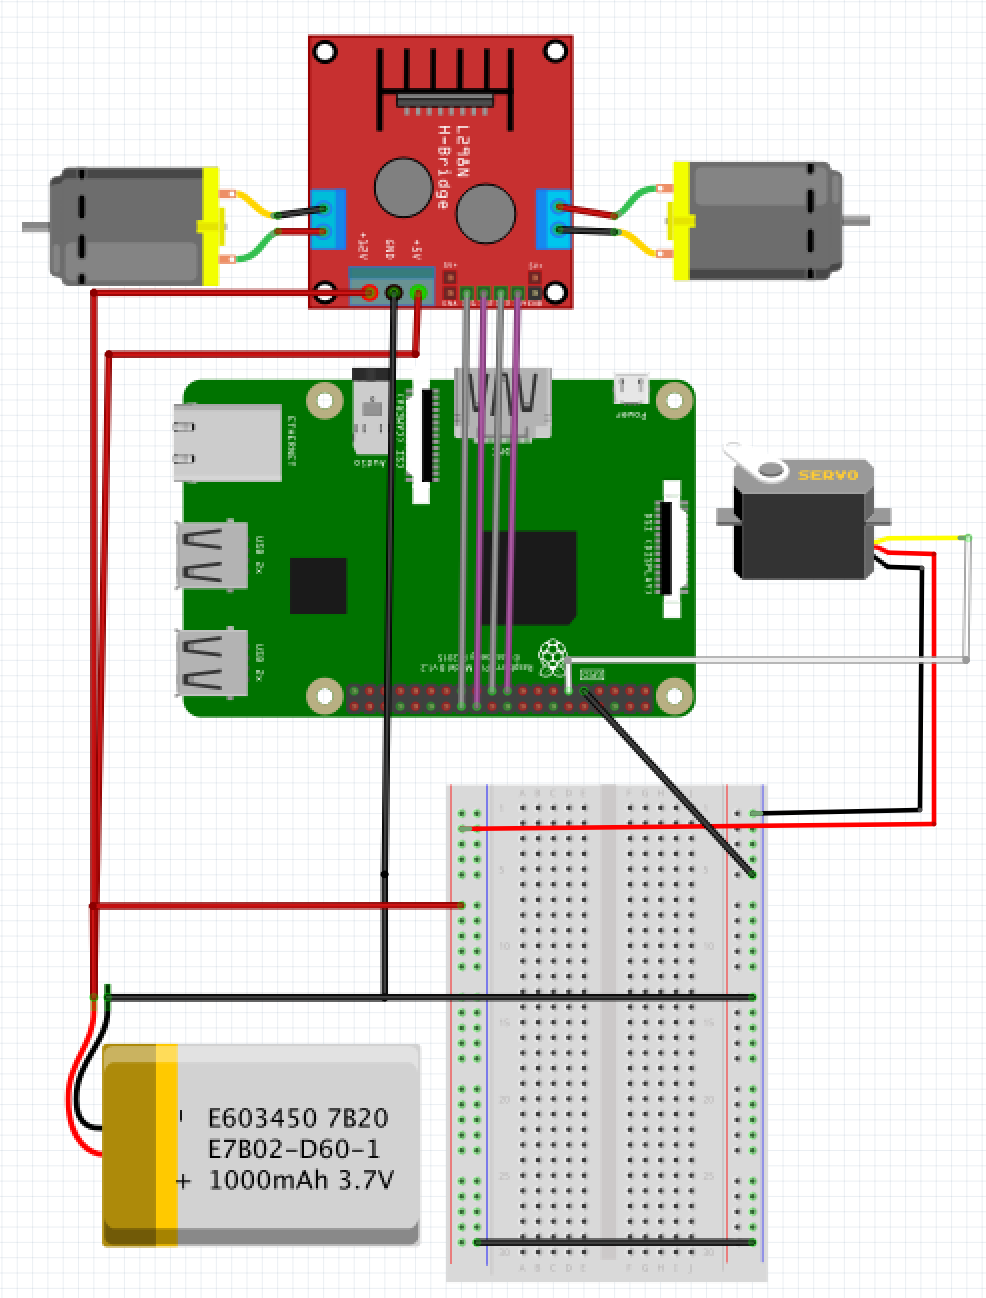
Raspberry Pi Claw RobotYou will need to connect the servo signal wire to the Raspberry Pi GPIO 17, and the GND and VCC to the breadboard. After that, fix the claw to the chassis. If you pick a different GPIO to the signal jumper, make sure you also change it in your blupants.json file. Please refer to the "Tuning" section for more details.
Connect the jumpers to the servo. Try keep the colors standard to avoid mistakes. Notice that the signal jumper (white) is male-to-female:
Connect the VCC (red) jumper to the "+" power rail on the breadboard, and the GND (black) jumper to the "-" rail:
Connect the signal jumper (white) to GPIO 17 on the Raspberry Pi.
After connecting the servo, fix the claw to the front of the chassis.
The servo was attached upside down on purpose. For the next tutorial, I will add a HC-SR04 distance sensor to the bot, and the servo "body" will be used to fix the sensor board to it.
And that is it! You have jus finished adding a claw to your Beaglebone MVP robot. You now can use the claw commands from the command blocks or from the BluPants Python module to pick-up and drop objects with your robot.
Tuning the clawFor tuning and customization, you need to edit the file "/root/blupants.json" on your robot. The blupants.json file will be reloaded every time you click the play button and execute your code.
If you picked a different servo output for your Beaglebone or a different GPIO for the Raspberry Pi, you will need to customize the following settings:
Beaglebone
Servo output 8 is the default value. If you picked a different one, change it here.
"beagleboneblue":
{
  "claw":
  {
    "servo": 8,
  },
}
Raspberry Pi
The array - "servos": [17, 27, 22] -, assign all GPIOs that are assigned for the servos. The first position has the value 17, i.e. GPIO 17. By default, the claw servo is the first one listed on the "servos": [17, 27, 22] array.
"raspberrypi":
{
  "servos": [17, 27, 22],
  "claw":
  {
    "servo": 1,
  },
}
Let's say you want to use GPIO 22 for the claw servo. All you need to do, is to assign the third servo to the claw. You could use the following configuration:
"raspberrypi":
{
  "servos": [17, 27, 22],
  "claw":
  {
    "servo": 3,
  },
}
Or let's say you want to use GPIO 23 for the claw. You would need add it to the array, and change the claw index. For instance:
"raspberrypi":
{
  "servos": [17, 23, 22],
  "claw":
  {
    "servo": 2,
  },
}
Beaglebone and Raspberry Pi
You may also need to change the default setting of your claw to make it open more or to close completely. To change the claw opening or closing angle, you will need to edit the following fields:
"claw":
{
  "angle_open": -60.0,
  "angle_close": 60.0
},Stay tuned for more tutorials, so you can expand your robot even more. Follow us on Twitter to stay tuned with all new releases.
See you next time!


Comments
Please log in or sign up to comment.