


Hardware components | ||||||
 |
| × | 1 | |||
| × | 1 | ||||
 |
| × | 1 | |||
| × | 1 | ||||
Software apps and online services | ||||||
 |
| |||||
| ||||||
| ||||||
| ||||||
The project demonstrates how to build up a BLE-Ethernet Bridge between PSoC 4 BLE and FM4.
OverviewMany of the FM4 series devices (like the S6E2CC family) supports Ethernet but not BLE. Similarly PSoC 4 BLE does not support Ethernet. Hence developing a bridge using them will be very useful when you need to monitor a wireless node using your PC over Ethernet.
Here, PSoC 4 BLE is configured as a server based on a custom profile. It receives a byte (or command) from your connected phone or Dongle. This data is then sent to FM4 over UART and then to PC over Ethernet.
Similarly, the PC can send data over Ethernet to FM4 which then sends this data to PSoC 4 BLE over UART and then to your phone or dongle as notifications.
Requirements- Design Tool: PSoC Creator 4.0 or above, IAR Embedded Workbench for ARM
- Programming Language: C (ARM GCC 4.9-2015-q1-update – included with PSoC Creator), C for IAR
- Associated Devices: PSoC 4 BLE, S6E2CCAJ0A
- Required Hardware: CY8CKIT – 042, FM4-176L-S6E2CC-ETH - ARM® Cortex®-M4 MCU Starter Kit with Ethernet and USB Host
The project can be tested on the CY8CKIT – 042 BLE and FM4-176L-S6E2CC-ETH Kits. Please ensure that both the Kits Operate at 5V Supply.
You need to make UART connections between the two Kits:
- Connect P0[4] of BLE Kit (UART Rx) to Tx Pin (CN9, Pin 7) of FM4 Kit
- Connect P0[5] of BLE Kit (UART Tx) to Rx Pin (CN9, Pin 8) of FM4 Kit
- You also need an Ethernet Cable which can be connected to CN4.
In the PSoC 4 BLE project, we have a BLE component and a UART. BLE is configured as a custom server using custom profile. There are two custom services added, each having one custom characteristic. One characteristic is used to receive the data from the Phone or Dongle and the other characteristic is used to send notification to Phone or Dongle.
The data received from Phone or dongle is sent to FM4 over UART. Similarly, the data received from FM4 over UART (originally over Ethernet) is sent to phone or dongle as notifications.
Here is the PSoC Creator Schematic:
The Ethernet Project which can be downloaded from here is used as the template. This project has been modified to incorporate MFS12 for UART communication.
The task "Task_UartRxRead
" monitors if there is any byte received over UART. If so, the received byte is added to Ethernet Packet. Similarly, the task "Task_Hmi
" monitors, if there is any data from PC over Ethernet. If so, the received data is sent over UART to PSoC 4 BLE. Also, the file s6e2cc_ethernet_lwip_SK-FM4-176L-S6E2CC-v11\thirdparty\lwip-1.4.1\apps\httpserver_raw\fs\index.html
can be modified using any editor to support your required HTML page. If this file is modified, you need to run the makefsdata.exe file and the "fs
" files get updated suitably.
The project is actually huge in terms of code. Hence you either need licensed version of uVision or IAR. I have used IAR for building the project and testing.
Testing1. Build the PSoC 4 BLE project using PSoC Creator and program it to the BLE Kit.
2. Build the Ethernet Project using IAR and program it to the FM4 Kit and execute the code in Run Mode. For more details on programming the Kit, refer to the Kit Guide available here.
3. Make the necessary connections between the two Kits. Also connect the Ethernet cable from your PC to the FM4 Kit.
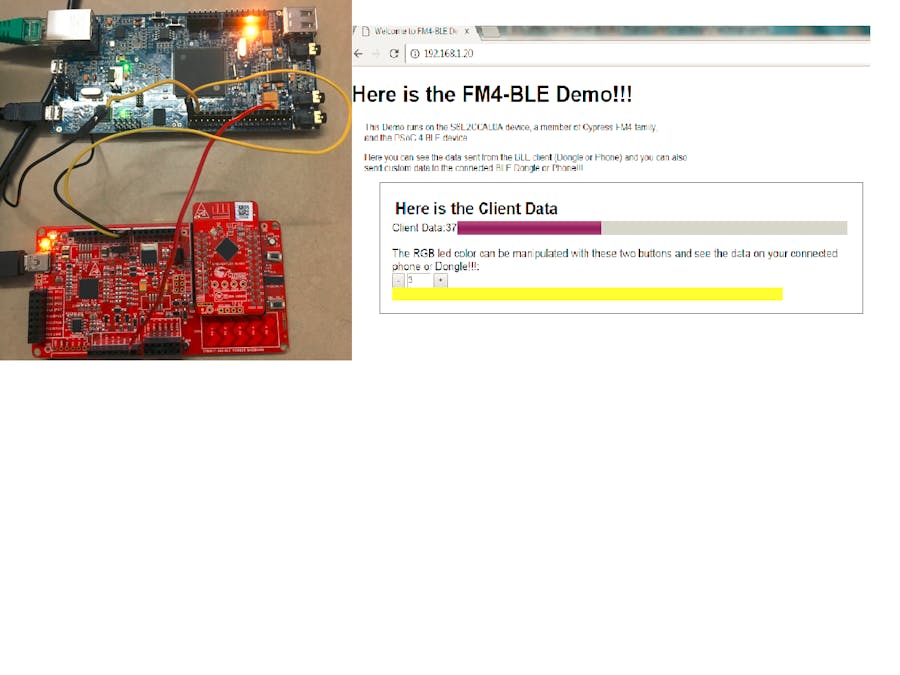
The hardware connections between the two kits look like below:
4. Configure the PC IP address to 192.168.1.1 and Subnet mask to 255.255.255.0
5. Now, open any Web Browser and type: 192.168.1.20
This opens the Web Page:
6. Now, you can use your phone or Dongle to connect to the PSoC 4 BLE device. Here, I have used an iPhone with CySmart installed. Connect to the device "FM4-BLE Ethernet
". You will see two custom services.
Select the first Unknown Service. This uses the characteristic which has both Write and Read Permission.
Using this characteristic, PSoC 4 BLE can receive 1 byte of data. You can send any data using this characteristic. For e.g., I am sending the data 0x25.
Now, check the Website. You can see the data 37 (decimal of 0x25) in the Client Data:
Now, open the second custom service on the Phone and open its custom characteristic. This characteristic has the notify option:
Select the Notify Option for this characteristic.
Now send the data 3 from the PC side (You can use the - and + buttons to send data from 1 to 7). You can see the LED glowing Yellow in the FM4 Kit. Also, you can see the data getting displayed in the characteristic:
Try sending different data from PC and you can see it getting reflected in this characteristic.


Comments
Please log in or sign up to comment.