


Hardware components | ||||||
 |
| × | 2 | |||
| × | 1 | ||||
| × | 1 | ||||
 |
| × | 2 | |||
 |
| × | 1 | |||
 |
| × | 1 | |||
 |
| × | 3 | |||
Software apps and online services | ||||||
| ||||||
| ||||||
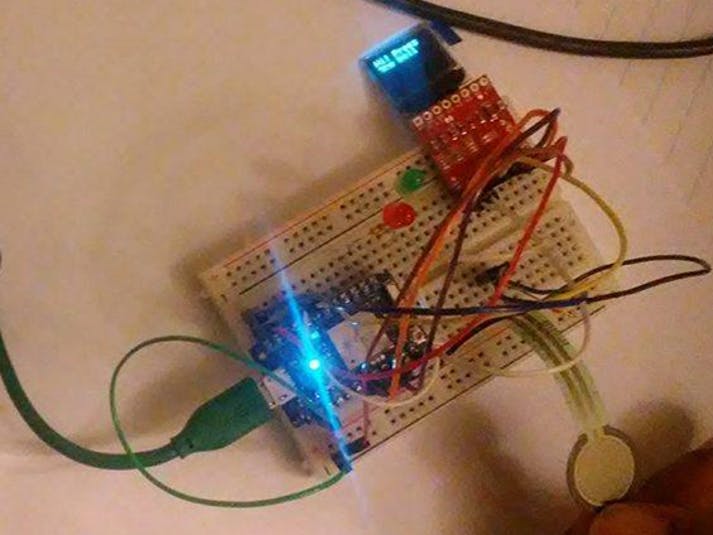
How many of you have missed a package from UPS? This smart bell can just solve your problem. We have a force resistor attached to a photon along with an OLED, placed on the door. Now when ever the force resistor is pressed, it triggers a bell in another photon which is placed inside the house. Moreover, it sends an SMS to the house owner. The house owner can just reply back to the SMS and this would be displayed on the OLED at the door. We are also using LEDs to show different events occurring.
app.js
JavaScriptNodeJS file for SMS sending and receiving using Twilio
Enter your photon's details and also your Twilio account's details
Enter your photon's details and also your Twilio account's details
var express = require('express');
var path = require('path');
var favicon = require('serve-favicon');
var logger = require('morgan');
var cookieParser = require('cookie-parser');
var bodyParser = require('body-parser');

var index = require('./routes/index');
var users = require('./routes/users');

var app = express();

// view engine setup
app.set('views', path.join(__dirname, 'views'));
app.set('view engine', 'ejs');

// uncomment after placing your favicon in /public
//app.use(favicon(path.join(__dirname, 'public', 'favicon.ico')));
app.use(logger('dev'));
app.use(bodyParser.json());
app.use(bodyParser.urlencoded({ extended: false }));
app.use(cookieParser());
app.use(express.static(path.join(__dirname, 'public')));
app.use(bodyParser.urlencoded({extended:false}));

/************************** Twilio configuration ************************/
process.env['TWILIO_ACCOUNT_SID'] = "YOUR_TWILIO_ACCOUNT_SID"
process.env['TWILIO_AUTH_TOKEN'] = "YOUR_TWILIO__AUTH_TOKEN"
process.env['TWILIO_PHONE_NUMBER'] = "YOUR_TWILIO_PHONE_NUMBER"
process.env['CELL_PHONE_NUMBER'] = "OWNER_CELL_PHONE_NUMBER"
var client = require('twilio')(
	process.env.TWILIO_ACCOUNT_SID,
	process.env.TWILIO_AUTH_TOKEN
);
/************************** End of twilio configuration ************************/


/************************** Photon Particle configuration for sending data to particle ************************/

process.env['PARTICLE_ACCESS_TOKEN'] ='YOUR_PARTICLE_ACCESS_TOKEN';
process.env['PARTICLE_DEVICE_ID'] ='YOUR_PARTICLE_DEVICE_ID';

var Particle = require('particle-api-js');
var particle = new Particle();

var Particle = require("particle-api-js");
var particle = new Particle();

var token = process.env.PARTICLE_ACCESS_TOKEN;
var device = process.env.PARTICLE_DEVICE_ID

/**************************End of Photon Particle configuration for sending data to particle ************************/


app.get('/',function(req,res){

	res.send("home page");
});

/** Incase if you want to check the particle function without twilio you can use this route to send data to photon. **/
app.get('/pingsms',function(req,res){
	var msg = req.query.sms;
	particle.callFunction({ deviceId: device, name: 'printTitle', argument: msg, auth: token });
	res.send(msg);
});
//will send the data to photon
app.post('/sendsms',function(req,res){
client.messages.create(
	{
		from: process.env.TWILIO_PHONE_NUMBER,
		to: process.env.CELL_PHONE_NUMBER,
		body: "Someone at the door!"
	},
	function(err,message){
		if(err)
		{
			console.error(err.message);
		}
	}
);

});

app.get('/sendsms',function(req,res){
	console.log("sending message..");

client.messages.create(
	{
		from: process.env.TWILIO_PHONE_NUMBER,
		to: process.env.CELL_PHONE_NUMBER,
		body: "Someone at the door!"
	},
	function(err,message){
		if(err)
		{
			console.error(err.message);
		}
	}
);
console.log("message sent");
res.send('Message sent');
});

app.post('/message',function(req,res){
	console.log(req.body);
	var msgFrom = req.body.From;
	var msgBody = req.body.Body;
	//Calling the particle function and passing the text message from twilio as argument
	particle.callFunction({ deviceId: device, name: 'printTitle', argument: msgBody, auth: token });
	//this message will be sent to the owner's phone
	res.send(`
		<Response>
			<Message>
				Hello ${msgFrom}. You sent: ${msgBody}
			</Message>
		</Response>
	`);

});

app.use('/', index);
app.use('/users', users);

// catch 404 and forward to error handler
app.use(function(req, res, next) {
  var err = new Error('Not Found');
  err.status = 404;
  next(err);
});

// error handler
app.use(function(err, req, res, next) {
  // set locals, only providing error in development
  res.locals.message = err.message;
  res.locals.error = req.app.get('env') === 'development' ? err : {};

  // render the error page
  res.status(err.status || 500);
  res.render('error');
});

module.exports = app;
/******************************************************************************
  Micro-OLED-Shield-Example.ino
  SparkFun Micro OLED Library Hello World Example
  Jim Lindblom @ SparkFun Electronics
  Original Creation Date: June 22, 2015

  This sketch prints a friendly, recognizable logo on the OLED Shield, then
  goes on to demo the Micro OLED library's functionality drawing pixels,
  lines, shapes, and text.

  Hardware Connections:
	This sketch was written specifically for the Photon Micro OLED Shield,
	which does all the wiring for you. If you have a Micro OLED breakout,
	use the following hardware setup:

    MicroOLED ------------- Photon
      GND ------------------- GND
      VDD ------------------- 3.3V (VCC)
    D1/MOSI ----------------- A5 (don't change)
    D0/SCK ------------------ A3 (don't change)
      D2
      D/C ------------------- D6 (can be any digital pin)
      RST ------------------- D7 (can be any digital pin)
      CS  ------------------- A2 (can be any digital pin)

  Development environment specifics:
  	IDE: Particle Build
  	Hardware Platform: Particle Photon
                       SparkFun Photon Micro OLED Shield

  This code is beerware; if you see me (or any other SparkFun
  employee) at the local, and you've found our code helpful,
  please buy us a round!

  Distributed as-is; no warranty is given.
*******************************************************************************/
#include "SparkFunMicroOLED/SparkFunMicroOLED.h"  // Include MicroOLED library
#include "math.h"

//////////////////////////////////
// MicroOLED Object Declaration //
//////////////////////////////////
// Declare a MicroOLED object. If no parameters are supplied, default pins are
// used, which will work for the Photon Micro OLED Shield (RST=D7, DC=D6, CS=A2)
MicroOLED oled;
//MicroOLED oled(MODE_I2C, D7, 0);    // Example I2C declaration RST=D7, DC=LOW (0)

//SYSTEM_MODE(MANUAL);
/* FSR simple testing sketch.

Connect one end of FSR to power, the other end to Analog 0.
Then connect one end of a 10K resistor from Analog 0 to ground

For more information see www.ladyada.net/learn/sensors/fsr.html */

int fsrPin = A0;     // the FSR and 10K pulldown are connected to a0
int fsrReading;     // the analog reading from the FSR resistor divider
int intLED = D0;
int greenLED = D1;
String knock = 0;
String text = "Hi! Press the bell";//Hi! I'm out. Will be back by 10:30 pm";
void setup()
{
    // We'll send debugging information via the Serial monitor
    pinMode(intLED,OUTPUT);
    pinMode(greenLED,OUTPUT);
    Serial.begin(9600);
    oled.begin();    // Initialize the OLED
    oled.clear(ALL); // Clear the display's internal memory
    oled.display();  // Display what's in the buffer (splashscreen)
    randomSeed(analogRead(A0) + analogRead(A1));
    Particle.function("printTitle",printTitle);//Sending SMS from the owner to the photon
}

void loop()
{
    fsrReading = analogRead(fsrPin);
    Serial.print("Analog reading = ");
    Serial.print(fsrReading);     // the raw analog reading
    // We'll have a few threshholds, qualitatively determined
    if (fsrReading < 25) {
        knock="0";
        digitalWrite(intLED,LOW);
        Serial.println(" - No pressure");
    }
    else if (fsrReading  >= 25) {
        knock="1";
        Particle.publish("knock",knock);//IFTTT - buzzing the bell in other photon
        digitalWrite(greenLED,HIGH);
        digitalWrite(intLED,LOW);
        Particle.publish("ProtocolGuestsIncoming",knock);//sending SMS from the photon to the owner
        Serial.println(" - Light touch");
        waiting();
    }
    delay(500);
    printTitle(text);
}

void waiting(){
    text = "Sent an SMS to owner";
    oled.clear(PAGE);     // Clear the screen
    oled.setFontType(0);  // Set font to type 0
    oled.setCursor(0, 0); // Set cursor to top-left
    oled.print(text);
    oled.display();       // Refresh the display
    delay(1500);
    digitalWrite(greenLED,LOW);
    delay(1500);          // Delay a second and repeat

    oled.clear(PAGE);
    text = "Waiting to hear back";
    oled.setCursor(0, 0);
    oled.setFontType(0);
    oled.print(text);
    oled.display();
    delay(5000);
    text = "Hi! Press the bell";
}

void textExamples(String title)
{
    oled.clear(PAGE);     // Clear the screen
    oled.setFontType(0);  // Set font to type 0
    oled.setCursor(0, 0); // Set cursor to top-left
    // Print can be used to print a string to the screen:
    oled.print(title);
    oled.display();       // Refresh the display
    delay(1000);          // Delay a second and repeat
    oled.clear(PAGE);
    oled.setCursor(0, 0);
}

int printTitle(String title)
{
    if(title == "Hi! Press the bell"){
        textExamples(title);
    }else{
        int font = 0;
        int middleX = oled.getLCDWidth() / 2;
        int middleY = oled.getLCDHeight() / 2;
        oled.clear(PAGE);
        oled.setFontType(font);
        oled.setCursor(0, 0);
        digitalWrite(intLED,HIGH);
        oled.print(title);
        oled.display();
        delay(5000);
        text = "Hi! Press the bell";
        title = text;
        digitalWrite(intLED,LOW);
        oled.clear(PAGE);
    }
  return 1;
}


_3u05Tpwasz.png?auto=compress%2Cformat&w=40&h=40&fit=fillmax&bg=fff&dpr=2)

Comments
Please log in or sign up to comment.