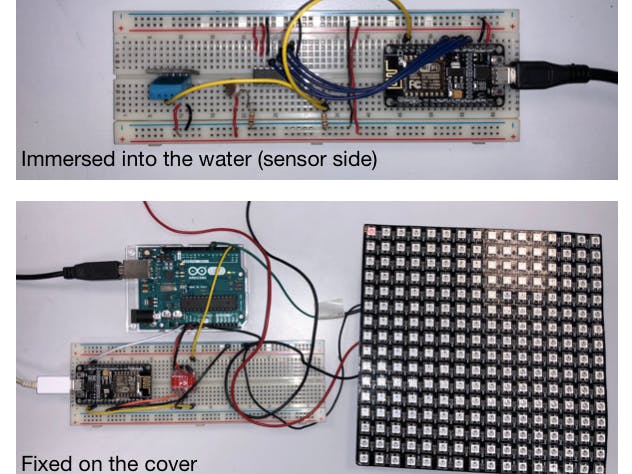
HARDWARE
This project requires minimal hardware components. You will need an ESP8266 development board, like NodeMCU that I'm using here, some sensor module as temperature, ph, salinity or light (depends on what you want to know).
Of course, basics stuff as breadboard, jumper cables and USB wire will be essential to build this thing.
Here is web hosting part where the sensors are connected (you can see that they are only light and temperature sensor. But it's pretty the same with two more sensors). As the ESP8266 proposes only one analog port, you will probably need an ADC (MCP3008 for example in which you can connect 8 analog sensors) depending in the sensors you use. (The SPI protocol of communication between the ESP and the MCP is already managed by MCP3008 library.)
Here is the light part. You can ESP8266 connected to the Arduino uno, and the neopixel LEDs.
LED matrix power supply with a voltage of 5 V and a current of 3A. See photos for editing. An ESP8266 card connected to an arduino UNO card via a voltage booster.
SOFTWARE
Get the sensors parameters
The ESP8266 firmware for this project is developed using Arduino IDE. You need to install the ESP8266 core to enable the Arduino IDE for ESP8266 programming. Instructions can be found here: http://easy-esp.com/getting-started-with-easyesp-1-using-arduino-ide/
You will also need the following Adafruit libraries for reading data from the sensors you'll use.
• ESP8266WiFi.h - For the wifi connection
• MCP3008.h - For the ADC
• TimeLib.h - For the time
• NtpClientLib.h - for the time too
• ESP8266WiFi.h & ESP8266WiFiMulti.h: To set the wifi connection on the ESP
• ESP8266WebServer.h: To communicate with ESP via HTTP requests
• Adafruit_NeoPixel.h & Adafruit_GFX.h & Adafruit_NeoMatrix.h: To order the matrix of neopixels leds
Create a web server
The code for a very basic HTML webpage with sensor output and auto refresh meta tag is include in the attachment. Note that you need to edit the SSID name ans password in the program to match with your WiFi network before uploading it to the NodeMCU board.
After uploading the program to NodeMCU, when the ESP8266 restarts it prints out on the serial monitor the IP adress it's allocated in the local network. In order to access the ESP8266 web server, you need to open a web browser on any computer tablet or smartphone connected to the same WiFi network and type in the URL field and hit enter. On receiving a client request, the ESP8266 serves a webpage containing all the sensor readings, as shown below.
The HTML page is refreshed automatically every 15 second to get the latest sensor readings.
see Sensor_Webserver.ino
gmail/sms alert
In order to get an alert when one of the parameters exceed a certain limit, I used IFTTT, a free web-based service to create chains of simple conditional statements, called applets.
I followed a really well-done tutorial on how to send an sms using ESP8266 and IFTTT. You can easily adapt it to send an e-mail. https://circuitdigest.com/microcontroller-projects/sending-sms-using-esp8266
I also made a function that limit the number of alert that you can receive. Because if something turns bad, you won't like to be harassed...
see Sensor_Webserver.ino
Send command form an ESP to another
The ESP8266 is used as a Web server that receives the commands to command the matrix leds by HTTP_GET requests. The requests come from the Master ESP with its specific IP adress.
The orders to be made are:
- Switch on and off of leds at a given moment
- modulation of the intensity of the LEDs according to the ambient brightness. We recover in the request the type of modulation (increase = 1 and decrease = 0)
Once the orders are received the ESP transmits the action to be made to the Arduino Uno by the serial port.
See wifi_led.ino
Control the luminosity
I decided to switch on the light at 8:00 am and to switch it off at 8:00 pm. So I needed to get the time. I used two libraries (TimeLib.h and NtpClientLib.h available on Arduino IDE).
NTP.getTimeDateString(NTP.getLastNTPSync()) return a string with the time and the date like: 10:00:00 17/03/March. Then I keep only the two-first characters to decide if it's night or day.
This is a very nice and handy way of monitoring the water parameters of our aquarium, as it allows to watch it on our tablets and smartphones that we are carrying all the time.
see Sensor_Webserver.ino
Power the Neopixel LEDs with Arduino uno
We use the Arduino board because it provides sufficient voltage (5V) to control the LED matrix . Depending on the orders received on the serial port, we call the function made for this purpose.
The code is pretty simple. No need to explain how it works.
See Matrix_led.ino
ACKNOWLEDGEMENTThanks to Rui Santos from Random Nerd Tutorials for sharing his DS1820-based temperature web server code.
Also to A. Aswinth Raj for his tutorial on how we can send a sms using ESP8266 and IFTTT.
This project was made with Aminata Diagne and Melaine Siako.


_ztBMuBhMHo.jpg?auto=compress%2Cformat&w=48&h=48&fit=fill&bg=ffffff)


_3u05Tpwasz.png?auto=compress%2Cformat&w=40&h=40&fit=fillmax&bg=fff&dpr=2)
Comments
Please log in or sign up to comment.