

Hardware components | ||||||
| × | 1 | ||||
| × | 1 | ||||
| × | 1 | ||||
| × | 1 | ||||
Software apps and online services | ||||||
 |
| |||||
| ||||||
| ||||||
Hand tools and fabrication machines | ||||||
| ||||||
Introduction
Have you ever considered making your own reflow oven but thought it would be too much work? Maybe you searched the web and even found some reflow oven controllers but with poor documentation and closed-source designs? Or maybe you thought about making one from scratch with an Arduino UNO but soon realized that your bill of materials was growing rapidly and would end up in a tangle of wires? With Reflowduino that's all about to change!
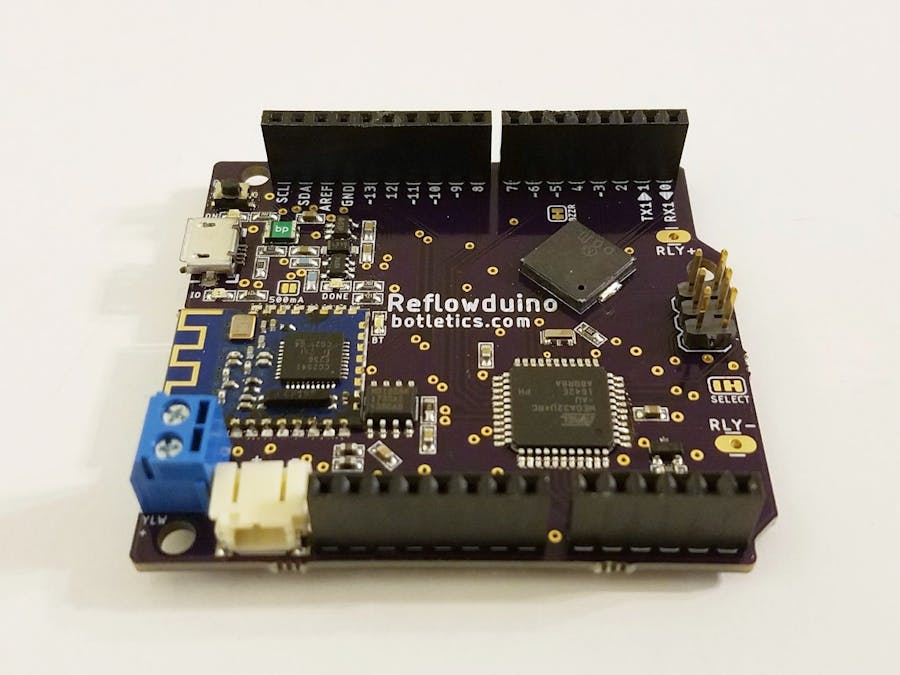
The Reflowduino is a completely open-source, all-in-one Arduino-compatible reflow controller board that can easily transform a toaster oven into a PCB reflow oven! It sports a versatile ATmega32u4 microprocessor with micro USB programming interface, an integrated MAX31855 K-type thermocouple interface with noise filtering, Bluetooth Low Energy (BLE 4.0) for easy communication with a mobile device, LiPo battery charging and status indication, an optional solid-state relay, and a piezo buzzer for playing your favorite theme song. Better yet, I've personally released what I've created as completely open-source for everyone to enjoy, including EAGLE PCB files, Arduino IDE example code, sample Android app for Bluetooth control, and full tutorials on how to modify a toaster oven to start cookin’!
Reflowduino Specs
The Reflowduino is packed with features. Take a look at what the Reflowduino can offer! You can see all design files, example code, demo app, and wiki on the Reflowduino Github page!
Here's a quick summary of each of the Reflowduino's features:
- ATmega32u4: This nifty little microcontroller is the same powerful brains of the well-known Arduino Leonardo with USB-to-serial conversion all handled inside the chip! The board operates at 3.3V, not 5V, so please use level shifters if you are interfacing the Reflowduino with 5V logic!
- Micro USB Connector: A micro USB powers the board, charges a LiPo battery (if it's there), and can also be used to program the board.
- Resettable Fuse: The Reflowduino uses a resettable PTC fuse rated at 750mA to protect your board from drawing more than that amount of current from the USB port! Simply removing the short (assuming this was causing the problem) will "reset" the fuse back to normal!
- Indicator LED's: A green power LED lights up whenever the board is powered (either by micro USB or by a LiPo battery); a blue LED flashes when the Reflowduino isn't connected via Bluetooth and turns solid when a connection is made; and a user-controlled red LED can be used for debugging, or, the in case of the Reflowduino demo code, can be used to indicate whether the reflow process is underway.
- Voltage Regulator: The Reflowduino has a 3.3V/600mA regulator for powering the ATmega32u4, Bluetooth module, and other things that you might want to connect to it!
- Thermocouple Interface: The board includes a MAX31855 thermocouple-to-digital converter chip for reading temperature via a K-type thermocouple (included with any Reflowduino purchase).
- Bluetooth: An HM-11 Bluetooth 4.0 Low Energy (BLE) module allows easy-to-program wireless communication and real-time data transfer between the Reflowduino and a mobile app, eliminating the need for expensive displays that use up a bunch of GPIO pins and eat up space! The Bluetooth can also be used to enable custom functions and user interfaces from the open-source app, allowing for endless possibilities! By default the app shows the real-time thermocouple temperature, graphs the reflow temperature in real time, shows when the reflow process if complete, and saves the data for you to analyze later. These features can be expanded to work with display shields, custom Bluetooth applications for other operating systems, special button functions, and more!
- LiPo Battery Charging: A 2mm JST battery connector and charging circuit allows you to use a standard single-cell 3.7V LiPo battery with a capacity of at least 250mAH. You can either keep the Reflowduino plugged in via micro USB or use a LiPo battery, or both! If both are plugged in, it will automatically use the micro USB power. The charging current is 250mA by default, but you can solder a jumper to set it at 500mA.
- Solid State Relay (Pro version only): The Reflowduino Pro comes with an opto-isolated solid-state relay rated at 25A/240VAC (max specs with convection cooling) or 10A/240VAC (which translates to 20A/120VAC) without active cooling, which is all you should need since your outlet can only supply 15A before tripping (at least in the US). If you get the Reflowduino Basic you will need to purchase your own solid-state relay, but no worries; the board has large, easy-to-solder pads that can be used to wire up the relay without tangling up the rest of your project! The board also has a solder jumper where you can cut the default 3.3V relay control trace and bridge a new trace to the USB voltage (5V) in case your external relay input won't operate at 3.3V.
- Buzzer: A piezo buzzer lets you know when dinner's ready, or you can have it play lullabies!
- Arduino Compatibility: The Reflowduino is fully Arduino-compatible and can be programmed using the Arduino IDE with a simple micro USB connection.
- Pinout and Headers: The Reflowduino uses the familiar Arduino header layout as well as matching 3.2mm mounting holes. The pinouts are labeled similarly to the Arduino Leonardo except for the notable exception of the "VIN" pin, which isn't connected by default on the Reflowduino because the battery is only meant to be plugged in via the battery connector. However, there is a solder jumper to connect this pin to 3.3V which may be convenient for another sensor, etc. Also, the "5V" pin on the Reflowduino is the USB voltage (which should be around 5V).
- Customization: Since the Reflowduino can be used like any other Arduino-compatible development board, you can add shields, sensors, LED's, displays, and more, and Bluetooth makes this especially versatile to interface with your phone or computer. Tinker away and be sure to share your cool projects with everyone!
- Solid-State Sidekick Relay Module: The Sidekick allows you to control almost any appliance simply by plugging in the appliance into the module and attaching the "RLY+" and "RLY-" control wires via the screw terminals. However, for toaster ovens you will need to make sure the knobs are set properly in order to control it without tweaking the wiring!
- Documentation: I'm a huge fan of detailed documentation, so I've prepared a comprehensive wiki and all the resources you'll need: electrical schematics, EAGLE PCB files, example Arduino IDE code, an open-source Android demo app using Thunkable (a free block-based app builder), starter guides for transforming your toaster oven with Reflowduino, and more!
Solid-State Sidekick Specs
The Sidekick is an extremely convenient solid-state relay module that allows you to simply plug in the controlled appliance (toaster oven or hot plate) and secure the Reflowduino's two relay input wires via a screw terminal!
Here are the tech specs:
- Relay control voltage: 3-15VDC, perfect for any 3.3V or 5V microcontrollers! (Note: the Sidekick uses the same relay that is on the Reflowduino Pro). A screw terminal allows for easy and secure connection of the two control wires.
- Output rating: 25A/240VAC (max spec with convection cooling), 10A/240VAC typical, or 20A/120VAC (good for any home appliance in the USA).
- Module power: Accepts a standard C13 power cord (included with purchase) that plugs in to the matching C14 connected on-board while the other end plugs directly into a wall outlet. The device connects the ground pin for safety.
- Appliance power: There is a standard NEMA outlet for the controlled appliance. The appliance is only switched on when the relay is activated and when the power switch is on.
- Power switch: The module has a power switch that shuts off or enables the whole shebang.
Control Options
There are a few options based on how much customization you need for your reflow controller project:
- Reflowduino Basic + Solid-State Sidekick: Easiest/safest control method
- Reflowduino Basic: Does not come with a relay (choose your own)
- Reflowduino Pro: Comes with a solid-state relay already mounted
- Update: Now there's also the option to use an ESP32 with a new Reflowduino32 add-on module! You will also need the Sidekick for this option. Check Github for the latest documentation!
The first option is by far the easiest and safest method to control your toaster oven or hot plate. Since the Sidekick takes care of all the mains wiring, all you have to do is plug in the appliance and attach the Reflowduino's "RLY+" and "RLY-" wires to the Sidekick and you're good to go!
The second option is great if you want to choose your own relay and is the most cost-effective method if you choose this type of relay which you can get for even cheaper on eBay. Just make sure the relay control voltage is low enough! All you need to do is wire the "RLY+" and "RLY-" pads on the Reflowduino to the relay's input and wire the relay's output terminals in series with the live wire of the appliance (more info in the next section).
The last option is ideal if you like the solid-state relay on-board and would also like to wire it yourself. This could be particularly useful if you want your system to compact to fit it inside the toaster oven and retrofit it with your own displays and controls!
General Control Scheme
Regardless of whether are using a Reflowduino Basic, Reflowduino Pro, or the Sidekick, the control principle is the same: The appliance's live wire is switched by a solid-state relay that is controlled by a microcontroller (Reflowduino in this case). In the case of the Sidekick the mains wiring is already taken care of on the circuit board so that you don't have to mess with it yourself. However, if you went with the second or third option in the previous section you will have to pay attention to the wiring!
Photo credit: Toaster oven photo provided by Hamilton Beach
As seen in the diagrams above, the appliance is being controlled externally. This means that you don't even have to open the appliance and tweak the wiring at all but you will have to set the knobs to the proper positions, as illustrated in the next section. However, if you do want to customize it and retrofit it with your own controls, read how I did mine on the Reflowduino Github wiki.
Hot Plate/Toaster Oven Knobs
As stated in the previous section, the knobs of your appliance need to be in the proper position for external control. If the knobs aren't in the right positions the appliance could turn off so even though the relay is activated (connecting the live wire), the appliance won't be on!
If you plan on using a hot plate, pick one that only has a single knob for temperature control. This will make it extremely easy to control because you won't even have to open it up and "hack" it! All you need to do is max out the temperature knob so that when you plug it in the wall it's always on! From there the solid-state relay will control the appliance on or off externally (from the hot plate's power cord).
This principle is exactly the same when applied to toaster ovens, although they're slightly more complicated (but not much!) Toaster ovens typically have three knobs: one for temperature control, one for a cooking setting (toast, broil, warm, bake, etc.), and another for the timer. What you will need to do is three things:
- Max out the temperature setting. The knob controls a mechanical contact that is moved closer or farther away from another contact to control when the oven is on or off using the principle of thermal expansion of the contacts.
- Set it to "Bake" so that both heating elements will turn on for best results. Other settings will turn on only the top filament, the bottom one, etc.
- Crank the timer knob to max it out when you're about to start reflowing! This activates and keeps the oven on.
Quick Note on Toaster Ovens
Toaster ovens come in many varieties, but generally they all come with a metal grill, a cooking tray, and usually a drip tray. Here's my $20 toaster oven from Walmart:
For reflowing PCB's it's very important that you have a flat pan to ensure an even thermal distribution. Some people out there simply place their PCB's directly on the metal grill, which is a horrible idea because the metal wicks away the heat and some components might reflow much later than others! Dave Jones from EEVblog actually shows this happening in this video.
At first I started sweating because I noticed that the cooking tray that came with my toaster oven was far from flat in the middle but then I noticed that the drip tray was not only flat but also very thin, which means it has minimal thermal mass and therefore heats up and cools relatively quickly!
Software Setup
To use the Reflowduino, all you need to do is
- Follow these instructions to get Arduino IDE set up
- Follow these instructions to get the Android demo app installed
- Follow these instructions to see how the Reflowduino demo works!
Reflow Setup
Using a Reflowduino Pro and the wiring diagram shown previously I wired up my toaster oven with alligator clips. (NOTE: this was a test only! Alligator clips are prone to shifting around if not used properly and may not be safe. Take proper safety precautions at all times!) The toaster oven in this test was tweaked to bypass the knobs internally, but you don't need to if you're using the Sidekick, as long as you set the knobs properly. For this test I connected the Reflowduino to a small laptop to power the board and to collect real-time data in Excel, as discussed here. However, you can simply power the Reflowduino with a LiPo battery.
Here are a couple of videos that show this setup in operation:
Reflow Results
I put my toaster oven to the test with a real board I wanted to reflow, and here were the results using lead-free, no-clean, low-temperature solder paste:
As you can see, the results were quite satisfactory!
- If you liked this project, please share and give it a thumbs up!
- If you would to order a Reflowduino or Sidekick Relay Module please visit my website!
- If you replicate this project, please share your results and any tips others might find useful!
- If you have any questions, comments or concerns, don't hesitate to ask or share them!


Comments