Auto Luminosity is just the beginning of a lighting project that I am working on. This project is using the Qualcomm Dragonboard 410c running Windows 10 IoT Core, an android app to handle managing different lights and rooms, and a couple smart bulbs from Lifx. As the project progresses, throughout multiple projects, you'll see new hardware used and new software written.
The goal of this project is to make it easier to setup schedules for my lights, like have them turn off or on at a certain time or being able to just turn on the lights before walking into the house; things like that. This phase of the project will handle just that, with additional lighting features, like dimming, color changes, and additional integration for other bulbs coming in the later projects.
Before we can jump into the project though we do have some setup we need to take care of in order to have this project function correctly. You'll need to have Lifx bulbs and an account (sorry, additional bulb integration as well as DIY smart bulbs will be coming in later projects. This is mainly to show a proof of concept.)
Assuming that's all good, next you'll need to generate your own Access Token! This is pretty straightforward, all you have to do is go to https://cloud.lifx.com/settings and then click on "Generate New Token".
Next you'll want to give it a meaningful label and click "Generate":
Then you should have your Access Token, but be careful and make sure you save that token somewhere safe because once you refresh or leave the page you will NOT be able to see your token again and you'll have to end up generating a new one.
Now we're ready to move on to the actual project!
Actual ProjectSo jumping into the project, here are the parts that it's split into:
- Web service
- Windows 10 IoT app (universal app)
- Android app
Web ServiceThe web service is a REST service to be easily consumed by any platform, you can pass Json objects and most responses are in Json too.
It's hosted on Azure, but of course you can host on any other hosting provider, like maybe AWS :)
I recommend downloading Visual Studio 2015 Community if you would like to reuse or modify the service in this project:
https://www.visualstudio.com/en-us/products/visual-studio-community-vs.aspx
For your convenience, the web service is hosted and publicly available in order for you to get up and going to try out the project, pretty please don't abuse it. Url is within the Android and Windows IoT apps.
Android AppThe Android app. This project has some basic registration code to setup a user account and Lifx integration for importing your lights and groups (which we'll turn into rooms), which you can tie to the account.
The very first time you load up the android app you should see something like this.
You can continue and register an account and then login into the app.
Once you've registered and successfully logged in you should see something similar to the following next screen. Previous projects would just dump you on a blank activity, thought of trying something else so its a little more interesting from previous apps I've done here.
So we still need to set a crucial piece, integration with Lifx (you can of course modify the code to integrate with other smart light bulbs like the Phillips Hue). Let's go into Settings, you should see this screen:
Tap on Lifx, and we can get going with integration. You'll see a couple settings options, one to add in your access token from Lifx and another to import your lights from Lifx's API. Tap on Access Token and let's add that token you generated earlier.
Based on the Access Token, this could probably be very annoying to have to type in, feel free to modify the code and hard code your token in the app settings :)
After your Access Token is in, tap on Import from Lifx, and if all goes well you should a successful toast message. Good news, you should only have to do this once or about as often as you add in new bulbs. So now if you go back to the Main Activity of the app and navigate to Lights, should, hopefully, see your list of light bulbs from Lifx.
And if you have any groups setup in Lifx, you should be able to go to Rooms and see the list of groups you have from Lifx. I decided to convert the naming of Group (from Lifx) to Rooms (this project). I thought Rooms made more sense, but I suppose it's all about how you use the features.
So you've just about made it through the hardest part of the project, good job! Now let's checkout adding a Schedule and additional features we can now use. Below I have selected My Room, when you select a room you'll see the list of lights that are part of that room.
Tap on Add Schedule and we can add some schedules to My Room. Also you'll notice that you can also toggle the room lights, much like the Lifx app.
Adding a Schedule is pretty simple, just select your action (more actions available in future projects) and the time you want that action to occur.
Tap save and you should have a success toast message. Once you've added your schedules, you can navigate back to the Main Activity and go to Schedules and see a list of all the schedules you have created so far.
You'll be able to see what action will happen, to which light bulb or room and at what time; some basic details to get an idea of the schedule. Of course, you tap into one of the schedules and remove the schedule if you no longer want it.
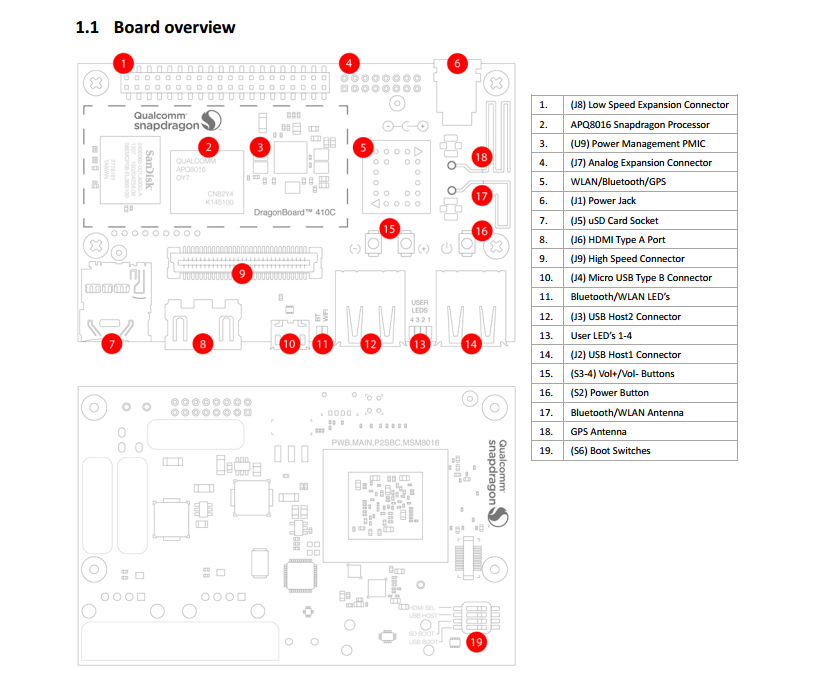
Phew! That's enough for the Android app, Now to the super awesome Qualcomm Dragonboard 410c, seriously it's a pretty awesome little board.
Dragonboard Things to KnowBefore we go into the Dragonboard and setting up the Windows IoT app, we should probably go through some things to know about the Dragonboard and some minor setup.
First thing to know, you'll need to pick up your own power supply as the board itself does not seem to come with one. I recommend a 2A 12V power supply, especially if you want to hook up any peripherals like a mouse and keyboard.
You can find a recommended power supply over at Arrow:
https://www.arrow.com/en/products/wm24p-12-a-ql/autec-power-systems
Next you may want to check out the Tools and Resources for the Dragonboard if you have not:
https://developer.qualcomm.com/hardware/dragonboard-410c/tools
Before moving on to the IoT app, I recommend checking out Microsoft's samples and documentation for Windows 10 Iot Core and get familiar with deploying code on your own Dragonboard 410c. Getting started: http://ms-iot.github.io/content/en-US/GetStarted.htm and Steps to setup: http://ms-iot.github.io/content/en-US/win10/DB410c.htm.
Windows IoT AppNow you're ready for the IoT app! Hopefully you managed to get Visual Studio 2015 installed from the Web Service section, it'll come in handy here as we need to deploy the IoT app to the Dragonboard and also modify some of the code to work with your user account. (Optionally you can check out my Relox project for an example on setting up a UI with a login screen so you don't have to hard code any data).
Go to the AppSettings class and change the UserId value to your own. You can get this from making the REST call to LoginUser through something like Postman to make the call. Just post a json payload like this to http://autoluminosityservice.cloudapp.net/AutoLuminosityService/Login:
{
"Email": "you@email.com",
"Password": "yourPassword"
}
And your return should be a User Json object with your UserId included.
Once you've deployed the app, you should be ready to go and now those schedules that you had setup earlier will get executed when the time comes. Below is the snip of code that will be running your schedules.
And that's it! Hopefully you're enjoying the project as much as I have been. Here's a quick demo of it in action:
Additional InfoSomething to mention, if you would like to have the IoT app run as the default app, so you don't have to redeploy every time you turn on the board then you can do so from the board's web portal.
Just select the AutoLuminosity app and click Set Default and that should be it.
And for more info on Lifx and their APIs here's a useful link on their selectors:
http://api.developer.lifx.com/v1/docs/selectors and some calls http://api.developer.lifx.com/docs/list-lights. You can also test out your Access Token there too and get a feel for how it all works.
There may be a small issue regarding the date and time of the Dragonboard, the fix is fairly easy. Using Powershell you can set the date and time to your local time. Here is a some info on how to use Powershell with Windows IoT Core
http://ms-iot.github.io/content/en-US/win10/samples/PowerShell.htm and then use the set-date "10/3/2015 2:00PM" command to set to the appropriate time.
I hope you enjoyed this project and have fun making your own, and look out for a series of projects that will add on this one.


Comments
Please log in or sign up to comment.