bruno_opaiva
Published © GPL3+

Door lock system with Arduino and RFID Module!

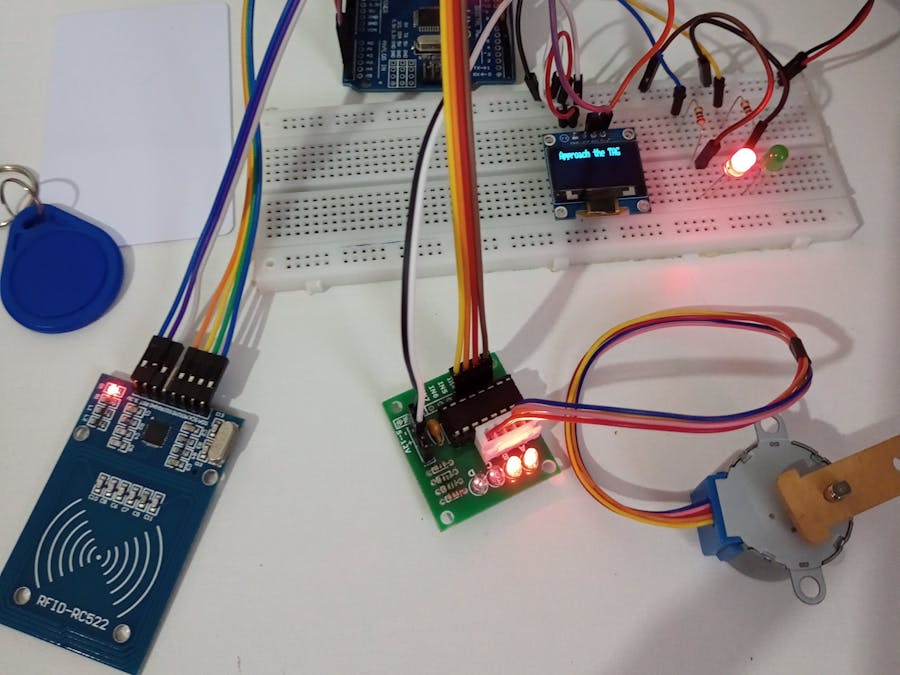
Hey! This project shows how to make a door lock system, using Arduino, RFID Module, OLED Display and Stepper Motor.

IntermediateFull instructions provided4,749
Door lock system with Arduino and RFID Module!

Things used in this project

Hardware components

Arduino UNO
Arduino UNO
Arduino Nano works too!
×1
USB-A to B Cable
USB-A to B Cable
To upload the sketch.
×1
RFID Module (Generic)
RFID RC522 Module.
×1
RFID Tags-Card and Coin
Tags to use with RFID Module.
×1
Gravity I2C OLED-2864 Display
DFRobot Gravity I2C OLED-2864 Display
OLED Display. 4 pins.
×1
28BYJ-28 Stepper Motor 5v
The lock.
×1
ULN2003 Stepper Motor Driver Module
Driver.
×1
5 mm LED: Red
5 mm LED: Red
×1
5 mm LED: Green
5 mm LED: Green
×1
Resistor 220 ohm
Resistor 220 ohm
Resistor for LEDs.
×2
Male/Female Jumper Wires
Connections for Modules.
×20
Jumper wires (generic)
Connections for protoboard.
×12
Solderless Breadboard Full Size
Connections for the OLED Display and LEDs.
×1

Software apps and online services

Arduino IDE
Arduino IDE

Story

Read more

Schematics

Schematics

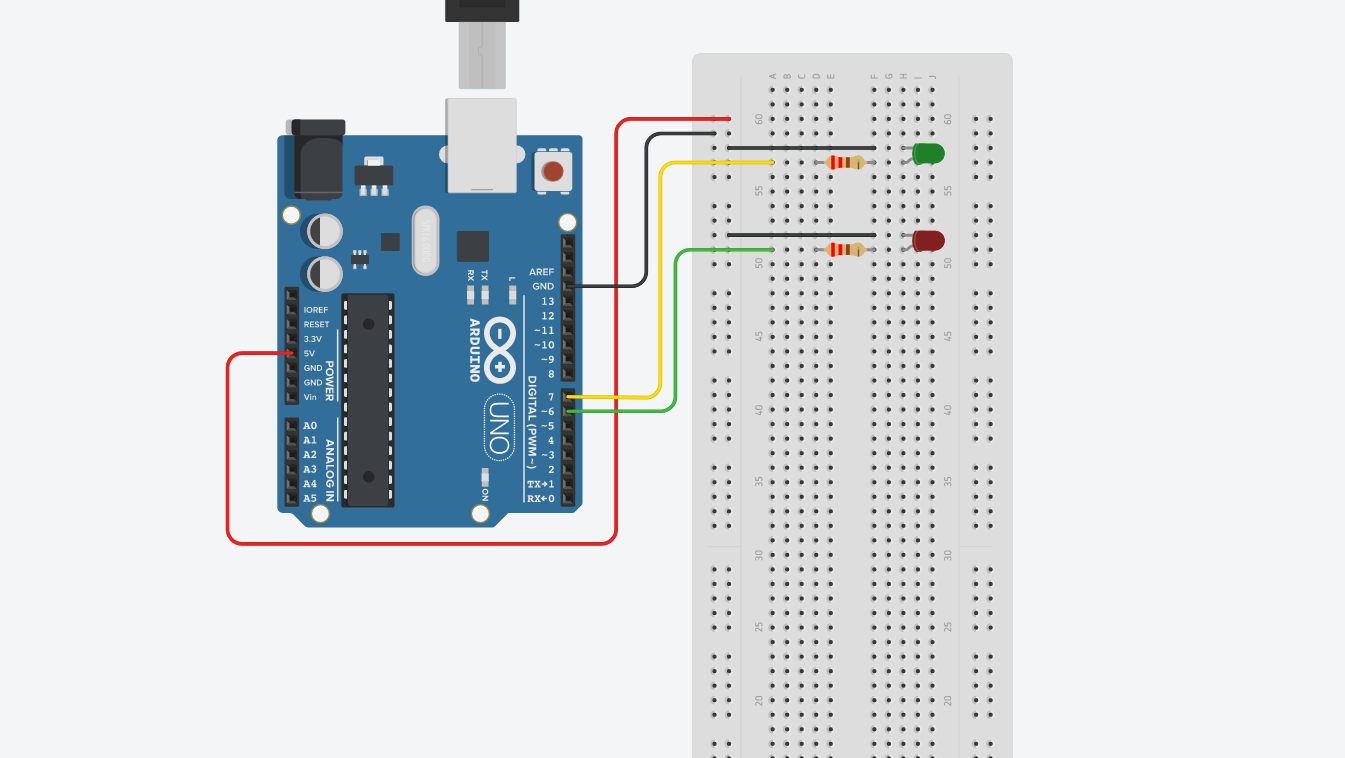
Nothing Here, Check all the steps. Here is only the led connection to arduino

Code

Test code (use this to get the TAG's code)

C/C++
Sketch to get your TAG's code
#define SS_PIN 10 
#define RST_PIN 9
 
MFRC522 rfid(SS_PIN, RST_PIN); 
 
void setup() {
  Serial.begin(9600); 
  SPI.begin(); 
  rfid.PCD_Init(); 
}
 
void loop() {
  if (!rfid.PICC_IsNewCardPresent() || !rfid.PICC_ReadCardSerial()) 
    return; 
  String content = "";
  byte letra;
  for (byte i = 0; i < rfid.uid.size; i++)
  {
    content.concat(String(rfid.uid.uidByte[i] < 0x10 ? " 0" : " "));
    content.concat(String(rfid.uid.uidByte[i], HEX));
  }
  content.toUpperCase(); //Converts the text to upper case

 
  Serial.print("TAG CODE: "); 
  Serial.println(content); 
 
  rfid.PICC_HaltA(); 
  rfid.PCD_StopCrypto1();
}

Door Lock system

C/C++
Final sketch, after the test code
//Including Libraries
#include <SPI.h> //SPI Library
#include <Wire.h> //Include the Wire Library
#include <MFRC522.h> //Library of the RFID Module
#include <Stepper.h> //Library for the Stepper Motor
#include <Adafruit_GFX.h> //Library for the OLED Display
#include <Adafruit_SSD1306.h> //Library for the OLED Display
Adafruit_SSD1306 display = Adafruit_SSD1306(); //Creates an object "display", the OLED Display
//Pins used by the RFID Module
#define SS_PIN 10
#define RST_PIN 9
//LED pins
int ledr = 6;
int ledg = 7;
char st[20];
MFRC522 mfrc522(SS_PIN, RST_PIN); //Creates an object "mfrc522", the RFID Module
Stepper myStepper(500, 2, 4, 3, 5); //Creates an object "myStepper", the Stepper motor
void setup() {
  myStepper.setSpeed(60); //Sets Stepper motor speed
  SPI.begin(); //Starts the SPI Library
  mfrc522.PCD_Init(); //Starts the RFID Module
  Wire.begin(); //Starts the Wire library
  display.begin(SSD1306_SWITCHCAPVCC, 0x3C); //Starts the display
  display.setTextColor(WHITE); //Sets the text color
  display.setTextSize(1); //Sets the text size
  display.clearDisplay(); //Clears the display
  //Defining LEDs as output
  pinMode(ledr, OUTPUT);
  pinMode(ledg, OUTPUT);
}
void loop() {
  display.clearDisplay();
  display.setCursor(5, 1); //Sets the cursor position
  display.print("Approach the TAG"); //Prints the message
  digitalWrite(ledr, HIGH); //Red LED is on
  if ( ! mfrc522.PICC_IsNewCardPresent()) { //RFID module searches for new TAGs
    return;
  }
  if ( ! mfrc522.PICC_ReadCardSerial()) { //Reads the TAG
    return;
  }
  //Decoding the TAG code
  String content = "";
  byte letra;
  for (byte i = 0; i < mfrc522.uid.size; i++)
  {
    content.concat(String(mfrc522.uid.uidByte[i] < 0x10 ? " 0" : " "));
    content.concat(String(mfrc522.uid.uidByte[i], HEX));
  }
  content.toUpperCase(); //Converts the text to upper case
  //The locker system
  if (content.substring(1) == "13 FE 51 3D") { //Change here by the code of your TAG
    display.clearDisplay();
    display.setCursor(10, 1);
    display.print("Authorized access"); //Shows a message on display
    display.display();
    digitalWrite(ledr, LOW);
    digitalWrite(ledg, HIGH); //Green LED turns on
    myStepper.step(-512); //Stepper motor moves
    delay(5000);
    display.clearDisplay();
    display.setCursor(10, 1);
    display.print("Approach the TAG"); 
    display.display();
    digitalWrite(ledr, HIGH); //Red LED turns on again
    digitalWrite(ledg, LOW);
    myStepper.step(512); //Stepper motor moves
  }
  //Acess denied
  else if (content.substring(1) != "13 FE 51 3D") {//Change here too
    display.clearDisplay();
    display.setCursor(10, 1);
    display.print("Access denied");
    display.display();
    delay(500);
    display.clearDisplay();
    display.setCursor(10, 1);
    display.print("Approach the TAG");
    display.display();
  }
}

Credits

bruno_opaiva

bruno_opaiva

6 projects • 4 followers

Comments