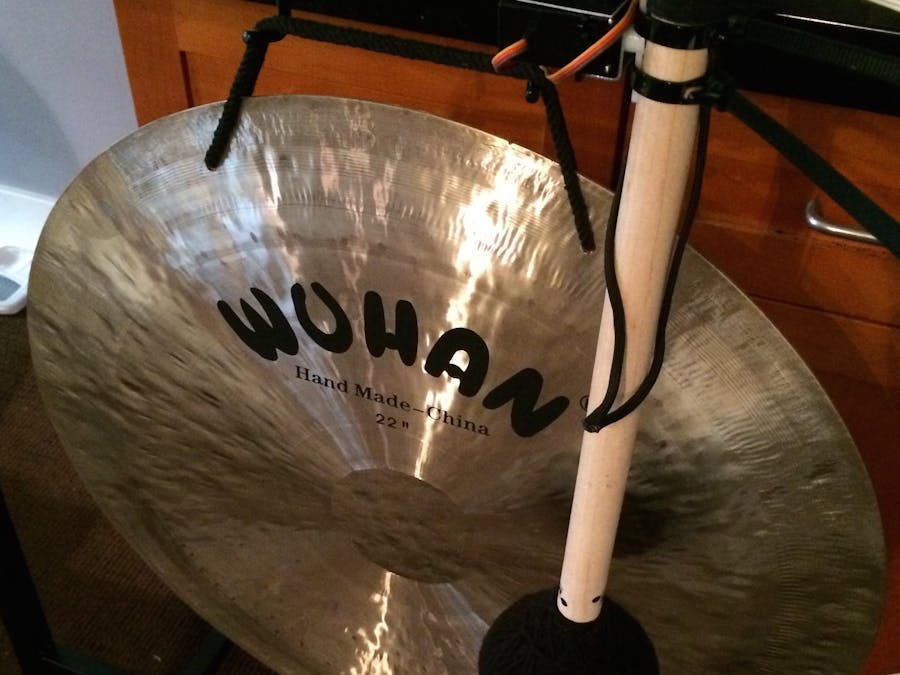
As the newest Spark employee going through the brand new on-boarding process, Zach, our CEO, asked me to build a robot. Zach had also recently bought Dan, our sales guy, a gong to be rung whenever he closed a large sale. Inspired by the addition of a musical instrument to the office, I decided a robot should be using its musical talents instead of a measly human. Gongbot was born.
The easy and direct way to have a robot hit the gong, is for the robot to physically swing the mallet. To accomplish the swinging, I chose to use a servo. You could also use a solenoid for a much larger crash. Unfortunately, not any servo is going to work. You need one that is pretty beefy in terms of torque and speed. We happened to have a GWS S03T lying around the office, which fit the bill nicely. This particular servo achieves maximum speed at 6V, so I found an adjustable power supply at Radio Shack (at their closing sale, no less) which could source 2A of current. It doesn't need 2A, but it was that or 500mA, and having the headroom is nice.
Drawing assembly inspiration from Stripe's Gongbot, I mounted the servo above the gong. This placement allows gravity to work with us a bit, instead of against. Drill a hole down through the top gong stand bar at your preferred placement. The hole needs to fit a #10-24 machine screw. The corner brace I found already had a properly sized hole, but if not, you should drill one through it as well.
Next up is mounting the servo. You will need a hole for the servo mounting hole and the servo output shaft. I used a pre-existing hole for the output shaft, and drilled a hole large enough for a #8-32 machine screw for mounting. Both holes should be in the opposite face of the corner brace. I used two nuts for the mounting screw, one to hold it tight against the brace, and one after the mounting bracket of the servo. A close-up photo is below. Remove the current beater (the white plastic thing with a bunch of tiny holes) from the output shaft, and mount your servo. Attach the arm beater (the one that looks like a straight line) on the outside of the brace.
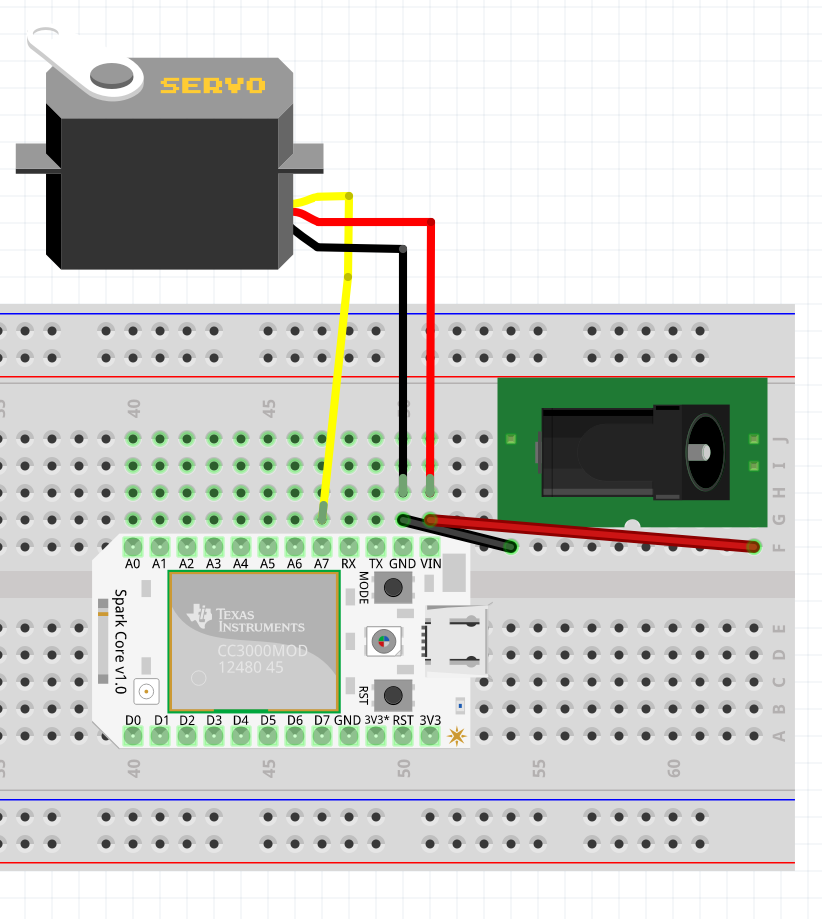
Once the servo is mounted, lets hook up the Spark Core. If you haven't already, you should go through the setup process for your Core before mounting it. Add the barrel jack and wire up the servo according to the diagram. This assumes a tip-negative power supply. Switch the red and black wires coming from the barrel jack if tip-positive.
Now that we have most everything hooked up, flash the attached code to your core. This will reset the servo to 90 degrees once the core is back online and running. At this point, detach the arm beater and re-attach it perpendicular to the floor. You can now attach the mallet using the cable ties, or a more permanent method if you prefer.
At this point you should have a working Gongbot. You can call the function using the command line. Follow the documentation to call the gong function on your core. The command should look like the following, with the device id and access token replaced with your values.
curl https://api.spark.io/v1/devices/0123456789abcdef01234567/gong -d access_token=1234123412341234123412341234123412341234
If everything is working, you should have just made some soothing zen sounds!
In some cases, you might trigger the gong hit with a simple push button. Since we make internet connected products at Spark, a button wasn't going to cut it. With several remote employees, we spend a lot of time in Slack (our chat provider). We also already had a chat robot (sparkbot) used for deployment, cat images, and a bunch of random tasks. Robot to robot communication makes sense right? Thus, a gong command was added to our hubot fork to call the exposed function. Follow the docs to generate an access token that doesn't expire and add it to the config variable in the code.
As a final touch, I am grabbing some coding zen quotes from https://api.github.com/zen and responding in the channel with them. Hit me up with questions/comments on twitter @brycekahle. Happy hacking!


Comments
Please log in or sign up to comment.