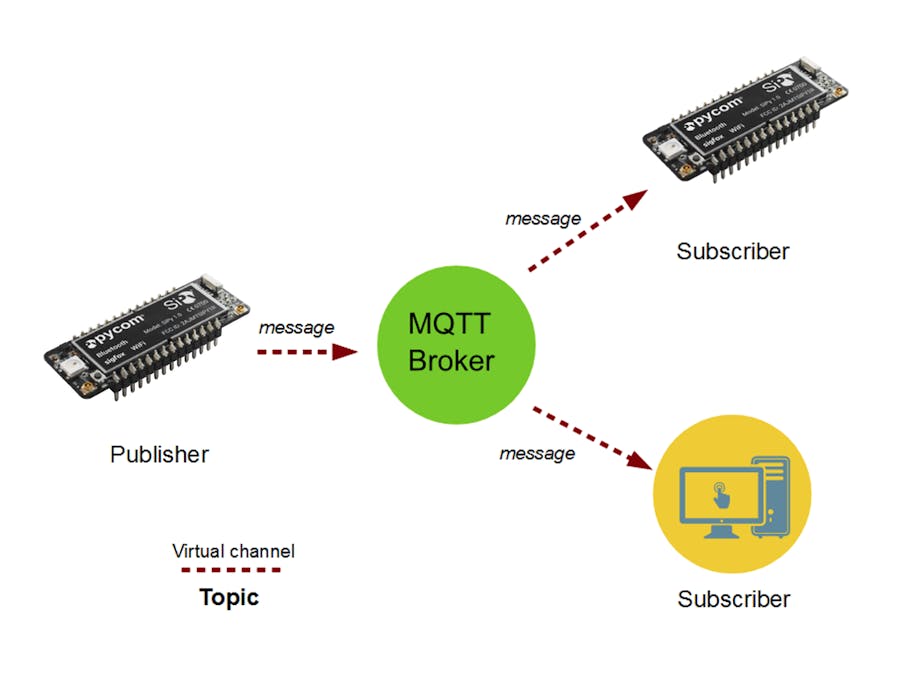
This tutorial will walk you through using MicroPython to communicate over MQTT via the subscribe/publish methodology.
It's a simple way to start sending and receiving data with your WiPy/LoPy/SiPy/ other MicroPython boards. We'll be using io.adafruit.com as an MQTT Broker for testing and displaying our data.
What is MQTT?MQTT stands for MQ Telemetry Transport. It is a publish/subscribe, extremely simple and lightweight messaging protocol, designed for constrained devices and low-bandwidth, high-latency or unreliable networks. The design principles are to minimise network bandwidth and device resource requirements whilst also attempting to ensure reliability and some degree of assurance of delivery. These principles also turn out to make the protocol ideal of the emerging “machine-to-machine” (M2M) or “Internet of Things” world of connected devices, and for mobile applications where bandwidth and battery power are at a premium.
Source: http://mqtt.org/faq
What You'll NeedIn order to follow along with this tutorial, you'll need the following:
- A MicroPython powered device (WiPy, LoPy, SiPy, etc.)
- An account at Adafruit IO (io.adafruit.com)
- The MQTT Library (GitHub)
We'll get started by assuming you've got your MicroPython device setup (for this tutorial we are using a WiPy 2.0) and have updated to the latest firmware. If not navigate to docs.pycom.io for more information about Pycom Devices. You may navigate to find your manufacturer's website for other boards.
Connect to your device and access its file storage (FTP or Pymakr Sync). Find the lib folder (/flash/lib) and copy across the mqtt.py, referenced at the end of this tutorial. This is the library we'll need to utilise the MQTT protocol.
Main.pyNow we can start writing our main.py file to connect, publish and subscribe with MQTT.
Either open a new file or edit the main.py under flash. We want to do a number of things in this script; connect to WiFi, connect to our MQTT Broker then publish messages on a topic of our choice. We'll write the script and fill in the blanks with what we will configure later at io.adafruit.com.
from network import WLAN
from mqtt import MQTTClient
import machine
import time

def sub_cb(topic, msg):
   print(msg)

wlan = WLAN(mode=WLAN.STA)
wlan.connect("yourwifinetwork", auth=(WLAN.WPA2, "wifipassword"), timeout=5000)

while not wlan.isconnected():
    machine.idle()
print("Connected to Wifi\n")

client = MQTTClient("device_id", "io.adafruit.com",user="your_username", password="your_api_key", port=1883)
client.set_callback(sub_cb)
client.connect()
client.subscribe(topic="youraccount/feeds/lights")
while True:
    print("Sending ON")
    client.publish(topic="youraccount/feeds/lights", msg="ON")
    time.sleep(1)
    print("Sending OFF")
    client.publish(topic="youraccount/feeds/lights", msg="OFF")

    time.sleep(1)
The main.py that we've just written, will publish a light on/off message to our MQTT broker. Although we haven't actually connected a light switch to our device, we can emulate its behaviour. We're expecting a message to appear on our topic/feed every second, alternating between "ON" and "OFF".
Setting up Adafruit IOAdafruit's IO broker is a great place to start for anyone wanting to try out MQTT and subscribing/publishing messages! Open up your web browser and navigate to io.adafruit.com, register an account then log in.
Now click on the feeds tab and create a new feed. You can name this anything you like but for this tutorial, we'll call it 'lights', the same as we've used in our main.py file.
This is the topic that we'll be listening for message on. We now need something to display our incoming data with. Adafruit IO has a great feature known as 'Dashboards' which can be used to display anything that happens on a feed. We'll use a simple on/off switch to show the changing input from our WiPy.
Create a new dashboard, then click on its name to open it. From here we can add various displays, toggles and views that can interact with our data. Select a toggle block and choose the 'lights' feed as the data source. Your dashboard should now look similar to the example below.
You can think of what we've built in terms of the publish - subscribe methodology. Our WiPy is publishing data about the condition of the lights (either ON or OFF), Adafruit IO is acting as our middleware (or broker) and the dashboard as the subscriber.
You should now go back and modify the line of code below (in your main.py file) with your Adafruit IO username and password, which is generated under the Adafruit IO settings tab and known as the AIO Key.
client = MQTTClient(client_id="example_client", server="io.adafruit.com", user="Adafruit IO Username", password="Adafruit IO Key", port=1883)
Assuming everything was set up correctly (and I didn't make an mistakes in this tutorial!) then you should see the toggle change between 'ON' and 'OFF' every second!
TroubleshootingIf you can't find where to generate your AIO Key for the password parameter of the MQTTClient, it should be located in the tab shown below.
And that's it! You should now have a working MQTT publisher, broker and subscriber, allowing you to utilise this low bandwidth messaging. You can extend the main.py script in any manner you wish; maybe you want to monitor the temperature in a room or track the number of times your door has been opened!
MQTT is a great way to allow devices to save power and data as well as support huge volumes of traffic. You might be surprised to know that Facebook even uses MQTT for their Messenger Platform! You can read about it here - (https://www.facebook.com/notes/facebook-engineering/building-facebook-messenger/10150259350998920/)


Comments
Please log in or sign up to comment.