According to my knowledge I believe the main problem in people with visual impairment (PVI) is unable to clearly recognise the objects/surrounding In front of them whether it is a table, a chair or a cup most of the time. There are multiple stages or levels of PVIs each of them have different level of ability to identify the objects. According to the expert in the field, either they need to touch the object or someone there to describe it in order to identify it.
So my solution is the create that someone with help of AI which is a wearable that can help the wearer to identify the object or surrounding in front of him/her.
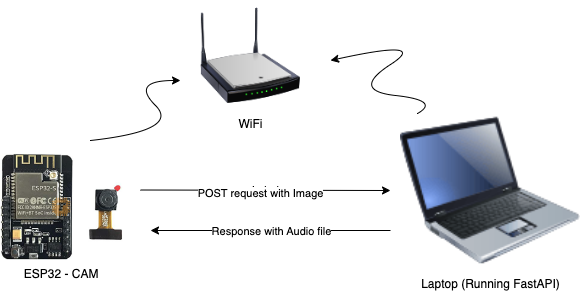
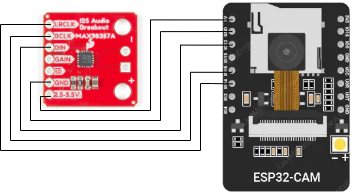
How it worksThe wearable consists of number of components, which as ESP32 cam module and audio processing and output device. ESP32 cam continuously capture the surroundings and send 1 image per second the Fastapi back-end (API) there the system compare the current snapshot with the previous one and calculate the similarity of the two images and if the delta is greater than or equals to 0.25 then it will feed the image into the AI service where it will do the image-to-text transformation. In the next step the output text will be fed to TTS module where it will generate the audio and send back to the audio processing unit and finally the description audio will be played in speaker.
Let's BuildNow we have clear understand of the problem and solution. This is the time to get your hands dirty.
Select a suitable AI model for Image-to-textThe AI model we are looking for is image-to-text model there are plenty but let's focus with the most constraint one to reduce computational power and the cost. The best place to looking for model is Hugging Face.
The model blip-image-captioning-base would be the ideal for this project but if you want more accurate one you can pick big models like blip-image-captioning-large.
This image-to-text model will be the first part of this project, in order to use the model as an API we need to create a back-end application for that we can use FastAPI python framework. The code is below. Make sure to update <HF API Token> with your HF access token.
import requests
from fastapi import FastAPI, File, UploadFile
from pydantic import BaseModel
from typing import Annotated
app = FastAPI()
API_URL = "https://api-inference.huggingface.co/models/Salesforce/blip-image-captioning-base"
headers = {"Authorization": "Bearer <HF API Token>"}
@app.get("/")
async def root():
return {"message": "Image-to-text API"}
@app.post("/uploadfile/")
async def create_upload_file(file: UploadFile):
#return {"filename": file.filename}
output = query(file.filename)
return output
def query(filename):
with open(filename, "rb") as f:
data = f.read()
response = requests.post(API_URL, headers=headers, data=data)
return response.json()
The output of the above API is something similar to below.
The best model for this is Whisper from OpenAI. Let's add another service to the FastAPI backend to convert generated text into a speech.
This is the final code with all the necessary APIs
import requests
from fastapi import FastAPI, File, UploadFile
from pydantic import BaseModel
from typing import Annotated
from pathlib import Path
from openai import OpenAI
import json
app = FastAPI()
client = OpenAI(api_key="<OpenAI API KEY>")
API_URL = "https://api-inference.huggingface.co/models/Salesforce/blip-image-captioning-base"
headers = {"Authorization": "Bearer <HF API Token>"}
@app.get("/")
async def root():
return {"message": "Image-to-text API and Text-to-speech API"}
@app.post("/uploadfile/")
async def create_upload_file(file: UploadFile):
#return {"filename": file.filename}
output = text(file.filename)
return output
def text(filename):
with open(filename, "rb") as f:
data = f.read()
response = requests.post(API_URL, headers=headers, data=data)
generated_text = response.json()[0]['generated_text']
speech(generated_text)
return (Path(__file__).parent / "speech.mp3")
def speech(text: str):
speech_file_path = Path(__file__).parent / "speech.mp3"
response = client.audio.speech.create(
model="tts-1",
voice="alloy",
input=text
)
response.stream_to_file(speech_file_path)
Make sure to provide both valid OpenAI and HF access tokens. The complete code can be found here in GitHub
Now we have all the AI models ready. Let's move to the hardware setup.
Select a suitable hardware platform
ESP32-CAM is a handy gadget when you want everything in single package. It has following features.
- The smallest 802.11b/g/n Wi-Fi BT SoC module.
- Low power 32-bit CPU, can also serve the application processor.
- Up to 160MHz clock speed, summary computing power up to 600 DMIPS.
- Built-in 520 KB SRAM, external 4MPSRAM.
- Supports UART/SPI/I2C/PWM/ADC/DAC.
- Support OV2640 and OV7670 cameras, built-in flash lamp.
- Support image WiFI upload.
- Supports TF card.
- Supports multiple sleep modes.
- Embedded Lwip and FreeRTOS.
- Supports STA/AP/STA+AP operation mode.
- Support Smart Config/AirKiss technology.
- Support for serial port local and remote firmware upgrades (FOTA).
Our intention is to call the API we created using FastAPI. Let's check the Swagger to see our API. To access it run the above FastAPI project. Use this link to access your local server documentation. http://127.0.0.1:8000/redoc
Fire up your Arduino IDE and compile and run the below code.
#include <Arduino.h>
#include <WiFi.h>
#include "soc/soc.h"
#include "soc/rtc_cntl_reg.h"
#include "esp_camera.h"

const char* ssid = "YOUR_SSID";
const char* password = "YOUR_PASSWORD";

String serverName = "http://127.0.0.1:8000";
String serverPath = "/uploadfile/";

const int serverPort = 80;

WiFiClient client;

// CAMERA_MODEL_AI_THINKER
#define PWDN_GPIO_NUM     32
#define RESET_GPIO_NUM    -1
#define XCLK_GPIO_NUM      0
#define SIOD_GPIO_NUM     26
#define SIOC_GPIO_NUM     27

#define Y9_GPIO_NUM       35
#define Y8_GPIO_NUM       34
#define Y7_GPIO_NUM       39
#define Y6_GPIO_NUM       36
#define Y5_GPIO_NUM       21
#define Y4_GPIO_NUM       19
#define Y3_GPIO_NUM       18
#define Y2_GPIO_NUM        5
#define VSYNC_GPIO_NUM    25
#define HREF_GPIO_NUM     23
#define PCLK_GPIO_NUM     22

const int timerInterval = 30000;
unsigned long previousMillis = 0;

void setup() {
  WRITE_PERI_REG(RTC_CNTL_BROWN_OUT_REG, 0);
  Serial.begin(115200);

  WiFi.mode(WIFI_STA);
  Serial.println();
  Serial.print("Connecting to ");
  Serial.println(ssid);
  WiFi.begin(ssid, password);
  while (WiFi.status() != WL_CONNECTED) {
    Serial.print(".");
    delay(500);
  }
  Serial.println();
  Serial.print("ESP32-CAM IP Address: ");
  Serial.println(WiFi.localIP());

  camera_config_t config;
  config.ledc_channel = LEDC_CHANNEL_0;
  config.ledc_timer = LEDC_TIMER_0;
  config.pin_d0 = Y2_GPIO_NUM;
  config.pin_d1 = Y3_GPIO_NUM;
  config.pin_d2 = Y4_GPIO_NUM;
  config.pin_d3 = Y5_GPIO_NUM;
  config.pin_d4 = Y6_GPIO_NUM;
  config.pin_d5 = Y7_GPIO_NUM;
  config.pin_d6 = Y8_GPIO_NUM;
  config.pin_d7 = Y9_GPIO_NUM;
  config.pin_xclk = XCLK_GPIO_NUM;
  config.pin_pclk = PCLK_GPIO_NUM;
  config.pin_vsync = VSYNC_GPIO_NUM;
  config.pin_href = HREF_GPIO_NUM;
  config.pin_sscb_sda = SIOD_GPIO_NUM;
  config.pin_sscb_scl = SIOC_GPIO_NUM;
  config.pin_pwdn = PWDN_GPIO_NUM;
  config.pin_reset = RESET_GPIO_NUM;
  config.xclk_freq_hz = 20000000;
  config.pixel_format = PIXFORMAT_JPEG;

  if(psramFound()){
    config.frame_size = FRAMESIZE_SVGA;
    config.jpeg_quality = 10;
    config.fb_count = 2;
  } else {
    config.frame_size = FRAMESIZE_CIF;
    config.jpeg_quality = 12;
    config.fb_count = 1;
  }

  esp_err_t err = esp_camera_init(&config);
  if (err != ESP_OK) {
    Serial.printf("Camera init failed with error 0x%x", err);
    delay(1000);
    ESP.restart();
  }

  sendPhoto();
}

void loop() {
  unsigned long currentMillis = millis();
  if (currentMillis - previousMillis >= timerInterval) {
    sendPhoto();
    previousMillis = currentMillis;
  }
}

String sendPhoto() {
  String getAll;
  String getBody;

  camera_fb_t * fb = NULL;
  fb = esp_camera_fb_get();
  if(!fb) {
    Serial.println("Camera capture failed");
    delay(1000);
    ESP.restart();
  }

  Serial.println("Connecting to server: " + serverName);

  if (client.connect(serverName.c_str(), serverPort)) {
    Serial.println("Connection successful!");
    String head = "--Begin\r\nContent-Disposition: form-data; name=\"file\"; filename=\"esp32-cam.jpg\"\r\nContent-Type: image/jpeg\r\n\r\n";
    String tail = "\r\n--EndofFile--\r\n";

    uint32_t imageLen = fb->len;
    uint32_t extraLen = head.length() + tail.length();
    uint32_t totalLen = imageLen + extraLen;

    client.println("POST " + serverPath + " HTTP/1.1");
    client.println("Host: " + serverName);
    client.println("Content-Length: " + String(totalLen));
    client.println("Content-Type: multipart/form-data; boundary=RandomNerdTutorials");
    client.println();
    client.print(head);

    uint8_t *fbBuf = fb->buf;
    size_t fbLen = fb->len;
    for (size_t n=0; n<fbLen; n=n+1024) {
      if (n+1024 < fbLen) {
        client.write(fbBuf, 1024);
        fbBuf += 1024;
      }
      else if (fbLen%1024>0) {
        size_t remainder = fbLen%1024;
        client.write(fbBuf, remainder);
      }
    }
    client.print(tail);

    esp_camera_fb_return(fb);

    int timoutTimer = 10000;
    long startTimer = millis();
    boolean state = false;

    while ((startTimer + timoutTimer) > millis()) {
      Serial.print(".");
      delay(100);
      while (client.available()) {
        char c = client.read();
        if (c == '\n') {
          if (getAll.length()==0) { state=true; }
          getAll = "";
        }
        else if (c != '\r') { getAll += String(c); }
        if (state==true) { getBody += String(c); }
        startTimer = millis();
      }
      if (getBody.length()>0) { break; }
    }
    Serial.println();
    client.stop();
    Serial.println(getBody);
  }
  else {
    getBody = "Connection to " + serverName +  " failed.";
    Serial.println(getBody);
  }
  return getBody;
}
Let's try to handle server response. The API response is a path to mp3 file.
Here is the Arduino code
#include "Arduino.h"
#include "WiFi.h"
#include "Audio.h"
#include "SD.h"
#include "FS.h"

// Digital I/O used
#define SD_CS          5
#define SPI_MOSI      23
#define SPI_MISO      19
#define SPI_SCK       18
#define I2S_DOUT      25
#define I2S_BCLK      27
#define I2S_LRC       26

Audio audio;

String ssid =     "*******";
String password = "*******";

void setup() {
    pinMode(SD_CS, OUTPUT);      digitalWrite(SD_CS, HIGH);
    SPI.begin(SPI_SCK, SPI_MISO, SPI_MOSI);
    Serial.begin(115200);
    SD.begin(SD_CS);
    WiFi.disconnect();
    WiFi.mode(WIFI_STA);
    WiFi.begin(ssid.c_str(), password.c_str());
    while (WiFi.status() != WL_CONNECTED) delay(1500);
    audio.setPinout(I2S_BCLK, I2S_LRC, I2S_DOUT);
    audio.setVolume(21); // default 0...21
    audio.connecttohost("http://127.0.0.1:8000/speech.mp3");

void loop()
{
    audio.loop();
}


Comments
Please log in or sign up to comment.