


Hardware components | ||||||
 |
| × | 1 | |||
 |
| × | 1 | |||
 |
| × | 1 | |||
 |
| × | 1 | |||
Software apps and online services | ||||||
 |
| |||||
 |
| |||||
This project will help you convert your house into a smart home within few steps only. To control your lights at your home you just need a phone and good internet connectivity.
Follow the given steps carefully in order to complete your project.
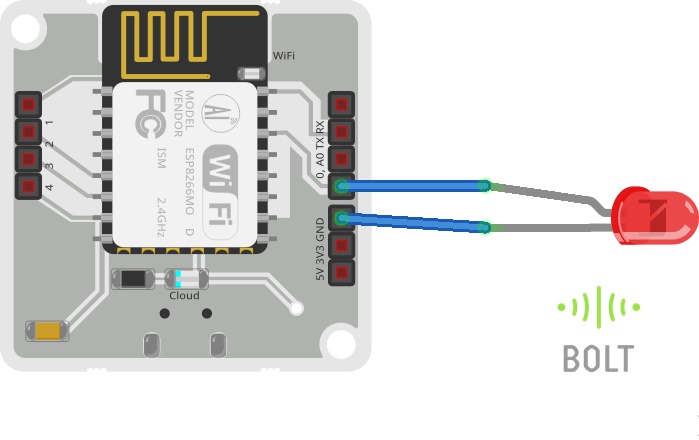
The circuit is quite simple and builds on Bolt Wi-Fi module.
Connect a resistor to the longer leg (positive terminal) of a LED. Another end of the resistor to GPIO pin 0 and the negative terminal of a LED to the ground pin(GND pin). Finally, your circuit will look similar to the image shown below.
Login to your Bolt Cloud account and go to API section you will find API key enable it. Similarly, you can get your device Id from the devices tab.
For this step, you need your API key, Device Id, pin number
The structure of the URL is:
https://cloud.boltiot.com/remote/API_KEY/digitalWrite?pin=PIN_NUMBER&state=HIGH/LOW&deviceName=DEVICE_ID
here you need to change API key, pin number = 0 (as mentioned in the above circuit diagram) and device id. Also, change the state to switch it on use HIGH to switch it off use LOW state. You need to create two different URL for two different operations (i.e. ON and OFF).
Step 4: Creating an account on IFTTTVisit the given link and sign up into it if you already have an account then login into it.
Login to your account.
Step 5: Creating an applet for google assistant1) Go to the create window in your account.
2) Click on +This and choose google assistant when asked to choose service.
3) After that choose the trigger as "Say a simple phrase"
4) Now we need to create a trigger. It means on which command google assistant should perform the given task. You can mention "Lights On", "Turn on the Lights" and etc. It should look something like this.
5) Click on create Trigger and then on +That.
6) Choose Webhooks from given services.
7) Choose an action as Make web request
8) Add an URL created previously as GPIO command in the URL part. Choose method as get and content type as application/json. So, it will look like this
Note: you should replace API key, Device Id, and pin number with your own.
9) Click on Create action and then on the finish.
In the same way, create another applet to switch off the lights.
CONGRATULATIONS you have completed your project and it is ready to be tested. There is no coding required for this project ENJOY.


Comments
Please log in or sign up to comment.