This watering project was borne out of necessity, I travel for work and cannot always be there to water the plants. I wanted something that would be reliable and that I would not have to worry about flooding my back yard by leaving the water on. This project gives me visibility and control over the my back deck garden from anywhere and it is designed to save water and never leave the water running.
I know there are many plant watering projects on Hackster.io and the web. However, the ones I looked at did not meet my needs or address my concerns, so, I decided to make my own. I also saw this as a chance to improve my skills on the Particle Platform.
For the Spring of 2018, I am updating this project. I have redesigned the carrier board to enable easier installation and dual watering zones. The board is currently at the fab with OSHPark and I will update the writeup as I get it back, build and test it, and make any needed changes.
- Update #1 - Received the board from Ubidots built and tested it. Will be updating pictures and files to reflect the new v3 hardware.
- Update #2 - Board Assembled and Tested - New V3 Firmware pushed to Github. Initial testing of system passed.
- Update #3 - Installed and hardware / software testing complete. Started watering trials
- Update #4 - Watering tests complete. System is working as planned.
I designed my system to meet these requirements:
- Remote monitoring via web or smartphone
- Notifications via e-mail or text if anything goes wrong
- Intelligent watering based on soil moisture and weather forecast
- Fail-safe design which would not lock up and would fail safe (and dry)
- Ability to extend and improve the system with data over time
- Connected to house's plumbing for all-season use
I decided to build a system that has three main components:
- The Particle Photon connected to my home WiFi for remote monitoring, sensing soil moisture, intelligent watering algorithm implementation and control of the water using a 12V normally closed solenoid.
- I will use a 1/2" plastic tube as the main trunk with 1/4" Tubing to tap into it and distribute water to my potted plants. The goal is to give a full-day's water in about 5 minutes with 1 minute adjustments given to get to the desired soil moisture.
- I don't want to water when it is about to rain so, the system will use the free WeatherUnderground API to get the risk adjusted rain forecast for the coming day and not water if it goes over a user-defined threshold.
- Web services of Particle for managing using the web console and mobile application and Ubidots for serial data streaming, dashboard reporting and insights for future refinements.
My first prototype proved the viability of the overall design and helped me develop the plumbing / watering system. It was a simple breadboard in a waterproof enclosure. I used a P-Channel MOSFET to turn the solenoid on and off and the Chirp capacitive soil moisture sensor from Catnip Electronics. Capacitive sensors are much better than the resistive ones that will corrode and degrade quickly. As it is capacitive, I was able to spray the entire sensor with a waterproof rubber paint and still get decent sensitivity. These are I2C based sensors so, I can extend the system by putting more sensors on the bus. For now, I picked one pot to be my indicator for soil moisture. There is also a temperature sensor on the probe which gives an indication of soil temperature.
This prototype worked well enough that I decided to build a more robust soldered version.
2nd GenThe big thing that was missing from this first prototype was an external watchdog sensor. I decided to add this to make sure that the device could not lock up while the water was running. This is my worst case scenario. The second generation was laid out on a prototype board as you can see in the pictures below. I used Adafruit SMD adapter boards for the watchdog and FET.
I was able to validate the design and tested the watchdog to ensure it could reset the board if it became non-responsive.
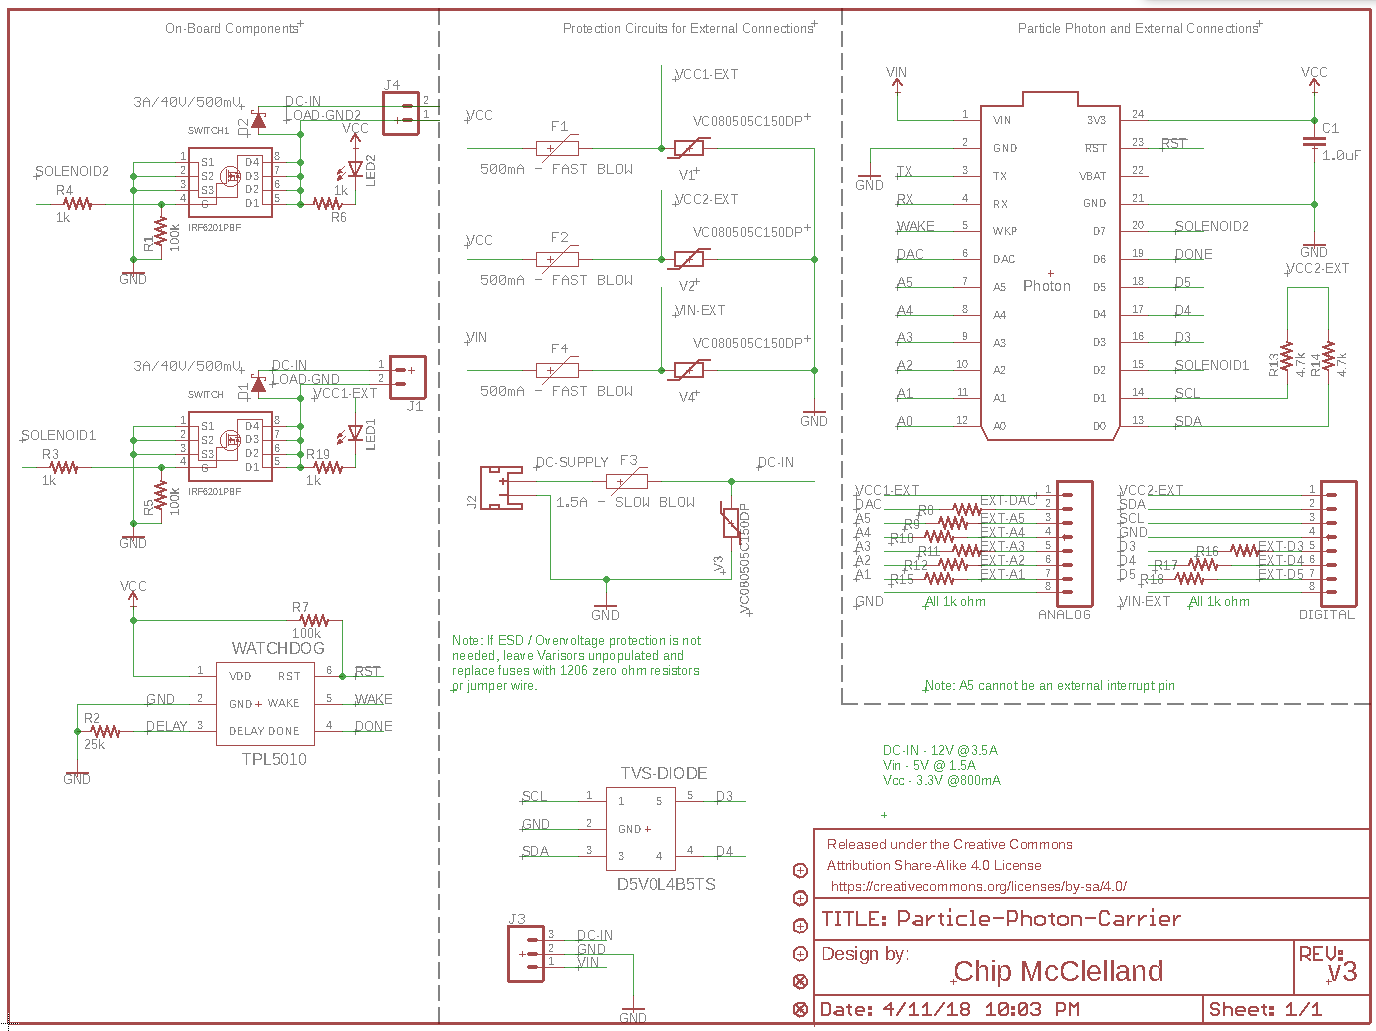
I have built many devices for extended outdoor use. In this revision, I wanted to provide a neater and more robust circuit board and incorporate protections against shorts, lightning strikes and electrostatic discharge (ESD). I have laid out this board in EAGLE (files provided below) and built and tested this design with OSHPark. The schematic has not changed much except that I have added voltage-dependent resistors or varistors to all the external power lines and, since these sacrificial parts will short the power lines to ground to protect the circuit, I added fuses to each of these lines as well to protect the power supplies.
As you can see from the photo below, this makes for a more compact and easily produced board. I chose components that can be easily hand soldered.
Here are the changes from v2.2 to v3:
- Added 3.5mm Screw terminal headers to make it easier to install and so it does not require crimping custom cables
- Added a second MOSFET so you can now have two watering zones.
- Added a 5V power pin so you can add flow measurement sensors easily
- Increased the circuit protection for i2c and the IO pins
- Added LED indicators for each of the FET switched outlets
This design has been built and tested. See repositories below:
- OSHPark - You can order boards directly here.
- Github - Here are the EAGLE files for the latest rev
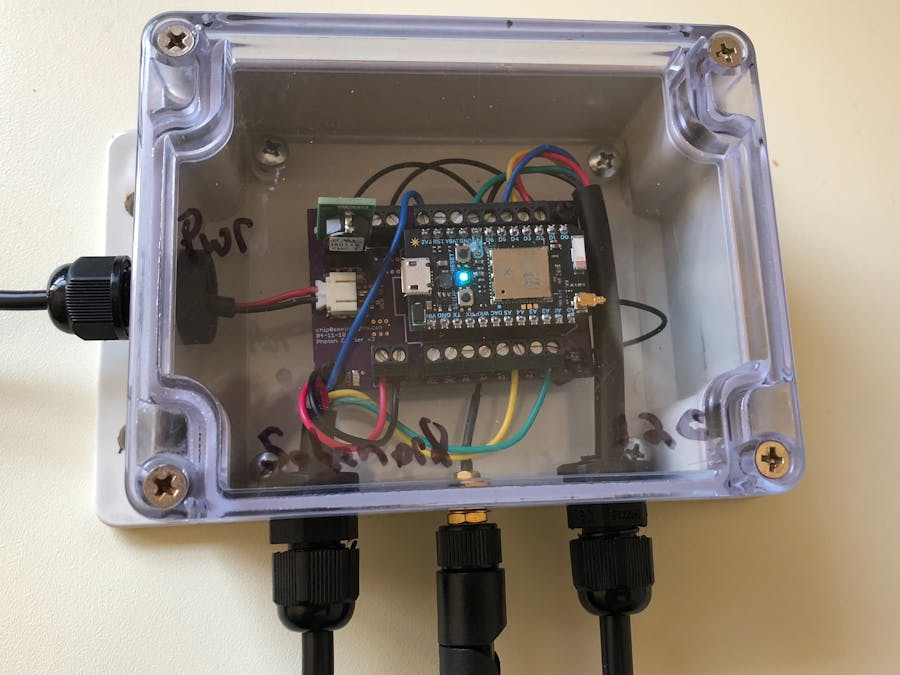
I wanted to mount this sensor under my deck near the Solenoid so I built a simple waterproof enclosure using parts from Amazon and Adafruit (see parts list). I also found that moving outside required an external antenna and, since it was under my deck, I went for a rather large 9 dBi version. Signal strength is very good. I bought an inexpensive outdoor power supply that could provide clean 12V power for the controller and enough current to operate the solenoid.
The next step was to control and distribute the water to the plants. I used an Adafruit solenoid which was surprisingly affordable ~$7 and will suffice for this season. I designed the current PCB to be able to drive the more expensive Brass Solenoid. I plan to upgrade to this once I have a season's experience. Both work the same way - 12V applied opens the valve which is otherwise closed. I put together a series of pipes and connectors (1/2" Nominal NPS for the Solenoid) and an adapter that allowed me to easily connect this to my garden hose. My plan is to tap into the yard's irrigation system after this season but, this approach works well and is easy to hook up.
Water distribution turned out to be fairly straightforward. I ran a 1/2 tube the length of the deck and inserted a "T" junction to connect it to my Solenoid. I can now tap into the 1/2" tube at any point and bring the water to each plant with a 1/4" tube and sprinkler head. See the above pictures which I will add to throughout the season.
Control LogicOnce I had all the parts together, I was able to start using and refining the code. I have attached my program and I think it is fairly straight forward. The main loop does only one thing: Every hour, it takes soil moisture measurements, gets the weather forecast from the Weather Underground and then follows this chain of logic to see if it is time to water: Is watering enabled? Is it time to water (5-8am)? Does the soil need water? Have I already watered this hour? Is there major rain in the forecast? If ALL of those are yes, it will start a watering session. Here is a snippet from Ubidots which shows how this logic works. Take a look at the examples below which captured the watering events and the underlying logic:
I decided to include an external watchdog timer to decrease the possibility that the system might freeze up while the water was running. It will also reset the Photon if it becomes unresponsive at any time. This is accomplished by the timer periodically nudging the Photon which then has a set period of time to "pet" the watchdog. I set the interval of these nudges to be slightly longer than the longest watering time. Then, before watering, I "pet" the dog and disable the feature until watering is complete. If the device hangs while watering, the watchdog will reset the Photon which will turn off the water. If the watering process completes normally, the "petting" feature is re-enabled.
Particle WebhooksNote, I used a powerful Particle feature called Webhooks to integrate this code with Weather Underground and Ubidots. Your project may need slightly different integrations so, I would highly recommend using LukeUSMC's tutorial on these integrations for your project. There are many things I like about Particle but WebHooks stand out as a powerful tool to create great IOT projects.
{
 "event": "weatherU_hook",
 "url": "http://api.wunderground.com/api/(your API key)/forecast/q/nc/raleigh-durham.json",
 "requestType": "POST",
 "headers": null,
 "query": null,
 "responseTemplate": "{{#forecast}}{{#simpleforecast}}{{#forecastday}}{{date.day}}~{{qpf_allday.in}}~{{/forecastday}}{{/simpleforecast}}{{/forecast}}",
 "json": null,
 "auth": null,
 "mydevices": true
}
Here is an example of my web hook for getting the weather data. It allows me to both get the 3-day forecast for my city and parse the response to extract only the data I need for my program (date and expected rainfall - qpf_allday). This makes the code required to integrate this information into my program trivial. Anyone who has had to parse large JSON payloads in C knows what a savings this is.
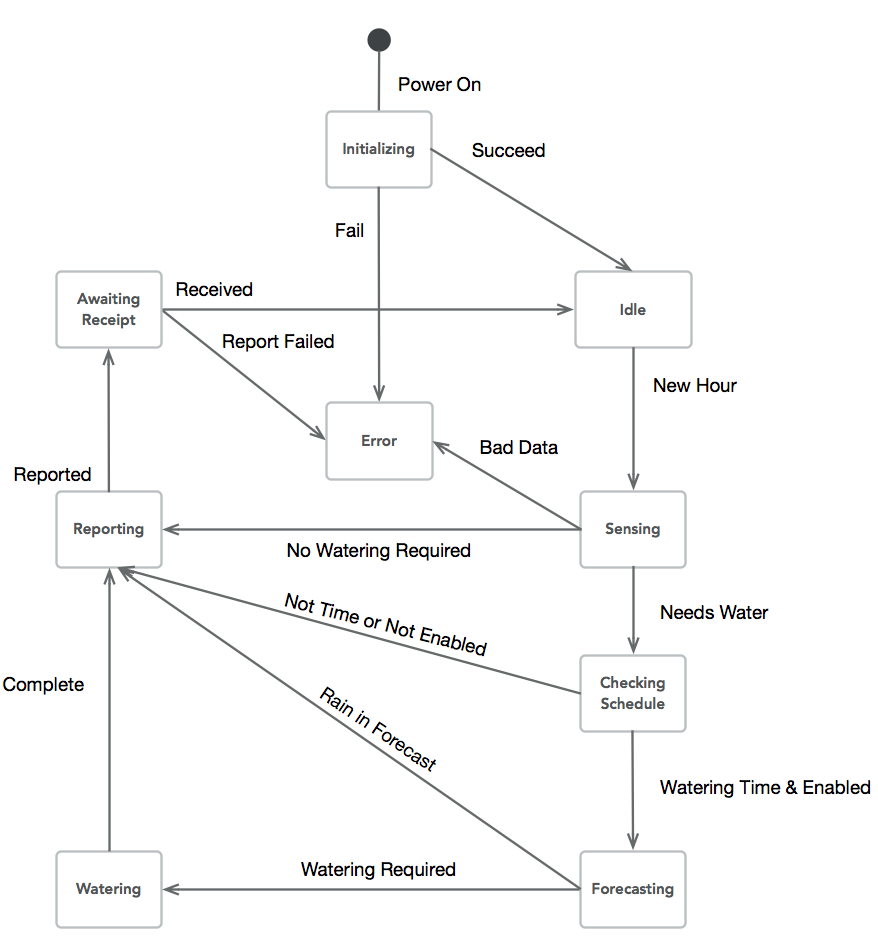
Major Code-Rewrite - Finite State MachinesThis project has been well received here and on the Particle.io community. One criticism of the first pass at the control software was that all the checks in the process of watering led to a large number of nested IF statements. This approach made it harder to determine where issues might come up and made for more complex code. It was suggested to me that I should rewrite the code as a "Finite State Machine" to make the code more reliable, more maintainable and less complex.
In a Finite State Machine, you define three things:
- A set of mutually exclusive states
- Specific criteria that must be met to transition between these states
- Actions to be taken in each state
It sounds easy but, as this was my first time using this approach, I went through a series of iterations before finally settling on this state machine diagram:
Once I had this worked out, I rewrote my software with a main loop moving from a series of nested loops to one that used SWITCH CASE to move from state to state. I have included links to both the original and the new Finite State Machine code in the Github links below. However, now that I understand this approach, I will be using it for future development.
DashboardWith these integrations, I can easily see the status of my watering device using Particle's device dashboard for current status and using Ubidots to store historical data and provide visualizations and reporting.
Here is a graph depicting a couple weeks of watering (green spikes) and soil moisture (blue lines). Notice that some increases in the soil moisture are caused by rain and do not have a preceding green spike.
I can also look at details data and monitor the performance of the system using the Ubidots device or variable views or on my phone using the Particle app.
My plan is to run this system for the rest of the growing season and then make improvements to the device and the water hookup and distribution system. I know there are many automated watering projects and commercial products such as those from Orbit out there so, please let me know if this is of interest and whether I should provide updates.
Mobile Application
The main reason I built this project was to ensure that my back-deck garden was well watered while I was away. To help in this, I have included logic to monitor and control the AquaMaster using Particle's Mobile application. The application has a data tab where you can control the AquaMaster with "functions" and read current values using "variables". There is also an "Events" tab where You can monitor communications between the AquaMaster and Particle.
Here are the functions available with this version in each case the inputs are numerical with a "1" meaning true or on and a "0" meaning zero or false for all the inputs except Set-Timezone:
- Start-Stop - This function turns the water on for one minute. Great for testing and observing the watering function. You can turn the water off at any time from this function as well.
- Enabled - This allows you to enable or disable watering. This is a persistent setting which will be preserved even after reset or power-cycle.
- Measure - Typically, measurements are taken before watering or on the hour. If you want to update the values displayed on the variables, use this function.
- Set-Timezone - Enter your Timezone offset from GMT. For example, the East Coast of the US is -4 in summer.
- Set-Start - Hour to start watering (early morning is best)
- Set-Stop - Hour to stop watering (before sun hits the plants is best)
- Set-Rain - How many inches of rain forecast in the next 2
- Set-Verbose - In this mode, the AquaMaster will send updates whenever its state changes or errors are encountered. If you turn this mode on, you can get a great idea of your AquaMaster's operations on the "Events" tab or on the Particle console.
There does seem to be interest in this project so here are my immediate plans for improvement:
- Add a flow sensor to the project (headers already on the new board) to record water usage AND to detect leaks
- Dual zone watering. The hardware now supports this but, I need to figure out whether my plant's watering needs are that different. One idea is a 2nd "mister" tied to a high-temperature alarm.
- Adding a UV-Index sensor? Adding temperature to the factors determining watering needed? I am open to comments and suggestions.
Please let me know what you think. I would love to know how I could improve this project and whether I should continue to develop it.
Thank you for your attention. I will end with the pictures of my well watered peppers, tomatoes, basil and mint.


Comments
Please log in or sign up to comment.