I am building a multifunctional drone that will be located in the center of a community with an open area and a small shelter. The drone is a flying PPE/medicine/test kit transporter. The drone is a remote-controlled temperature taker. The drone is a traffic director. The drone is a checkpoint monitor. The drone is a contact tracer with computer vision. The drone is also a flying entertainer. Most importantly, the drone is a tool that eliminates the need for close contact between people, so social distancing can be maintained.
A Cloud-Based Design
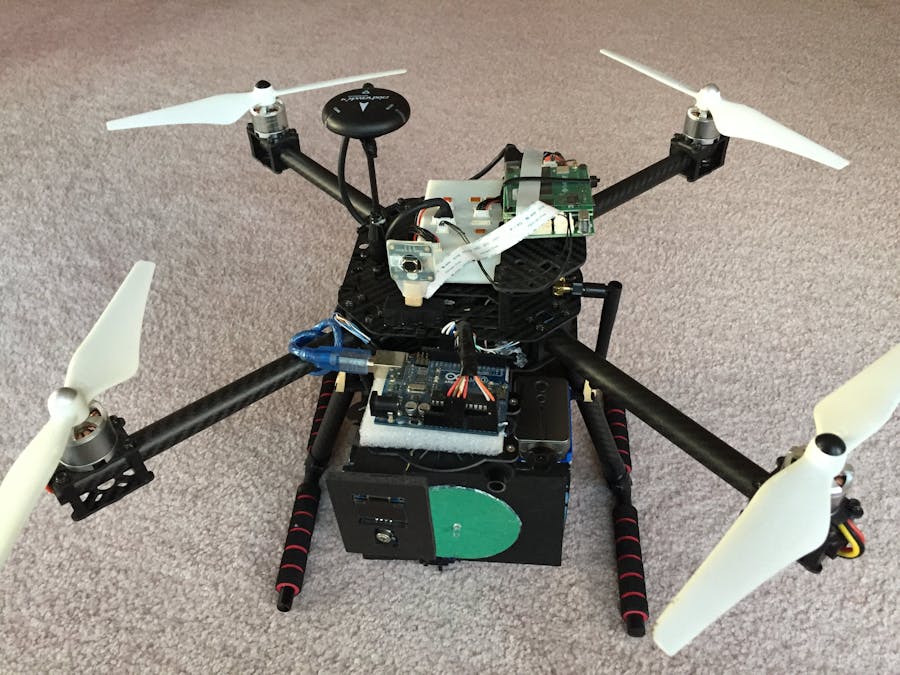
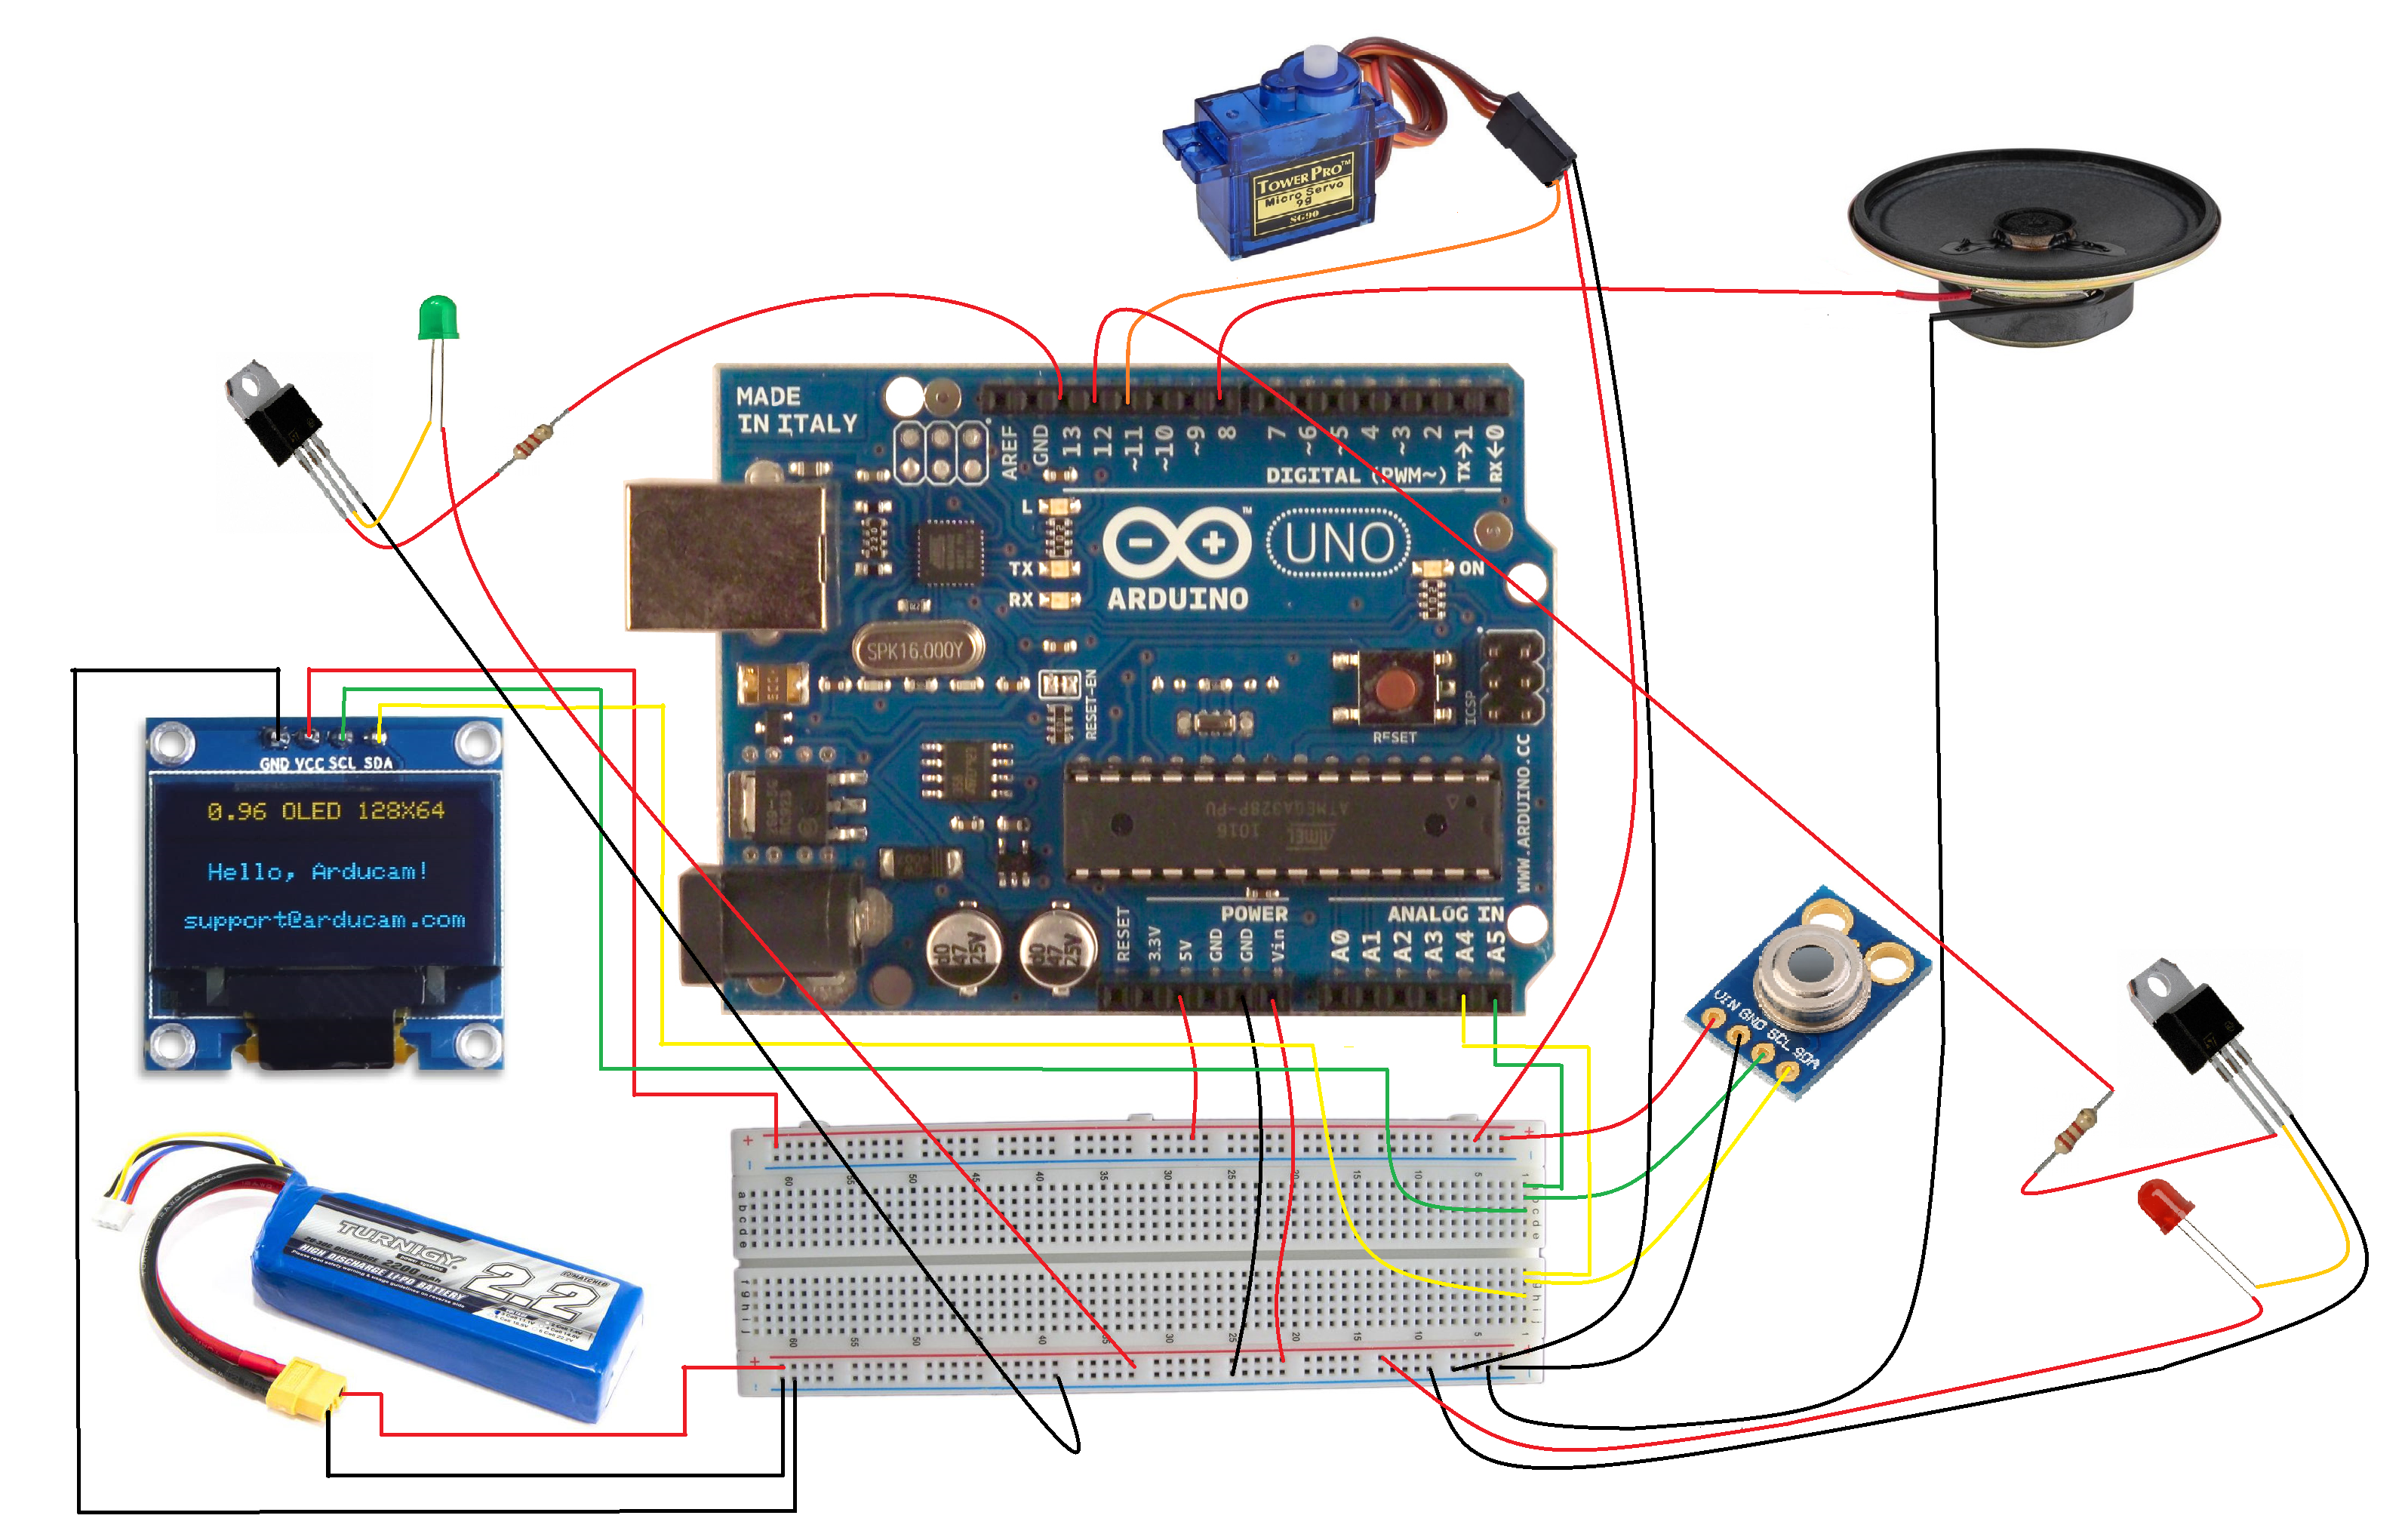
A CAD model of the drone is designed using Onshape. The standard components are a NXP HoverGames drone kit, including the PX-4 based flight controller FMUK66, and a companion computer NavQ with a Google Coral camera. The included Neo-M8N GPS receiver is connected to the GPS port of the controller. A telemetry radio is connected to the TELEM port of the controller to communicate with a ground station wirelessly. An R/C receiver is connected to the RC IN port to communicate with the radio transmitter. The NavQ computer is connected to the TLM2 port of the flight controller. In addition, an Ardiono UNO board is added to the system to handle the operation of the sensor, the display, the speaker, the actuator, and the LEDs. UNO is connected to NavQ through a USB cable. The payload box is made of foam boards. The front of the box has a bright green LED and the back a red LED. A Sony speaker is installed on the side. The payload front door is operated by a 9-g servo. An OLED display and an infrared temperature sensor are mounted in front of the drone rails. A RunCam Wi-Fi camera is mounted on the top of the payload box to take FPV video.
A COVID-19 Go Away Broadcaster
To boost morale, a 'COVID-19 Go Away' song was created. The song is played through a 2" speaker connected to Arduino UNO digital pin 8, and the lyrics are displayed on the 128x64 OLED screen facing the client. The display is an I2C device with special address 0x3C, and the software libraries need to be installed.
#include <Wire.h> //I2C
#include <Adafruit_SSD1306.h> // OLED display ****************************************
#define SCREEN_WIDTH 128
#define SCREEN_HEIGHT 64
Adafruit_SSD1306 display(SCREEN_WIDTH, SCREEN_HEIGHT, &Wire, -1);

void setup() {
    pinMode(8, OUTPUT); //speaker ****************************************************
    display.begin(SSD1306_SWITCHCAPVCC, 0x3C);
}
A Traffic Director
The drone can also be used for mobile traffic control. The bright 12V LEDs are switched on and off by Darlington transistors. There is a green light in the front and red in the back. The drone can be rotated 180 degrees to change the direction of traffic.
The Companion Computer NavQ
NavQ is a Linux companion computer made by NXP. With OpenCV on NavQ, I am able to harness a vast library of computer vision tools for use in HoverGames. OpenCV is installed out of the box on the HoverGames-BSP image and can be installed easily through the package manager on the HoverGames-Demo image.
The Coral Camera
The tiny Coral camera can be used for user interaction to get pictures taken or QR codes read using OpenCV Python code. It can also get the FPV from the drone through Wi-Fi connection. The drone operator can watch the view on the ground station or on a mobile device using QGroundControl.
ID Check
Each user of the service drone has a unique ID picture (see below) provided on his/her phone. When requesting services like receiving a mask or getting temperature measured, the user needs to place the phone picture in front of the Google Coral camera.
The OpenCV function matchTemplate() is used to determine the identity of the drone user.
# Compare picture taken with template
img_rgb = cv.imread('IDimg.png')
img_gray = cv.cvtColor(img_rgb, cv.COLOR_BGR2GRAY)
template = cv.imread('ID2.png',0)
w, h = template.shape[::-1]
res = cv.matchTemplate(img_gray,template,cv.TM_CCOEFF_NORMED)
The correctly-identified user ID is boxed. Otherwise, the ID is invalid. The best threshold value is experimentally determined. With threshold tuning, subtle differences in user ID pictures can be detected.
The user can also provide contact information and travel history by using a QR code generator app on his/her phone.
The Coral camera takes a picture of the code. OpenCV then decodes and saves the data in the NavQ computer.
Face detection can also be implemented as shown below. OpenCV can be trained to recognize human faces.
The service can even be extended to chimps if necessary.
A Mask Dispenser
The masks are stored in the payload box. Once the ID check is passed, the masks become available. The payload door is opened and closed by a small servo.
A Remote Temperature Taker
An IR temperature sensor is installed in the front of the drone. The sensor is another I2C device that libraries need to be installed.
#include <Wire.h> //I2C
#include <Adafruit_MLX90614.h> // IR temperature sensor ******************************
Adafruit_MLX90614 mlx = Adafruit_MLX90614();
The user is instructed to put the hand or wrist in front of the sensor for 10 seconds. The measured data are displayed on the OLED screen and transmitted to NavQ for further processing.
A Field Test
Both the Python code in the NavQ and the Arduino code in the UNO were tested thoroughly. Now, we can do a field test outside.
OK, your ID is good. You can take your mask and get your temperature taken. Have a good day.
Thermal Screening Data Bank Established
The information collected by the drone, including the time and location of service and temperature data, as well as the pictures taken at the service station, has to be organized, so data analysis can be conducted. The Python module XlsxWriter run on NavQ is used to write an Excel worksheet for each user of the drone. The workbook for each community can then be merged with larger area data for the purpose of contact tracing.
Flight Planning
Each service mission is planned in QGroundControl and saved as abc.plan. Mission plan is a JSON text file with a listing of commands like TAKEOFF(22), WAYPOINT(16), LAND(21), and RTL(20). Each command is associated with 7 parameters. For WAYPOINT, the parameters include latitude, longitude, altitude, yaw angle, hold time, and others.
The Fly Sky FS-I6S radio transmitter is configured so that switch B can change flight mode from MANUAL to POSITION to MISSION.
To execute a mission, I can simply arm the drone and then switch to MISSION mode. The NXP FMUK66 flight controller will take over and complete the mission automatically. The mission can be paused by switching to HOLD mode using switch A. I can also override the mission by moving the control sticks and the mode will switch to POSITION. Switch D is assigned as a kill switch. It proved to be necessary on certain occasions.
A Test Flight Mission
The first test flight above the drone-serviced community was a success. There was a small mishap toward the end of the flight. The service door popped open and caused the drone to bounce in the air as shown in the video.
Mission Control from NavQ
MAVLink (Micro Air Vehicle Link) is a communication protocol between drone flight control units, companion computers, and ground stations.
MAVSDK is a MAVLink library with APIs for C++, Python, iOS, and Android. The service drone mission can also be controlled by a program written using MAVSDK libraries running on NavQ.
Since the outdoor weather conditions were not ideal for flight, I developed and tested a one-stop mission indoors with the drone propellers removed. The drone followed all the commands successfully without leaving the home point.
An Automated Mission with QGC Plan
In this mission, the location of the service station was defined by latitude and longitude. The service height was set at 1.5 meters or ground depending on weather conditions. After the flight, PX4 Flight Review was used to generate the 3D flight path. The overlay of the path on the FPV video was edited in VideoPad.
A Two Service Station Mission
To make the project more challenging, I developed a 2-stop autonomous mission. The drone would land in two places for service and then return to launch. I chased the drone around to maintain line of sight, especially during landing. The drone finished the mission with a low battery warning.
A Flying Entertainer
During the pandemic, indoor theater gatherings have been limited. The service drone can also play the role of an outdoor flying entertainer. It will carry an LED and servo-animated character with a loud speaker. The residents of the community can watch the show at a distance from their windows or their yards.
In addition to the Arduino controlled servos, two more servos can be connected to the FMUK66 servo rails. With RC pass-through, two actions of the character can be controlled from the two dials on the sides of the radio transmitter.
With several drones and choreography, a drone-controlled marionette performance can be a reality.
A Payload Release Mechanism
A payload release system I made a few years ago for 3DR Solo can also be adapted to use in this service drone. The masks can be dropped on the target while the drone is still in the air.
System Integration
Progress has been made so that the three major components of the drone can perform their tasks.
- The FMUK66 flight controller can execute any flight plan within the limits of battery power.
- The NavQ computer with Coral camera can communicate with the client by taking pictures and analyzing data using OpenCV Python code.
- The Arduino UNO can display messages on OLED, open the mask dispenser, measure the client's temperature, and play the COVID-19 Go Away song.
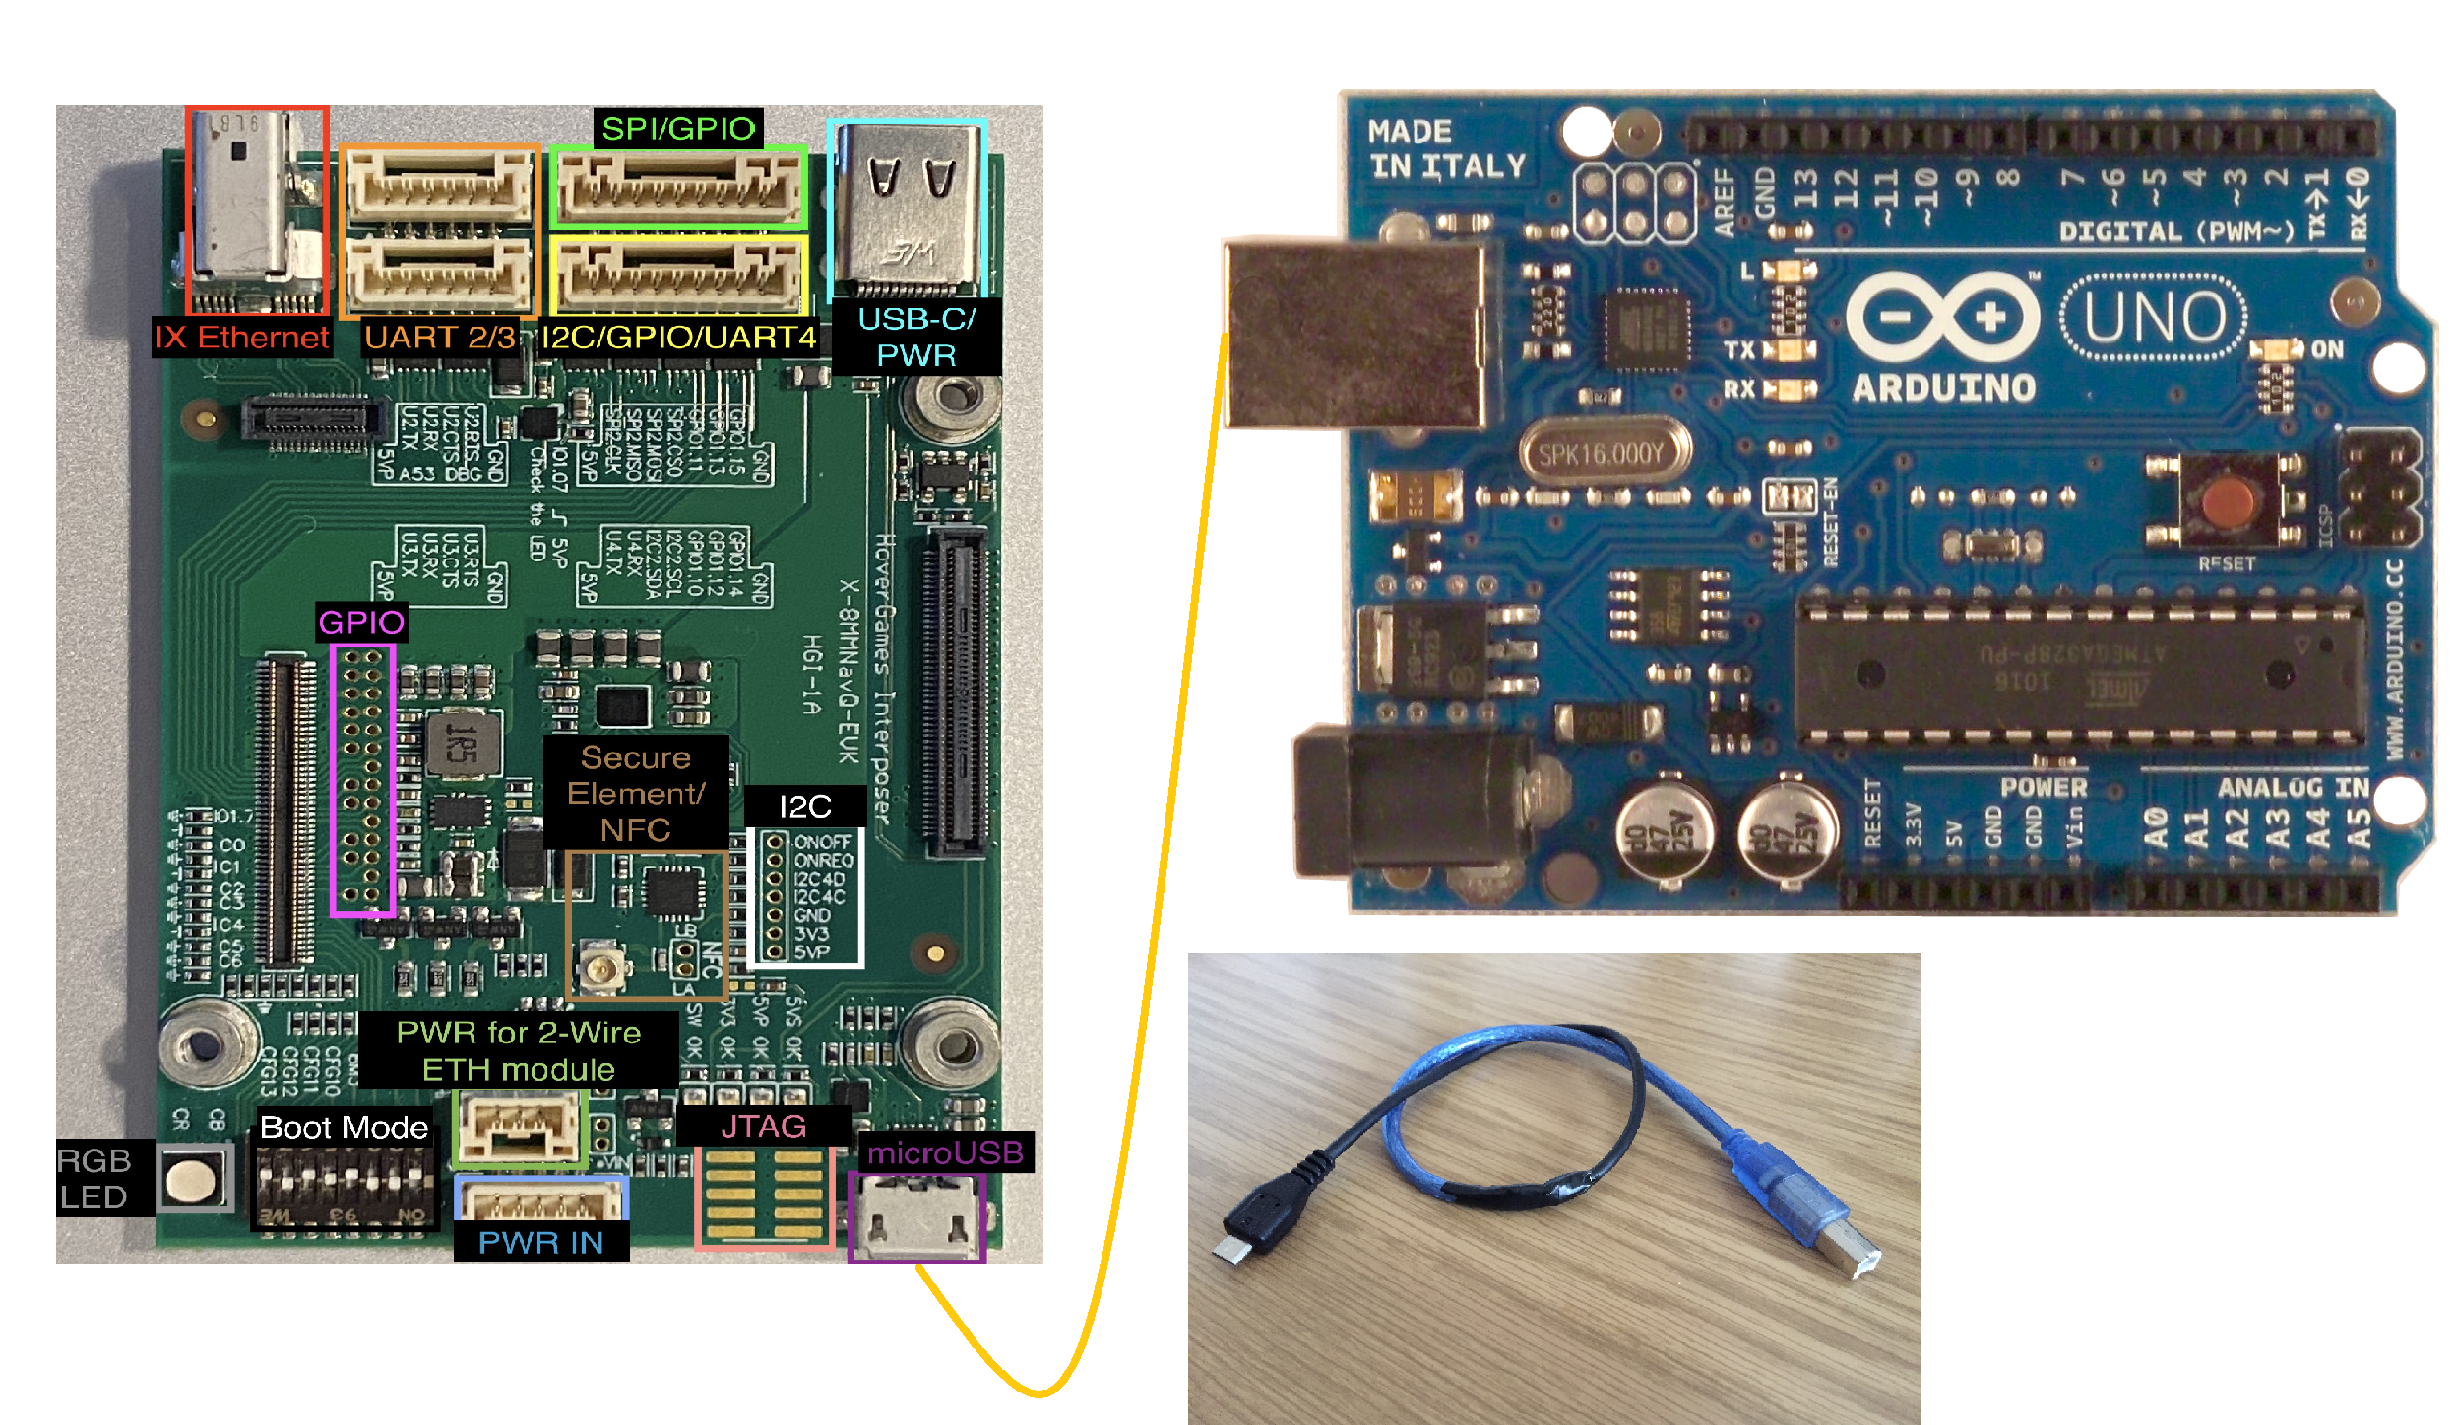
With the above three milestones passed, the next step is to link NavQ and UNO with a USB. Serial cables are widely available. The cable with USB Type B on one side for UNO and Micro USB on the other side for NavQ can be made by cutting the connectors from an A/B cable and an A/Micro cable and reconnecting.
After many tries, I realized that NavQ would only recognize the official Arduino board as a valid serial device when a correct cable was connected.
navq@imx8mmnavq:~$ lsusb
Bus 001 Device 003: ID 2341:0043 Arduino SA Uno R3 (CDC ACM)
Bus 001 Device 002: ID 1a40:0101 Terminus Technology Inc. Hub
Bus 001 Device 001: ID 1d6b:0002 Linux Foundation 2.0 root hub
The UNO board was identified as ttyACM0.
The following Python code was then used to set up the serial communication.
import serial

# Setup serial communication with Arduino UNO ****************************************
if __name__ == '__main__':
    ser = serial.Serial('/dev/ttyACM0', 9600, timeout=1)
    ser.flush()
I used the following code to send a command from NavQ to UNO:
ser.write(b"Start the service\n")On the Arduino side, the following code was used to start the serial communication.
void setup()
{
    Serial.begin(9600); // start serial communication with NavQ **********************
}
The Arduino would respond with Serial.println("Service started"); and then send the temperature data collected by the IR sensor back to NavQ for processing. The code runs in a loop, so a long delay was added at the end.
void loop()
{
    if (Serial.available()>0)
    {
    delay(5000);
    String data=Serial.readStringUntil('\n');
    Serial.print("NavQ sent me(UNO) the command: ");
    Serial.println(data);
    Serial.println("Service started");
    temp(); // IR Temperature Sensor Taking Data and Send to NavQ ********************
    delay(5000);
    thanks();
    mask();
    c19(); // Sing COVID-19 Go Away Song *********************************************
    seeU();
    Serial.println("Service finished");
    Serial.end();
    delay(10000000);
    }
 }
The NavQ would read the temperature data and save them in a file for processing.
# Read and write temperature data from UNO *******************************************
i=0
while True:
    i=i+1
    ser.write(b"Start the service\n")
    line = ser.readline().decode('utf-8').rstrip()
    print(line)
    myfile.write(line)
    myfile.write("\n")
    if i==50:
        worksheet.write('D1',line)
    if i>80:
        break
myfile.close()
The Python code in NavQ is supposed to run once and initiate from the ground station computer.
The integrated solution was tested out on the ground flawlessly. The Arduino followed the command from NavQ. It distributed the masks and took temperatures. The NavQ took pictures and received the temperature data and saved them in a file.
The flight test, however, revealed a communication problem, as shown in the video below. The W-Fi link between NavQ and the ground station computer was disrupted during flight so service could not be provided to the client.
Final Work and Thoughts
In the early stage of this 3-month project, I dealt with a few defective parts, including motors, ESCs, and propellers.
Although NXP supplied me with 11 motors through several warranty replacements, only 3 of them actually worked. I ended up replacing all motors with higher grade ones.
To prevent the failure of ESCs due to weak solder joints, I corrected the tight fit bullet connectors by sanding down the male connectors.
The unbalanced propellers provided in the drone kit would cause vibration. The problem was quickly solved by switching to Phantom propellers.
The flight test revealed other problems. The drone could not hold steady enough for the client to approach for service. The turbulent flow around the drone would get worse when the service door popped open. The problem was solved by planning the service time when the drone would land and wait on the ground. An alternative solution was to install an ultrasonic sensor HC-SR04 in the front for collision avoidance and to open the service door downward.
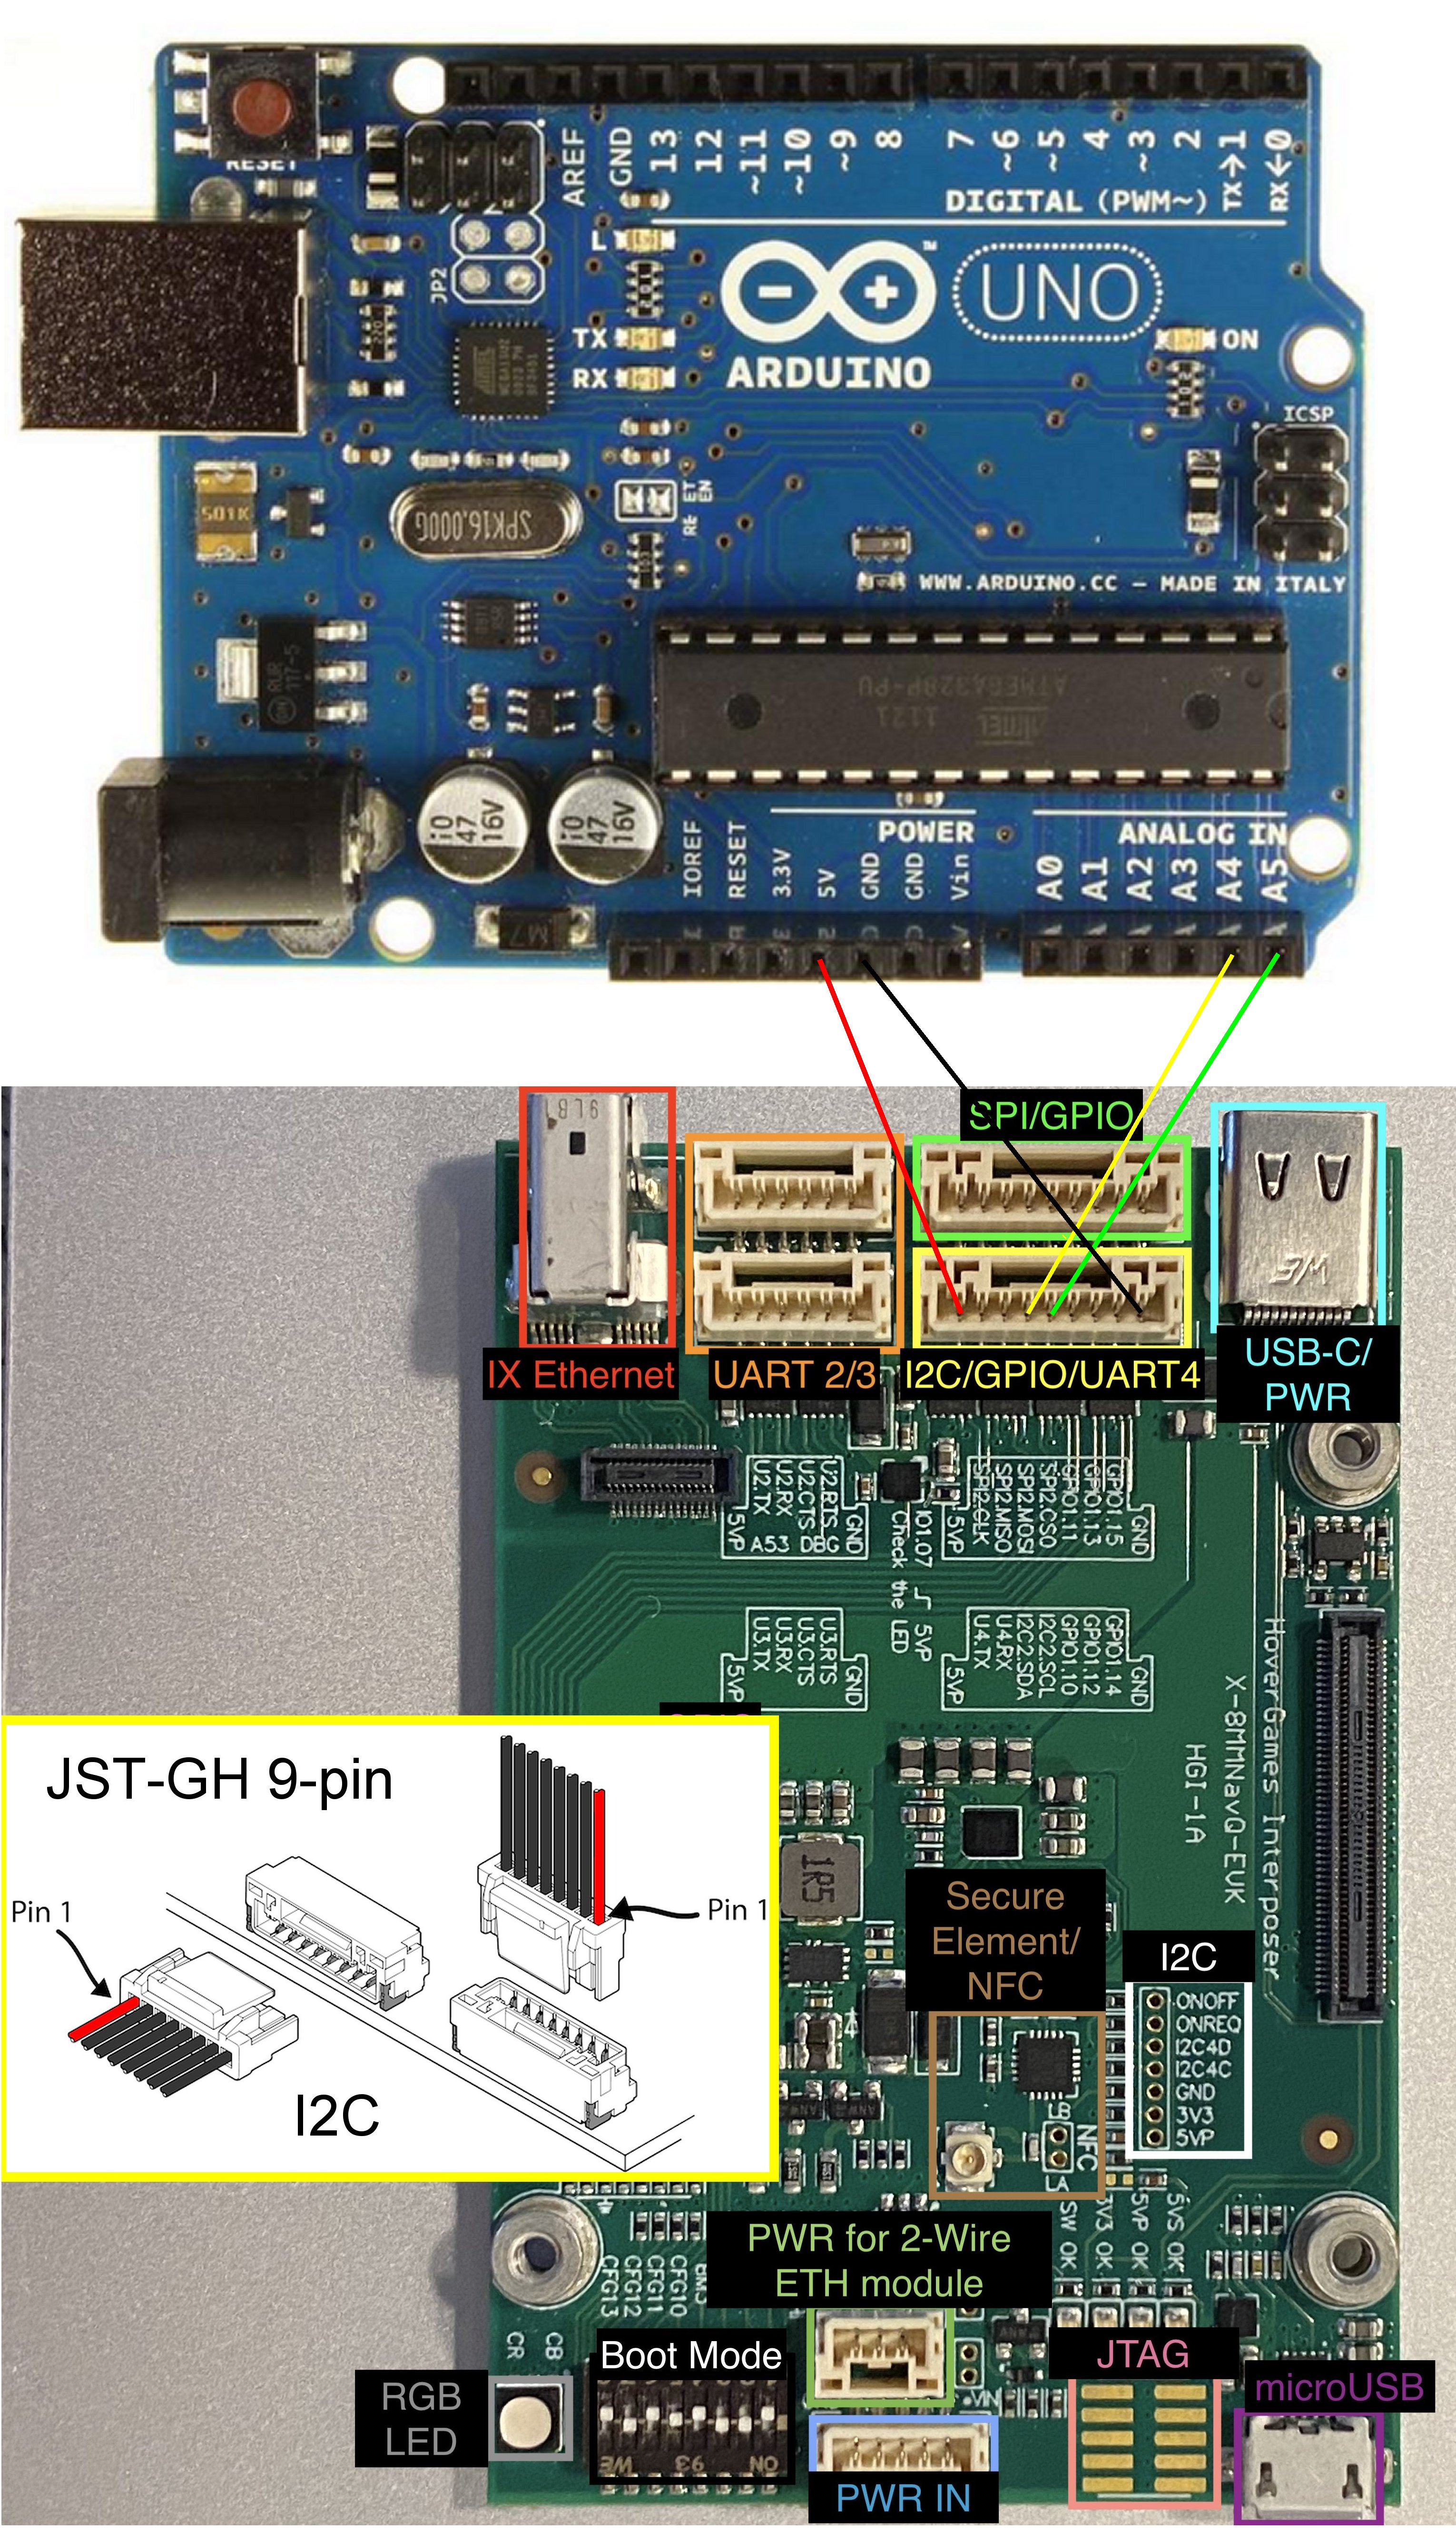
I have been working on the communication between NavQ and Arduino UNO for quite awhile. The initial thought was to use I2C connection. The required JST-GH 9-pin cable for I2C communication is hard to find and hard to work with. The vendor kept sending me wrong cables. The custom cable I made from components did not work. I suggest NXP to adopt more popular and simple connectors for the next generation of NavQ.
Overall, most of the objectives stated in the proposal were reached. The service drone demonstrated the use of technology to remotely distribute masks and take temperatures with social distancing.
As we have learned from the global pandemic, masking is the vital part of the first line of defense, and thermal screening is the fastest way to trace the spread of the disease. The service drone does have a role to play in the crisis. There is still room for improvement . I have to work on a full vision system so safe user interaction and precision landing can be realized.
With the rollout and distribution of vaccines, we hope the COVID-19 pandemic will end soon, and the NXP NavQ and drone kit will have another use in HoverGames Challenge 3.
Fork and Pull
The following repositories in Github have been copied. The code developed for this project is included in the Code section.
Collaboration
We did help each other in this contest, as shown in the following discussion. I really appreciate the help from others.


_ztBMuBhMHo.jpg?auto=compress%2Cformat&w=48&h=48&fit=fill&bg=ffffff)


Comments
Please log in or sign up to comment.