


Hardware components | ||||||
 |
| × | 1 | |||
 |
| × | 1 | |||
 |
| × | 1 | |||
| × | 1 | ||||
| × | 15 | ||||
| × | 1 | ||||
| × | 25 | ||||
| × | 1 | ||||
| × | 1 | ||||
| × | 6 | ||||
| × | 6 | ||||
| × | 4 | ||||
| × | 4 | ||||
| × | 1 | ||||
Software apps and online services | ||||||
 |
| |||||
 |
| |||||
| ||||||
| ||||||
| ||||||
Hand tools and fabrication machines | ||||||
| ||||||
| ||||||
| ||||||
This project was designed as an aesthetic output for a class final at the University of Maryland, for CMSC730, “Interactive Technologies For Human-Computer Interaction” by Dr. Huaishu Peng.
Sculpture IntroductionA key element of many HCI systems is that they claim to make people “feel” things - to alleviate upset, or to read faces and correct for emotional states. This seems like a lot to put on an AI system - but artworks do this quite regularly. Therefore, we aimed to put together a sculpture that would make an audience “feel” something immediately.
In addition, we had some aesthetic concerns:
- Because this project is happening within a computer science department, it needed to look like it was a “rapid prototype,” and make use of that design language. This meant exposing the raw materials we used to assemble the project, and restricting obvious processes to digital fabrication outputs
- The sculpture should be made of things which are usually considered to be garbage, to reduce material costs and reinforce a DIY aesthetic
- Because we were inspired by Mire Lee’s work, the project should be very organic
- We also work from the basis of making a "flower" - in this case, the notorious amorphophallus titanum, the Titan Arum "corpseflower," which blooms extremely inconsistently and smells like rot.
- Other inspiration included the Stinkhorn mushroom, with which our final work had much in common, shape-wise
A lot of the difficulty of ensuring audience response was solved by making use of condoms as the core actuation structure, which tends to directly focus audience attention while reducing the likelihood that an actuator will explode during demonstrations.
The sculpture was designed to be assembled from modular parts, based on "trash" or disposable work like stir-sticks and bamboo skewers and condoms, with most effort going into ensuring the 3D printed parts would be printable in a short window of time for rapid iteration.
Related Products, Works, And Inspiration- Love, K., Borgatti, M. "Make: Soft Robotics" 2019
- Mire Lee, "Milk Of Dreams, " Venice Art Biennale 2022
- Sun Yuan & Peng Yu, "Can't Help Myself, " Guggenheim Museum, 2016
- Penn & Teller, "Shadows, " 2015
- Titan Arum, Amorphophallus titanum
This system was inspired in part by the book Make: Soft Robotics, by Kari Love and Matthew Borgatti (2019, ISBN: 9781680450934), in part by Mire Lee’s work “Milk Of Dreams” at the Venice Biennale 2022. It was also inspired by Penn & Teller’s work “Shadows, ” a standard part of their act for many years.
We made extensive use of the Programmable Air’s demonstration libraries, especially the “suck” library, while learning to use the hardware system effectively.
Hardware Systems IntroductionFor this project we wanted to work with pneumatic systems, which give a great organic affect relatively easily. This pointed to using the Programmable Air pneumatic control system by Tinkrmind. We also wanted the system to appear effortless, or at least to have no obvious or overt controls - so we chose to work with the semi-abandoned Myo armband by Thalmic Labs.
The Myo armband has been controlled by many companies - most recently Meta - but remains the industry standard for documenting myoelectric connections in neuroscience labs, and we were interested in seeing if it could be reasonably updated and paired to do some types of practical effects/performance work in contained systems. It can! Over the course of the project we did discover that unfortunately, its initial reviews in 2014 as a “deeply impractical” way to control any human-computer system are very accurate.
It was fun to work with!
We would not elect to work with it this again.
The Programmable Air, on the other hand, is a delightful and useful system for working with pneumatics of all types! It has really good prototyping provisions. By combining the two systems we were able to make a novel project that offers some scope for fun performances with “invisible” controls.
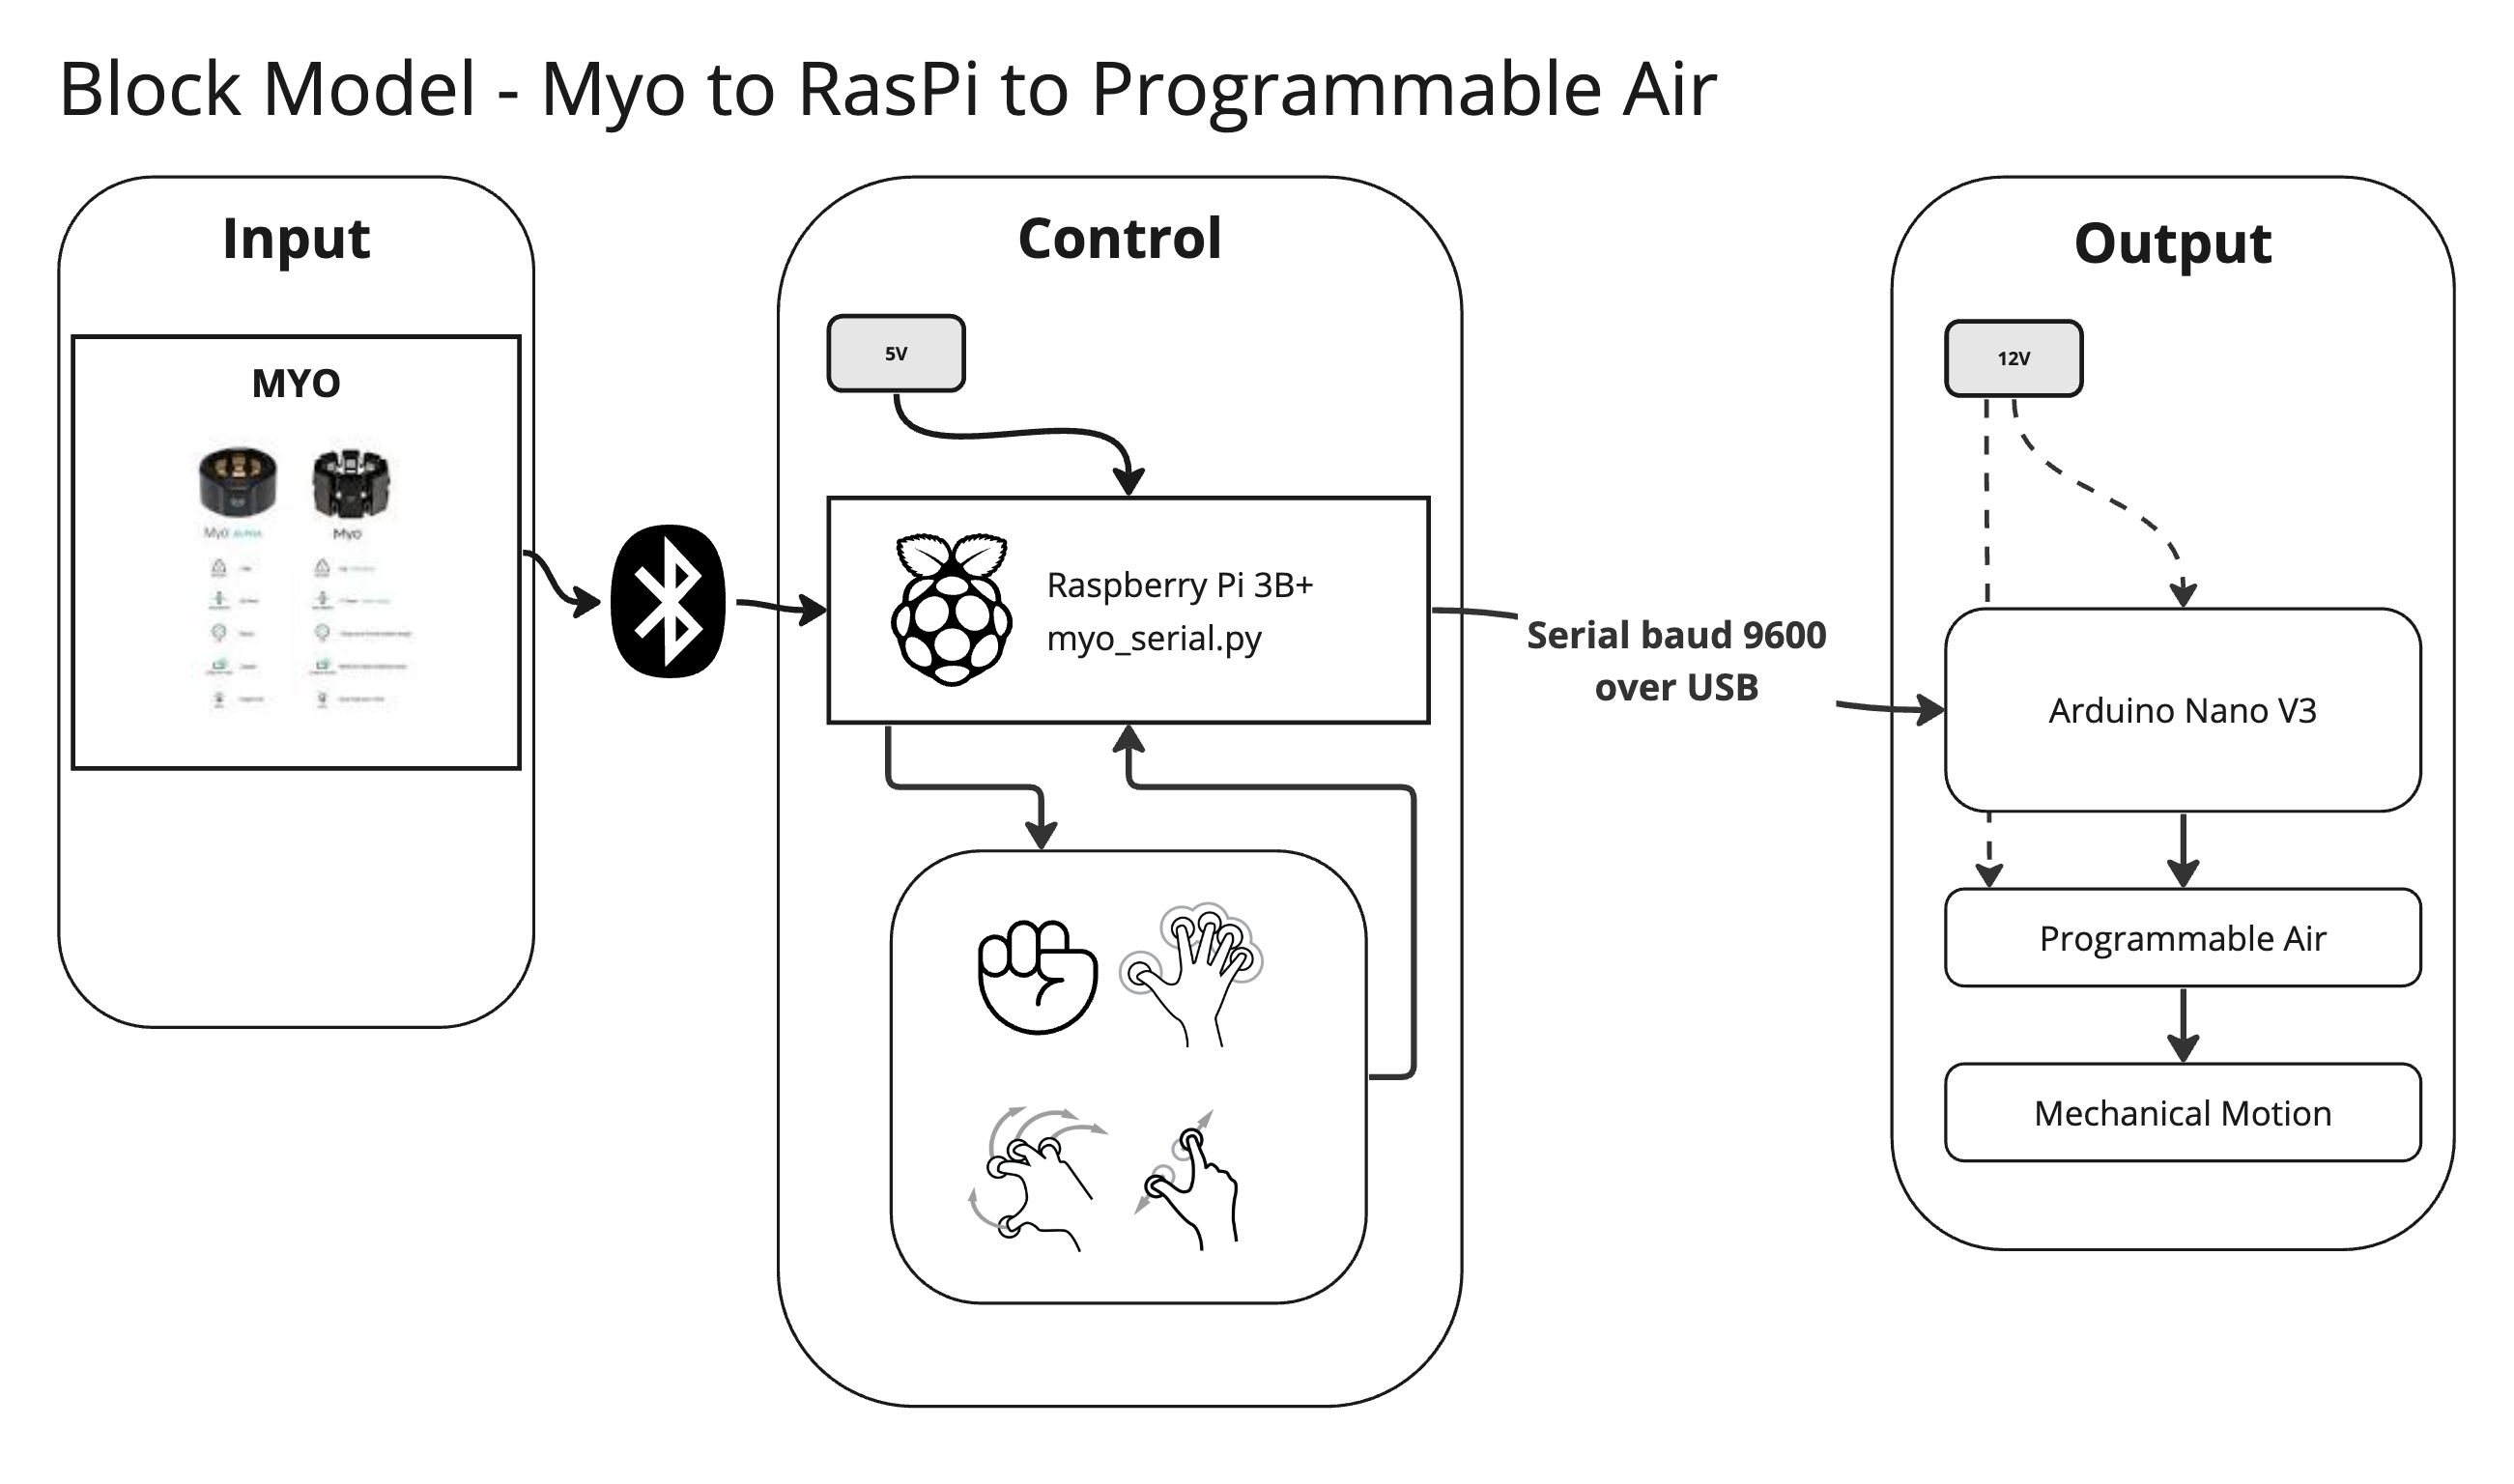
System FunctionThe system works by detecting “poses” from the Myo armband, once paired to the Raspberry Pi 3B+, and then sending those “poses” over serial 9600 to the Programmable Air project in order to control inflation or deflation.
It can additionally be controlled using the onboard buttons for the Programmable Air in order to test robot response.When not actively inflating or deflating, the system maintains peristalsis, and gives the impression of “breathing” while doing so.
If all goes well, the two systems should connect relatively seamlessly. The system is designed to be updated mainly in the Arduino sketch, which should be able to listen for any of the six core Myo poses.
Arduino Nano Instructions
- Installing the basic arduino sketch included in this project should result in the peristalsis code running immediately
- The Nano must be booted before the Myo serial connection tries to attach or the Myo script on Raspi will fail
Raspberry Pi Instructions
- Install relevant scripts to the Raspberry Pi
- Make sure it is accessible over WiFi
- Open an SSH connection to it through Putty
- Plug in the Myo armband and pair it to the system using the advice from Thalmic Labs
- Run the myo_serial.py script. When the script is live, it should show detected poses in your Putty terminal window
- The Nano will respond, by default, to "fist" and "spread" instructions
This project took place over three months.
For our first milestone, we assembled our related works and inspirations, and decided which systems to use.
For our second milestone, we completed the systems engineering and integration, which gave us a functioning Programmable Air controlled by a Myo armband.
For the third milestone, we completed the physical fabrication and Raspberry Pi integration for the project.
Enclosure - BreadBox
A 3/16 hole will work well for this part, as you'll need 3 holes per actuator - one for the pipe and two for the threaded insert screw mounts.
This was generated at https://www.festi.info/boxes.py/ , using their "bread box" generator

Strain Schematic


_t9PF3orMPd.png?auto=compress%2Cformat&w=40&h=40&fit=fillmax&bg=fff&dpr=2)


Comments
Please log in or sign up to comment.