
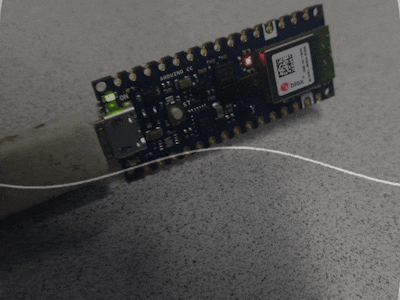


Hardware components | ||||||
 |
| × | 1 | |||
Software apps and online services | ||||||
 |
| |||||
| ||||||
Hand tools and fabrication machines | ||||||
 |
| |||||
 |
| |||||
What should you do when you lose your phone (again)? Before 2014, the only solution was to call your phone using another phone, or just ask your mom. Yet, with iOS8 launched in 2014, we have another solution -- shouting out
"Hey Siri!"
But what happens behind the scene? Is your voice keep being recorded by the phone? Will there be any privacy issues? But in that case, the battery should run out fast. So the question arises, What can an IoT device as small & light as an iPhone can do to us?
We, the Cookie Team, have had the honor to come across this interesting "Wake Word Detection Project" that can resolve our shared puzzle. We met each other and teamed up with our shared curiosity and missing-phone symptom and our gratitude to the creator of "Hey Siri". Both of us agreed that the best way to pay tribute to technology is to get a better understanding of it.
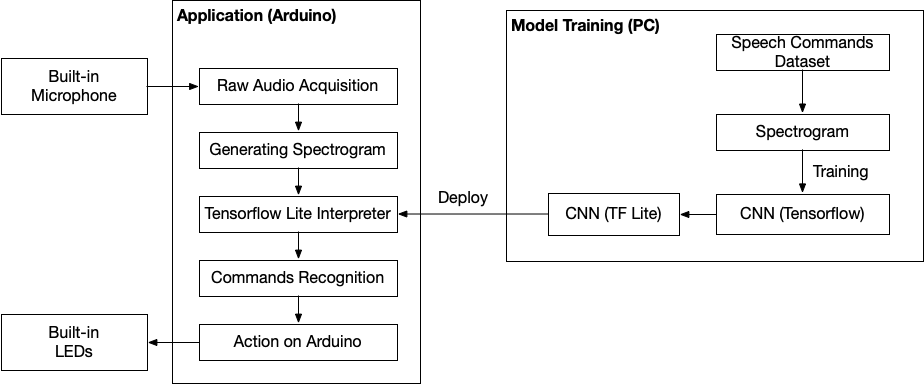
OverviewIn order to get a better understanding of the techniques underlying Wake Word Detection in resource-limited IoT devices, we shall conduct our investigation on Arduino that is far less powerful than the iPhone.
We will use the existing dataset, train our model with Tensorflow, convert it into the TensorFlow Lite model and deploy the model into Arduino. Then we shall observe the LED light and look at Arduino IDE messages to get output information from the Arduino.
Step-by-StepDataset
As mentioned above, we used existing dataset, called the Speech Commands Dataset (https://oreil.ly/qtOSI). Each data in this dataset is one-second-long audio, representing one of 30 different words including “yes” and “no”.
ML model specification
Input: Instead of directly using each one-second-long audio data to train the ML model, we converted each data into a spectrogram. To generate each spectrogram, we made 49 pieces of a 30-ms audio segment from one-second-long audio data, sliding the 30-ms-window by 20 ms. Then, we transformed each 30-ms audio segment into 40 frequency buckets.
This way, we could generate the spectrogram composed of 49 rows and 40 columns.
Network: We used a convolutional neural network (CNN), which is well known to be effective in recognizing 2D images. It is also known that the spectrogram works well with CNN.
Output: This model evaluates each spectrogram and generates the scores of 4 groups: “yes”, “no”, “unknown”, and “silence”. Higher score means the input is more likely to be in that group.
Lite ML model
Firstly we generated an ML model using standard TensorFlow library on a PC, which has a high-performance processor in general. However, we could not directly use this model for a microprocessor. This model had to be converted into the format that a microprocessor can understand. In addition, ML models generated on the general PC are usually too large to be directly used in a microprocessor. Therefore, we had to convert it into a lighter version. This process was done with the TensorFlow Lite. The TensorFlow Lite provides us the converter that includes several optimization options including quantization. These optimization options let us to reduce the size of the ML model significantly. After we obtained the lighter version of the model, we converted it into a C++ file so that we could compile and deploy it into the microprocessor.
Raw audio acquisition
To recognize words, we should continuously monitor the audio data from the microphone. We utilized the attached code (audio_provider.h and audio_provider.cpp) which was in the TensorFlow library for this task. The function, GetAudioSamples( ), provided us corresponding audio samples when we specified the start time and the duration. We continuously queried audio samples by continuously updating the start time with the current time with the one-second duration.
Generating Spectrogram
We had to convert the captured audio data into a spectrogram since we used spectrograms as the input feature of the ML model. Since FFT(Fast Fourier Transform) is computationally expensive, we did not perform FFT on all 30-ms pieces of one-second audio data every time. We calculated the time difference between the current time and the last time we generated features. Then, if we found an overlap between two consecutive one-second-long audio data, we just shifted the last several rows that should be remained to the topmost rows and filled the rest rows with newly generated slides.
Commands recognition
The interpreter of the ML model we generated will infer the score of each group every time we feed a feature. However, we do not have to make an output every time we get the scores. Rather, in order to make our algorithm robust, we collected a certain amount of sequences of inferences and counted the number of each group that was over the threshold. In this project, we set 200 as the threshold and used the 1000-ms window to collect the sequences of inferences. Then, we found the group that the number of the count is greater than 3 in those sequences. In addition, we put a 1500-ms gap between each recognized command not to generate outputs too frequently.
Test on the PC
At first, we tested our implementation on the PC. We could see that it recognizes “yes” and “no” well. The figure below shows the result of the test performed on the Mac.
Action on Arduino
We specified the actions on Arduino according to the recognized command. We implemented to toggle the LED on and off when the inference is running. When the Arduino hears the word “yes”, we made it turn on the green light. Likewise, we implemented to turn on the red light for the word “no” and the blue light for unknown words. We set the duration of each light-up as three seconds.
Deployment
To deploy, one would need the Arduino IDE or equivalent software/plugin that allows deployment of code on to the Arduino via an USB cable. While choosing an USB cable, one must see that the chosen cable is capable of transferring data and is not just one that can be used for charging. Setting up the IDE might also require giving it access to some ports, etc. Please see the guide for more details on this.
The code for this project is attached. One can obtain it by cloning the tensorflow repository and then traversing to the necessary directory. Alternately, on the IDE, simply click on `Tools -> Manage Libraries...` and search for `Arduino_TensorFlowLite`. Once that installs, go to `File -> Examples` and search for `TensorFlowLite:micro_speech`.
Once loaded, simply click the "Verify" button to compile and the "Upload" button to deploy.
Once deployed, all you need to do in order to run your TinyML program is to have your Arduino connected to a power source. The USB cable used for deployment should do fine. You could also open up the "Serial Monitor" on the Arduino IDE and see what the program prints to the console.
ConclusionIn this "Wake Word Detection" project, we explored how to deploy a machine learning model to an Adurino. We trained a convolutional neural network with a spectrogram generated from raw audio data, and deployed a lighter version of this network to Adurino. The deployed Adurino can distinguish "yes" and "no", and provide a signal with light. Although this is a pretty simple experiment, we could better understand how modern devices process raw audio data to provide functionalities like "Ok Google" or "Hey Siri".


Comments
Please log in or sign up to comment.