If you don't have or is difficult to get the part you can just buy our full kits!
Visit www.ottodiy.com
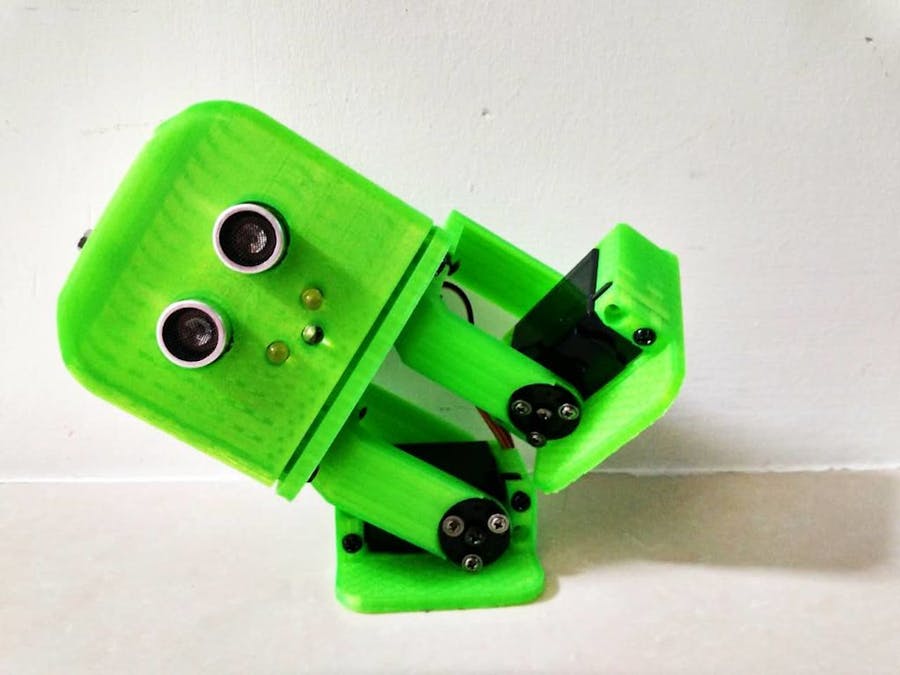
Tito is a Bi-ped dancing DIY robot, derivative from Zowi and Bob. Basically has been adapted to a standard Arduino UNO board with easier connections and supports. It was the first iteration for Otto DIY
- Arduino UNO board or compatible (in my case a DFRduino UNO)
- Nano breadboard
- Buzzer
- Futaba servo S3003 x4
- HC-SR04 Ultrasound sensor
- Powerbank (optional)
- Nut M3 x20
- Screw M3 x20
- 3D printed Head
- 3D printed Base
- 3D printed Leg x2
- 3D printed Foot R
- 3D printed Foot L
Tools:
- 3D printer
- Allen key
- Screwdriver
3D.stl files here. Find a way to 3D print the parts, they are designed for no supports so is very easy to print with 20% infill and 0.2mm resolution. Since Tito is completely open source you can find the design of the 3D model files made in Autodesk 123D Design here:
Pre-assembleThere are many ways to build Tito, but one recommendation is: before connecting the servos, assemble the servo disk pieces to the legs, then put the servos in the body and the feet.
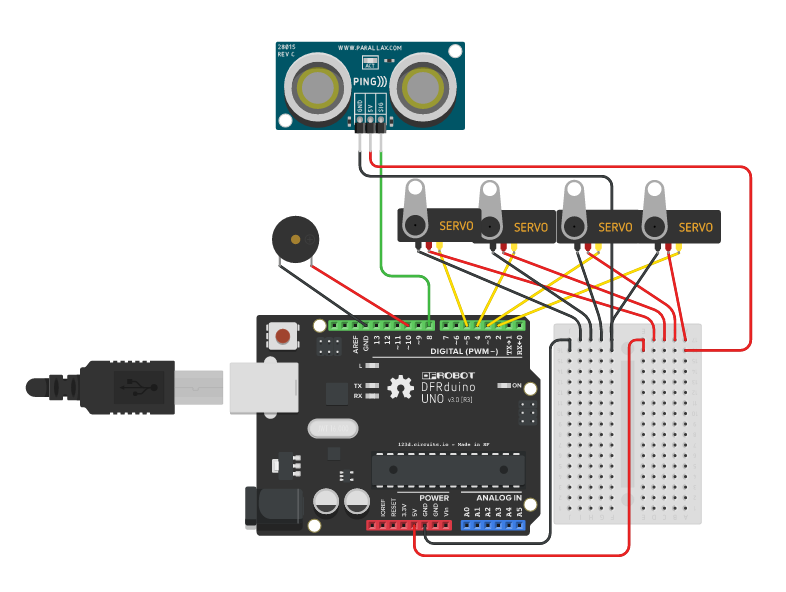
The SchematicFollow the picture for the connections. HC-SR04 ultrasound sensor (trig for pin 8 and echo for pin 9). During the making process you may need to disconnect and connect constantly so just keep this schematic present for further fixes.
Test the position of the ServosIn the picture, the cables are disconnected but the idea here is to upload a code to the Arduino UNO board that will put the all servos in 90 degrees. Then match the right angle for the crank discs in the body and the feet. Tito should be in a position as the one in the photo. Then you can fix all the servos with the screw axis.
Assemble the Arduino UNO boardThis design makes it easy to fix any Arduino Uno compatible board (in my case a DFRduino UNO) in the head part, you can use up to 4 screws.
Final assemblyIf all connections are secured you can close the head part and fix it to the body using the lateral screws.
Arduino IDE ProgrammingAll libraries and sketch codes are in this Github repository. Just connect your USB cable to Arduino UNO and upload the codes. There are many programmed movements for the robot like walk different directions, ultrasound, raise, tilt and dance.
post your remix and modifications in the hackster community or Thingiverse


_ztBMuBhMHo.jpg?auto=compress%2Cformat&w=48&h=48&fit=fill&bg=ffffff)


_3u05Tpwasz.png?auto=compress%2Cformat&w=40&h=40&fit=fillmax&bg=fff&dpr=2)
Comments
Please log in or sign up to comment.