


Hardware components | ||||||
 |
| × | 1 | |||
| × | 1 | ||||
| × | 1 | ||||
| × | 1 | ||||
Software apps and online services | ||||||
 |
| |||||
The easiest and quickest way to get started with Programmable Wireless connectivity for your IoT (Internet of Things) devices is to use Machine to Machine commands.
With the simple steps in this Quickstart, we will show you how you can send and receive text-based commands using the Adafruit Feather 32u4 FONA development board.
While most of your code will be transferable, new product development for 2G in the United States is not a good choice. 2G networks in the United States are being deprecated. For new product development, we suggest researching alternatives or discussing your idea with the Twilio Programmable Wireless team.
In this Quickstart, you'll learn how to:
- Sign up for a Twilio account.
- Purchase your first SIM cards for Twilio Programmable Wireless.
- Insert your SIM card into the Adafruit Feather 32u4 FONA development board.
- Power and flash the board.
- Send a Machine to Machine command from the Adafruit Feather 32u4 FONA and read it in the Wireless Console.
- Receive a Machine to Machine command on the Adafruit Feather 32u4 FONA.
- Adafruit Feather 32u4 FONA development board, which is an Arduino-compatible board having audio/sms/data capable cellular capabilities.
- Lipoly (Lithium Ion Polymer) Battery (from Adafruit)
- GSM Antenna (from Adafruit)
Already have a Twilio account and a SIM card? Skip ahead to the register and activate step by clicking the button at the end of this section.
Before you can connect with Twilio Programmable Wireless, you'll need a Twilio Account and a SIM card.
After you have signed up, then purchase a set of 3 starter SIMs:
- Open the Console and from the Programmable Wireless menu, click Orders.
- On the Order SIM Cards page, enter your details (Order Details, Delivery Address, and Payment method), and then submit your order.
Orders of 10+ SIMs will be delivered with the SIM cards already registered to your account.
Detailed information about ordering SIMs is available here.
Once you receive your SIM shipment, pick a favorite and unpack it.
Register and give a unique name for the SIMIn the Console, open the Register a SIM page in the SIMs section of the Programmable Wireless menu and enter the registration code as instructed:
Next, pick a distinct Unique Name for this SIM.
Choose a Rate PlanSelect a Rate Plan from the options provided by Twilio.
We have created data metering quotas that are optimized for both high and low usage devices. You can use our data usage estimator to find the right Quota for you. Rate Plans also let you control every aspect of what your device can do with data, voice, and messaging.
For this quickstart, you can choose a low volume plan but ensure the plan you choose includes messaging.
Activate your SIM cardWhen you're happy with the name and plan, Activate the SIM card.
Detailed information about registering and activating SIMs is available here.
Attach the LTE antennaIf your module does not come with a PCB (onboard) antenna, you need to connect the antenna to the board. If you are unsure, check for an antenna included with your module or read the documentation included with your purchase.
Carefully attach the antenna to the board. Although your board may differ, here is a picture of one module with an antenna connected:
Punch out your Twilio SIM card and, if necessary, insert it into the slot on the module. Be very careful to get the orientation correct with the SIM card insertion. If you are unsure of the correct side to insert, look for a diagram on the housing or the board showing the layout.
On our version of the board, the casing shows the correct SIM orientation:
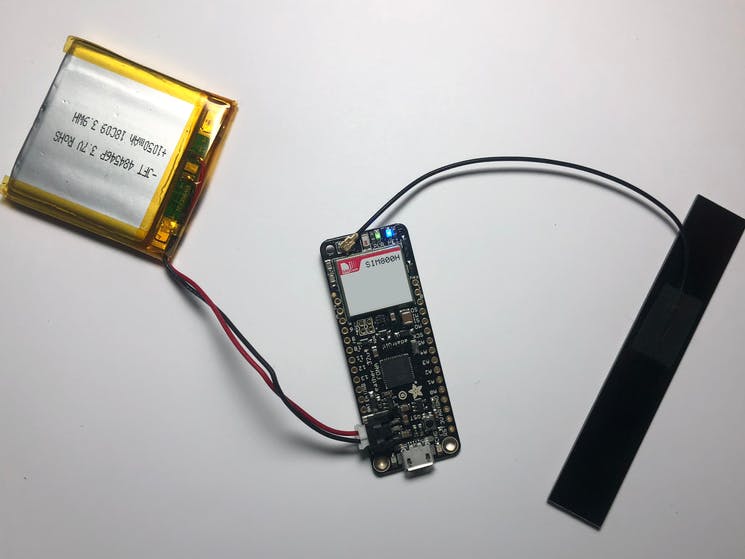
Locate the JST connect and plug the Lipoly battery into the board. The battery must be plugged in at all times for connectivity to work.
Your setup may vary, but one possible setup will look like this:
- Download the Adafruit_FONA library by Adafruit.
- In the Arduino IDE add the newly download.ZIP to your Library folder by going to Sketch > Include Library > Add.ZIP Library.
- In the Arduino IDE, select File > Preferences.
- Find the field Additional Boards Manager URLs and paste the following URL, then click OK:
https://adafruit.github.io/arduino-board-index/package_adafruit_index.json
- From the Tools menu, select Board > Board Manager.
- Search for the Adafruit AVR Boards package and install the package.
- Restart the Arduino IDE.
You can download the code directly from this directory on Github.
Load the file m2m_command_feather32u4fona.ino into the Arduino IDE. Alternately, you can copy/paste the code into a new Arduino sketch using File > New Sketch.
- Power your Adafruit Feather 32u4 FONA by connecting it to your computer using a USB cable.
- Wait for a few moments.
- Then in the Arduino UI, select your board and the serial port it enumerates from Tools > Board > Adafruit Feather 32u4 FONA.
Now, upload (flash) the code to the board. You have a choice:
- One way is to use the Upload button on the toolbar
- Another is to select Upload from the Sketch Menu.
While the board receives your code, open the Serial Monitor from the Tools menu.
And that's all you need to do on the Arduino side! Watch the monitor and you should see it churn away and send an M2M command:
If you don't see the above, make sure the power is connected and you have set the speed set to 115, 200 baud. Power cycle or hit the reset button on the Adafruit board to have it spin through again.
Let's look at how the message was sent in the next section and then prepare to send a response from our computer.
Send a Machine to Machine Command from an Adafruit Feather 32u4 FONABehind the scenes, we send an SMS to the shortcode 2936.
/*
   Twilio Machine to Machine Commands Quickstart on Adafruit Feather 32u4 FONA
*/
#include "Adafruit_FONA.h"
#include <SoftwareSerial.h>
#define FONA_RX  9
#define FONA_TX  8
#define FONA_RST 4
#define FONA_RI  7
/*
   Software Serial definitions:
   https://www.arduino.cc/en/Reference/SoftwareSerial
   If you get errors, lower the modem baud rate.
*/
SoftwareSerial fonaSS = SoftwareSerial(FONA_TX, FONA_RX);
SoftwareSerial *fonaSerial = &fonaSS;
Adafruit_FONA fona = Adafruit_FONA(FONA_RST);
char replybuffer[255];
void setup() {
 while (!Serial);
 Serial.begin(115200);
 Serial.println(F("FONA SMS caller ID test"));
 Serial.println(F("Initializing....(May take 3 seconds)"));
 /*
    Adafruit Feather 32u4 FONA setup
 */
 fonaSerial->begin(4800);
 if (! fona.begin(*fonaSerial)) {
   Serial.println(F("Couldn't find FONA"));
   while (1);
 }
 Serial.println(F("FONA is OK"));
 fonaSerial->print("AT+CNMI=2,1\r\n");
 Serial.println("Sending Command!");
 /*
    Send an SMS to short code 2936, which is a Twilio
    Machine to machine command.
 */
 char sendto[21] = "2936";
 /*
     Keep `command` under 160 ASCII characters, or 67 UCS-2 characters.
     https://www.twilio.com/docs/glossary/what-sms-character-limit
 */
 char command[141] = "hello from feather32u4";
 /*
     Write a Twilio M2M command.
 */
 if (!fona.sendSMS(sendto, command)) {
   Serial.println(F("Failed"));
 } else {
   Serial.println(F("Sent!"));
 }
}
The easiest way to check the command was successful is through the Programmable Wireless Console.
- From the Console, select SIMs from the Programmable Wireless menu.
- Click the SIM you are using for this project, then navigate to the Commands tab.
- Copy the SIM Sid.
As you might guess, we will implement the reverse - you'll receive an inbound SMS from 2936 on the Arduino triggered by an API call using the SIM's Sid. Let's look at that next.
Receive a Machine to Machine Command on the Adafruit Feather 32u4 FONASending (or in this case, manually responding to) a Machine to Machine command is very straightforward from your development machine.
The fastest way to respond to a command is to use cURL if available. If you can, send a command (under 160 ASCII characters) back to the SIM using cURL:
curl -X POST https://wireless.twilio.com/v1/Commands -d 'Sim=DEXXXXXXXXXXXXXXXXXXXXXXXXXXXX' -d 'Command=Testing return' -u 'ACXXXXXXXXXXXXXXXXXXXXXXXXXXXX:YOUR_API_KEY'
Again, we've included code to help you receive the M2M command easily.
void loop() {
 uint16_t smslen;
 int index = 1;
 /*
     Read a Twilio M2M command. Note that it will find the lowest
     indexed one with the code as is; in your code. if you cache the
     index you can start the next read_command to move to the next one.
 */
 if (!fona.readSMS(index, replybuffer, 250, &smslen)) {
   Serial.println(F("Failed!"));
 } else {
   /* Print the command */
   Serial.println(replybuffer);
   delay(2000);
   /* Delete the stored command */
   fona.deleteSMS(1);
   /* That's all, folks! */
   Serial.println("Finished.");
   while (1) {
     delay(5000);
   }
 }
 /* Poll for a stored command every 5 seconds */
 delay(5000);
}
To test this out, return to the Arduino IDE and make sure the Serial Monitor is still connected.
Cycle power or reset the Adafruit Feather 32u4 FONA. If all goes well, the Adafruit Feather 32u4 FONA should once again send a command, then after a short wait, you should see...
... magic!
And that's all there is to Machine to Machine commands. You now know how to send them from an Adafruit Feather 32u4 Fona and check their status in the console. You can also return a message from your machine and have seen how to receive it on your Feather.
With those basic building blocks you're ready to build the next big IoT Thing!
What's next?Now that you have seen how to send and receive Machine to Machine commands on both your Adafruit Feather 32u4 FONA and development machine, you're ready for your custom application. Here are some possible ideas to take it to the next level:
- Try full end-to-end applications with Twilio Wireless Blueprints
- Dig into the Programmable Wireless API
- See all Programmable Wireless Guides and Tutorials
We all do sometimes; code is hard. Get help now from our support team, or lean on the wisdom of the crowd browsing the Twilio tag on Stack Overflow.


Comments
Please log in or sign up to comment.