The following image shows where the new lamps (LED light ropes) are located. In this phase of the project the required amount of channels (physical outputs) was defined. It results in 52 outputs which must be available. One for each lamp. Groups of lamps are combined in software later. Also the size of the house, windows, etc. was measured.
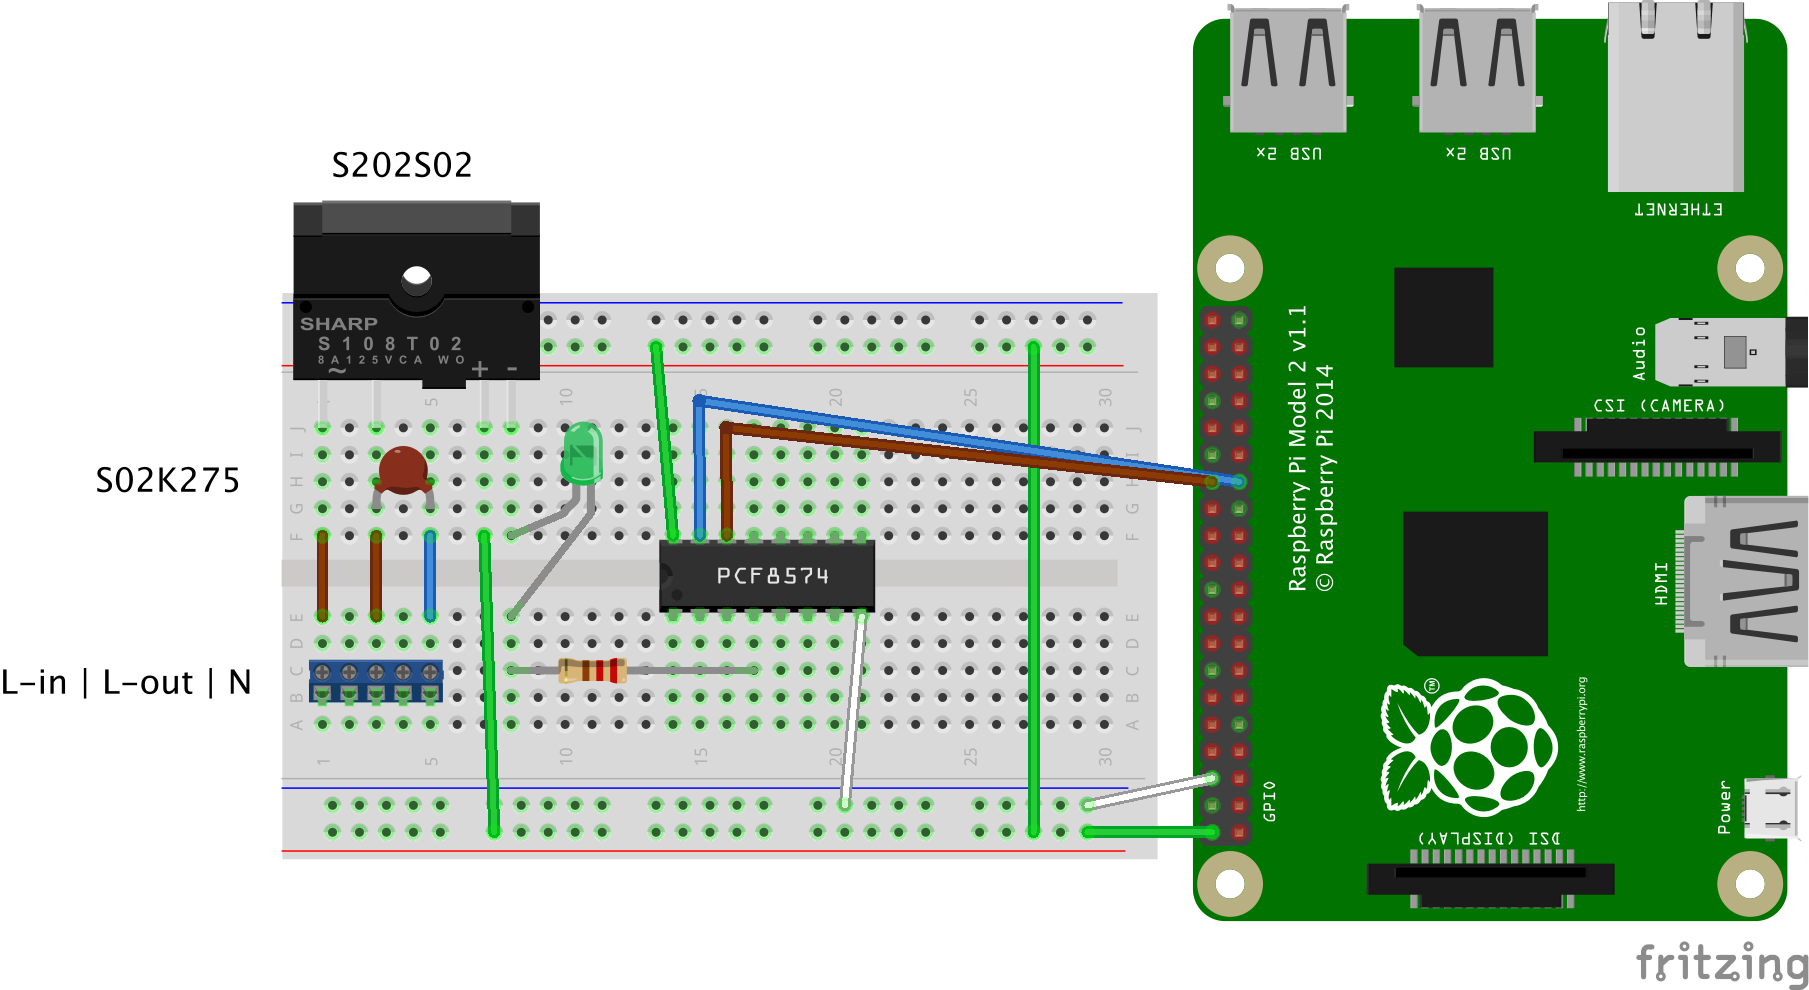
Working with 230V is extremely dangerous! Never work with 230V on a bread board. The following sketch is only for illustration! Ask a professional electrician for a proper installation of all 230V components!
Every LED light rope is controlled via one power distributor with DIN rails inside. This device contains boards from CCTools (http://cctools.eu) which are containing the required SSRs including all required resistors and a varistor for protecting each SSR. The SSR requires a port expander with 5V. I am using two board from CCTools with a MAX7311 port expander with 16 GPIOs on it. The board allows placing the port expander on the DIN rail and connecting the cables via screw terminals.
The following sketch shows the entire circuit for one channel. The sketch shows a PCF8574 which is also a port expander with 8 GPIOs. Both are working in the same way.
The following pictures are showing the orchestrator:
The orchestrator contains regular relays (12V, orange) and SSR relays (5V, black). The SSRs are limited to 200W, so the regular relays are used for higher values but are not able to flash very fast. The Raspberry Pi 2 is located at the bottom left.
The orchestrator is an UWP background application (headless app) and receiving UDP packages on a dedicated port. Each UDP package contains a prefix and the state of all outputs. So it is not possible to send the state for just one output.
The orchestrator is dropping all packages while applying a package. That means that there is no queue which is filled and then processed. This ensures that sending lots of events will not cause delays.
MIDI SequencerIn order to create animations the decision was to use a MIDI sequencer (Ardour https://ardour.org). This software is a cheap (but very good) audio sequencer with MIDI support. Ardour is used as the recording software. So an attached MIDI device is used to record animations etc. Then, while playback, the pressed notes are send to an output MIDI device.
The following screens are showing Ardour in action:
The screen shows the loaded project for the song "Silent Night" which is uploaded to YouTube. There are several MIDI tracks with different kinds of animations. The are played with a MIDI keyboard to allow precise inputs according to rhythm and melody.
MIDI to Orchestrator bridgeThis virtual MIDI output device is called "MIDI 2 Orchestrator Bridge" and is also part of this project and included in the GIT repository.
The bridge has the following features:
- Map incoming MIDI events like "NoteOn" or "NoteOff" to several outputs
- Send the complete state of the orchestrator to it via UDP protocol
- Provide an emulator to allow recording animations without sitting in front of it
- Show debug information like logs and current power consumtion
- Allow manual enabling or disabling of every output
- Show the actual status of every output
- Show incoming events from Ardour
The following screens are showing the bridge with the above mentioned features:
The layout of the emulator (top right) is the same as the positions of the lamps at the real house. This allows recording animations without seeing the house. When the animation should be played at the real house the bridge will forward them to the orchestrator via UDP. There is a checkbox at the bottom right corner to enable or disable this feature.
The most important feature is creating 'Mappings'. These mappings are connecting Notes with outputs. A mapping contains the note and the list of outputs which should be active while the note is pressed. The outputs are disabled until the note is released. It is also possible to select a channel to create lots of mappings without the need of a very huge keyboard.
The library NAudio (https://naudio.codeplex.com) is used for MIDI event processing.
loopMIDIThe project requires a special tool called 'loopMIDI' (http://www.tobias-erichsen.de/software/loopmidi.html). This tool creates a virtual MIDI loopback-port at the local PC. This port is required to connect Ardour with the bridge. The bridge is not creating a virtual MIDI port. That means that Ardour and the bridge are connected with the same loopback-port and sending and receiving events.
Data flowThe following picture shows all components which are required to record and play the animations and the communication with other components:
The most lights are LED light ropes. The power supply of them is not water resistant so they are cut off and placed in a safe location. But there are still some LED spots etc. used. Each lamp has its own 230V cable which leads to the orchestrator behind the house. When all lights are active the house looks like this:
There is also an App (HTML, JavaScript based) available which allows turning on and off all lamps manually. The App is also hosted on the Pi2 using the library 'restup' (https://github.com/tomkuijsten/restup).
PrototypesBefore recording the final animations the entire system was tested a couple of times. The following video was recorded while testing the system with MIDI drums and a metal version of "Eye Of The Tiger".
Final songThe following song is one of ones I used for animations. I got a license from Charlie Parra Del Riego to use this song for an upload to YouTube.
PicturesHere are some pictures showing the building process, etc.
The plan for Christmas 2017 is to extend the amount of lights and channels and record animations for other songs. If you want to contribute or use this hardware or software four your Christmas house please contact me.


Comments
Please log in or sign up to comment.