Since there is no vaccines for COVID-19 yet, the best way to avoid the pandemic are social distancing, staying at home, avoiding group of people, washing hands frequently, and avoid to touch the face. Wearing mask is one of the best method to stop the spreading of the virus. Wearing mask (surgical mask) will stop almost all of the droplets for 90% (when sneezing), that is why wearing mask is mandatory during this pandemic. Almost all of Covid-19 patients experienced fever, it can be detected by measuring the bodys temperature. WHO said that the bodys temperature for fever is above 38 Celcius. In order to keep people wearing mask and keep your office or house free from covid-19, one of the best way is using a screening rule that will force people to wear their mask. In this case, a technology can be used to do that job.
The Screening Rule.
People that wanted to pass the screening must have wearing mask + bodys temperature < 38 Celcius.
How to do the job.
The job can be done by doing a face mask detector, The aim of this project is detecting face mask by training our machine, so the machine can detect the mask by itself. The machine also can do touchless temperature measuremen using infrared temperature sensor.
The Project
This project is built by free hardware from balena, that is balena fin. Combined with RPi CM 3+ and 12 MP RPi Camera that can be found at the local online store. Since the Infrared temperature sensor can't be purchased at the local online store, I have to buy it from outside of the local store. Unfortunately, The infrared temperature sensor that I ordered from abroad is not yet arrived till today. So I assume it will not arrive till the deadline.
How to Build the project:A.Configuring the hardware
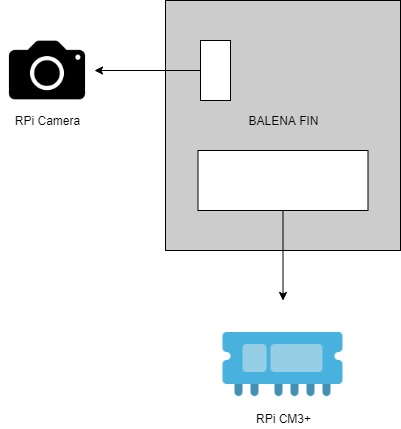
1. Attach all the additional hardware (RPi CM3 and Camera) to Balena Fin 1.0. as discribed in picture 1.
2. Connect adaptor to Jack connector, but do not power up. Connect micro-usb port to computer, and then power up the 12V power supply.
The PC (my case: with OS win 10) may not recognize the device, then you need to install the on-board-flash (eMMC) driver. You can follow this guide [2]. If the driver installation successfull, your board will be detected by system.
3. Then you can write the image file (raspbian[link1], pre-configured raspbian by balena or balena OS [link2]). I recommend the newest raspbian OS (in this project using Raspbian Buster, that has python 3.7). Or you can try to install pre-configured raspbian from balena (info: it has python 3.5 installed). I suggest to use latest raspbian, this will affect compatibility with tensorflow.
4. Flash your Image file using Balena Etcher. If the driver installed properly, the eMMC will be popped up as a removable device.
5. After flashing finished, remove the device from PC. Then power up. You can use a monitor + usb keyboard-mouse to set your fresh balena fins (network, interface, resize partition)Optional: I am the person who do not really comfortable to switch my PC monitor hdmi cable, so you can try headless Rpi as I did.
B. Balena Fins Settings for RPi CM3+
The first mistake I made was to think that balena fin + RPi CM3+ is exactly same with RPi 3 model B, but there is a slight different. At first you may experienced an error on the wifi network, then unable to use camera, eventhough you set everything in perfect place. If you are using pre-built raspbian from balena, this would'nt be the problem. it occured when you use raspbian for raspberry pi.To overcome this problem, you need to download balena settings for CM3 in this link. You need to download them, then install them properly, explained in raspberry pi tutorial.After installation, we can check the camera functionality by[3]:
raspistill -v -o test.jpgAlso the wifi will work perfectly.
C. Installing Tensorflow & Open CV for Your Balena Board
Installing tensorflow from scratch for raspberry is somehow difficult and taking much time, so I let another did that. We can download Compiled wheel package of Tensorflow from this [link]. Pick tensorflow version that meet your OS requirement. For example:update your pip version
sudo apt update
sudo pip3 install -U pip
Then install downloaded tensorflow package
sudo pip3 install tensorflow.whlYou may facing some warnings during installation, then you need to upgrade mentioned package to the latest one.
sudo pip3 install -U package-nameInstall next package:
sudo pip3 install imutils
sudo pip3 install opencv-python
After successfully package installation for your balena board, then the project should be working fine.
D. Troubleshoot
For all installed package needed to be checked, example for tensorflow:
python3
>> import tensorflow as tf
>> test = tf.constant('hello world')
>> test.numpy()
You may facing many errors during code execution, the common issue can be found here:
E. Running The Main Code
To run the projects main code, you need to clone a github repositories. then run
$ git clone https://github.com/dadanugm/hackster_facemask_detector.gitThe dataset that used in this learning is divided into couple group, those are facemask colour, and head accessories. some of general facemask colour like blue, white and brown. Head accesories for example are hijab, glasses, and hat. The more variety image we train, higher accuracy that we will get.
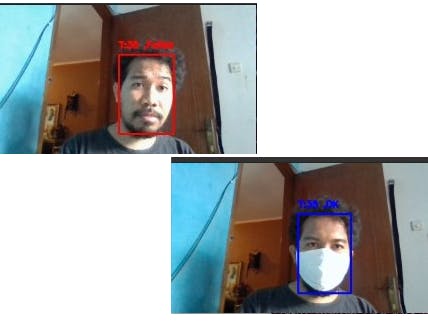
Result of Image training is a model that we will use to detect every frame on a video. The result of image detection will be given label "OK" and "failed". "OK" means passing the screening, failed means fail to pas the screening.
The deep explanation about image training are described in link [4], [5], [6]
G. Demonstration VideoThe streaming video has really poor quality image, though it can detect the facemask. The facemask detector was tested using several different colour of mask, and still can perform the detection. Till today (7/5/2020) the Infrared termperature sensor that has been ordered (6/6/2020) from abroad online store is not yet arrived, so the value of temperature is hardcoded(constant), it can be seen from video indicated with label T=35. if the object passed the screening, it gives blue box indicator, otherwise it will be red box.
References:
1. https://www.balena.io/fin/1.0/docs/getting-started/
2. https://www.raspberrypi.org/documentation/hardware/computemodule/cm-emmc-flashing.md
3. https://www.raspberrypi.org/documentation/configuration/camera.md
5. Hands-On Machine Learning with Scikit-Learn, Keras, and TensorFlow, By Aurélien Géron


Comments