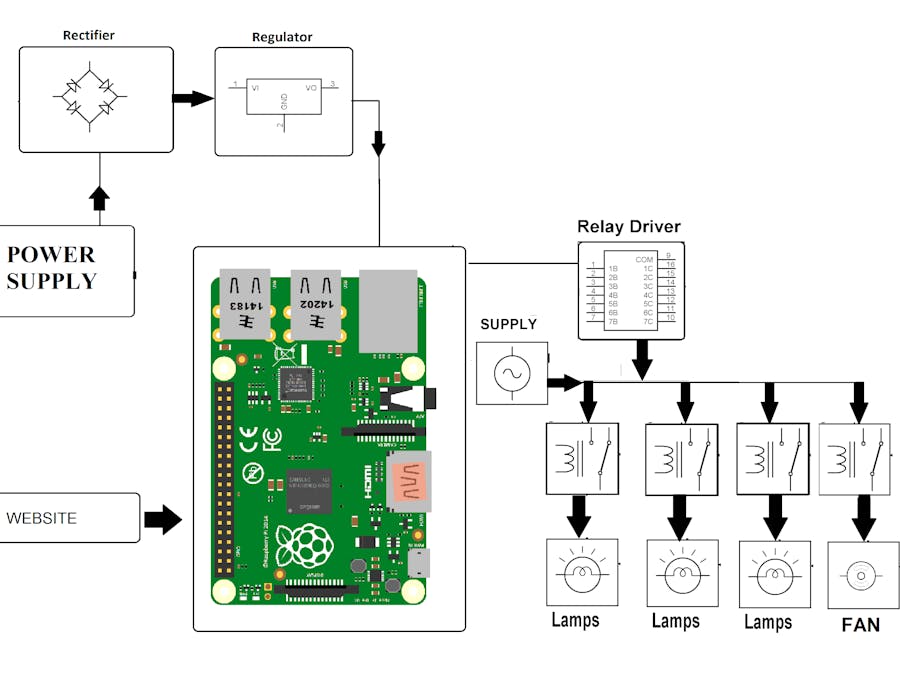
In this project we are going to use one Raspberry pi interfacing with 12 bulb using 3 relay module with low level trigger. We can trigger the relay from anywhere in the world using a website in which we’ll have GUI Button. In each trigger of relay the correspondence Bulb or group of bulb will glow. Here we are using pagekite to make our website publicly accessible.
Installation of All Software:1. Raspian OS
This is the recommended OS for raspberry pi. You can also installed other OS from third party. Raspbian OS is a Debian-based OS. We can install it from the NOOBS installer. You can get the link:
2. PuTTY
PuTTY is an SSH and telnet client, developed originally by Simon Tatham for the Windows platform. PuTTY is open source software that is available with source code and is developed and supported by a group of volunteers. Here we are using PuTTY for accessing our Raspberry Pi remotely. You can download PuTTY here.
3) Installation of Pagekite(Pagekite we are using to make local server publicly accessible):
You can download the latest Pagekite from this link:
Component Used:1. Raspberry Pi
This is the latest version of Raspberry Pi. In this we have inbuilt Bluetooth and WiFi, unlike previously where we had to use a WiFi dongle in one of its USB port. There are total 40 pins in RPI3. Of the 40 pins, 26 are GPIO pins and the others are power or ground pins (plus two ID EEPROM pins). There are 4 USB ports, 1 Ethernet slot, one HDMI port, 1 audio output port and 1 micro USB port and also many other things you can see the diagram below. Also, we have one micro SD card slot wherein we have to insert a micro SD card with the recommended operating system installed. There are two ways to interact with your Raspberry Pi. Either you can interact directly through HDMI port by connecting HDMI to VGA cable and use a keyboard and mouse, or else you can interact from any system through SSH(Secure Shell). (For example in Windows you can interact from putty ssh.) Figure is given.
2) Relay Module:
We have used 3 four channel relay module to control 12 led bulbs. As we are working with 220 volt ac we have to make sure that our connection are properly connected.Figure is given above.
3) LED Bulb: In this project we are using 12 bulbs
Circuit DiagramBulb connection with relay and Raspberry Pi:
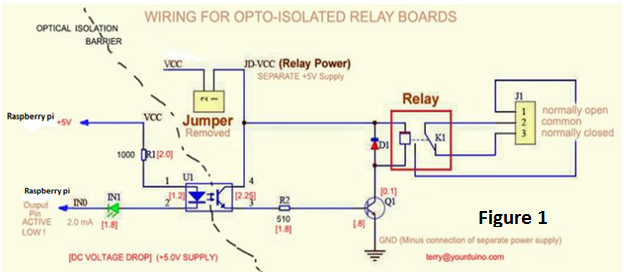
Here we are connecting our relay to one single Bulb. In this there is no optical isolation we can make it by removing jumper from vcc and jd-vcc. And by giving separate power supply to Jd-VCC. As below the diagram I’ve just shorted all the com pin of relay and from NO we've taken wire which is going to the entire bulbs one terminal and from the second terminal of bulb it will go to the ac main and the hot line of the ac will be coming from the shorted com pin of relay. Connection are given in figure 2
Okay so everything is working fine. But one problem is there that you can only access your web page within local network. So that is one challenging thing.
We have so many option for that like we can do port forwarding in our router but if you don't want to mesh up with these things then you can chose some third party option. Those option are like pagekite, ngrok etc. So here we are going to use pagekite. So you have to install pagekite for that. As we provided link of pagekite you can go to the website and follow the process of installation. It is very simple.
Now, You have to run this command below to make your ip publicaly accessible
sudo pagekite.py 80 yourname.pagekite.me
Here 'yourname' will be your pagekite name which will you get when you will sign up to pagekite, and 80 is your port number.
As you can see in below figure
our pagekite name is deligence so you can give any name
NOTE: pagekite free trial is only for 30 days after that you have to pay some amount of bucks as per your need
The whole project description are given in the above video
If you have any doubt regarding this project feel free to comment us below or you can mail us on
info@deligence.com
And if you want to learn more about these type of project then feel free to visit our youtube channel: link


Comments
Please log in or sign up to comment.