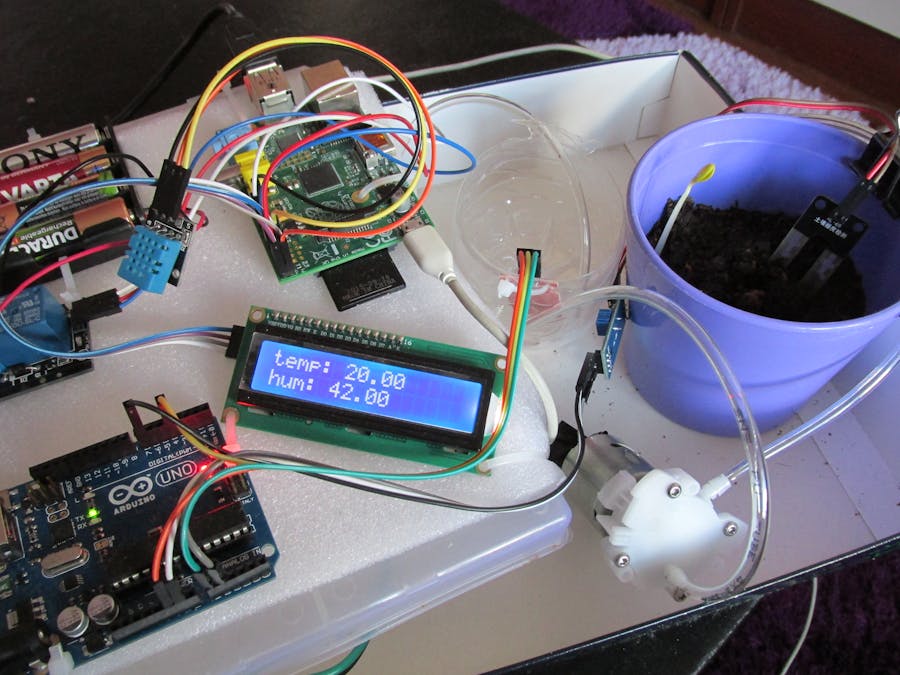
The system is a suitable solution for people who love and want to look after plants in their house but very busy in daily jobs to do that. Growing plants requires time and effort in order to be successful because there are some regular things to do like watering them every day. People sometimes forget to take care of their plants. Also, some people travel a lot and spend less time in their house. In this context, they generally ask for help to look after their houseplants otherwise they simply give up to have them. WaterPi can help those people with doing regular things for plants. Also, because it can be controlled remotely, plant owners can interfere the watering process easily when needed.
The system monitors temperature and humidity of the place, and soil moisture of the ground, waters the plant remotely, then saves all data to DynamoDB through AWS IoT. Collected data is visualized by different charts and figures to give better understanding of conditions where the plant thrives.
Raspberry Pi runs a nodejs application to control all the sensors and water pump. For that purpose I preferred to use Johnny-Five library. To communicate with AWS, I used AWS IoT SDK for javascript.
DynamoDB is used to save data collected by sensors. Go to DynamoDB page and create a new table with following attributes:
- Table Name: waterpi_sensor_data
- Partition Key: key
- Click Add Sort key and add timestamp
Important thing is that key and timestamp type must be String.
Go to AWS IoT Console Page and do the followings:
Create a thing with the name raspi-water-pump
Create a new policy. Policy name pump-policy, Action iot:*, resource *, select Allow, then click Add statement and Create.
Create a certificate with 1-Click certificate create. Then download public key, private key, and certificate.
Then you should select the certificate which you created and do the followings:
- click Actions > Activate button the certificate
- click Actions > Attach a policy, type policy name you created and click Attach
- click Actions > Attach a thing, type raspi-water-pump, and click Attach
Create a rule with the followings:
- name saveToDynamoDB
- Attribute *
- Topic Filter sensor/data
- Choose an action insert message into a database table
- Table name waterpi_sensor_data
- Hash key value ${topic()}
- Range key value ${timestamp()}
- Role Name > Click create a new role and click Allow button from the opening page then select it from Role Name dropdown
Water level, and soil moisture sensor outputs are analog output. So instead of wiring them directly to Raspberry Pi, I prefer to use Arduino to take those analog values and then send to Pi over Arduino as a digital value. Arduino codes is updated by pi, so the only thing we should do in this step is that connecting Arduino to our computer and upload standard firmata to it.
If you do not have Arduino IDE, follow the steps here to install it.
- Open Arduino IDE
- Open File > Examples > Firmata > StandardFirmata example
- Upload sketch to Arduino
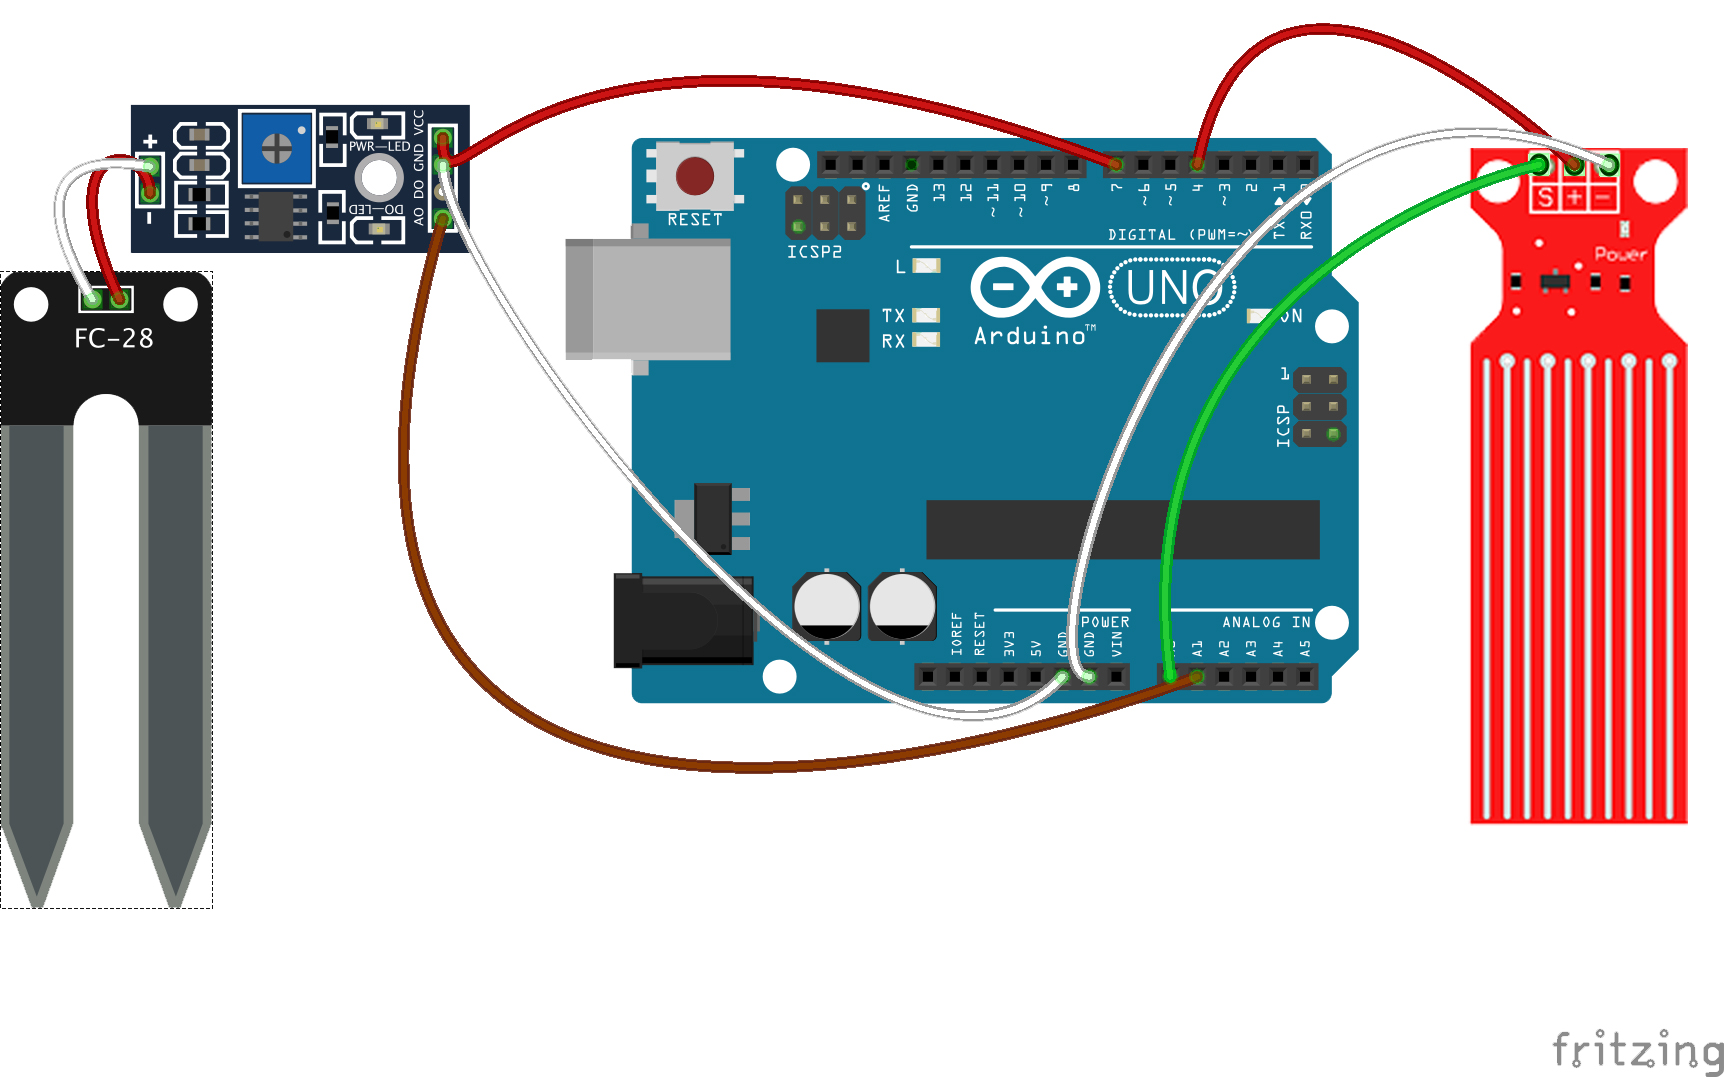
Wiring Soil Moisture to Arduino schema should be like below;
- VCC (power) -> PIN 7
- GND (ground) -> GND
- AO (analog output) -> A1
Wiring Water Level sensor to Arduino schema should be like below;
- (+) -> PIN 4
- (-) -> GND
- S -> A0
After that you should connect your arduino with raspberry pi via usb cable. Also don't forget to put your soil moisture sensor into flowerpot and your water level sensor to your water tank.
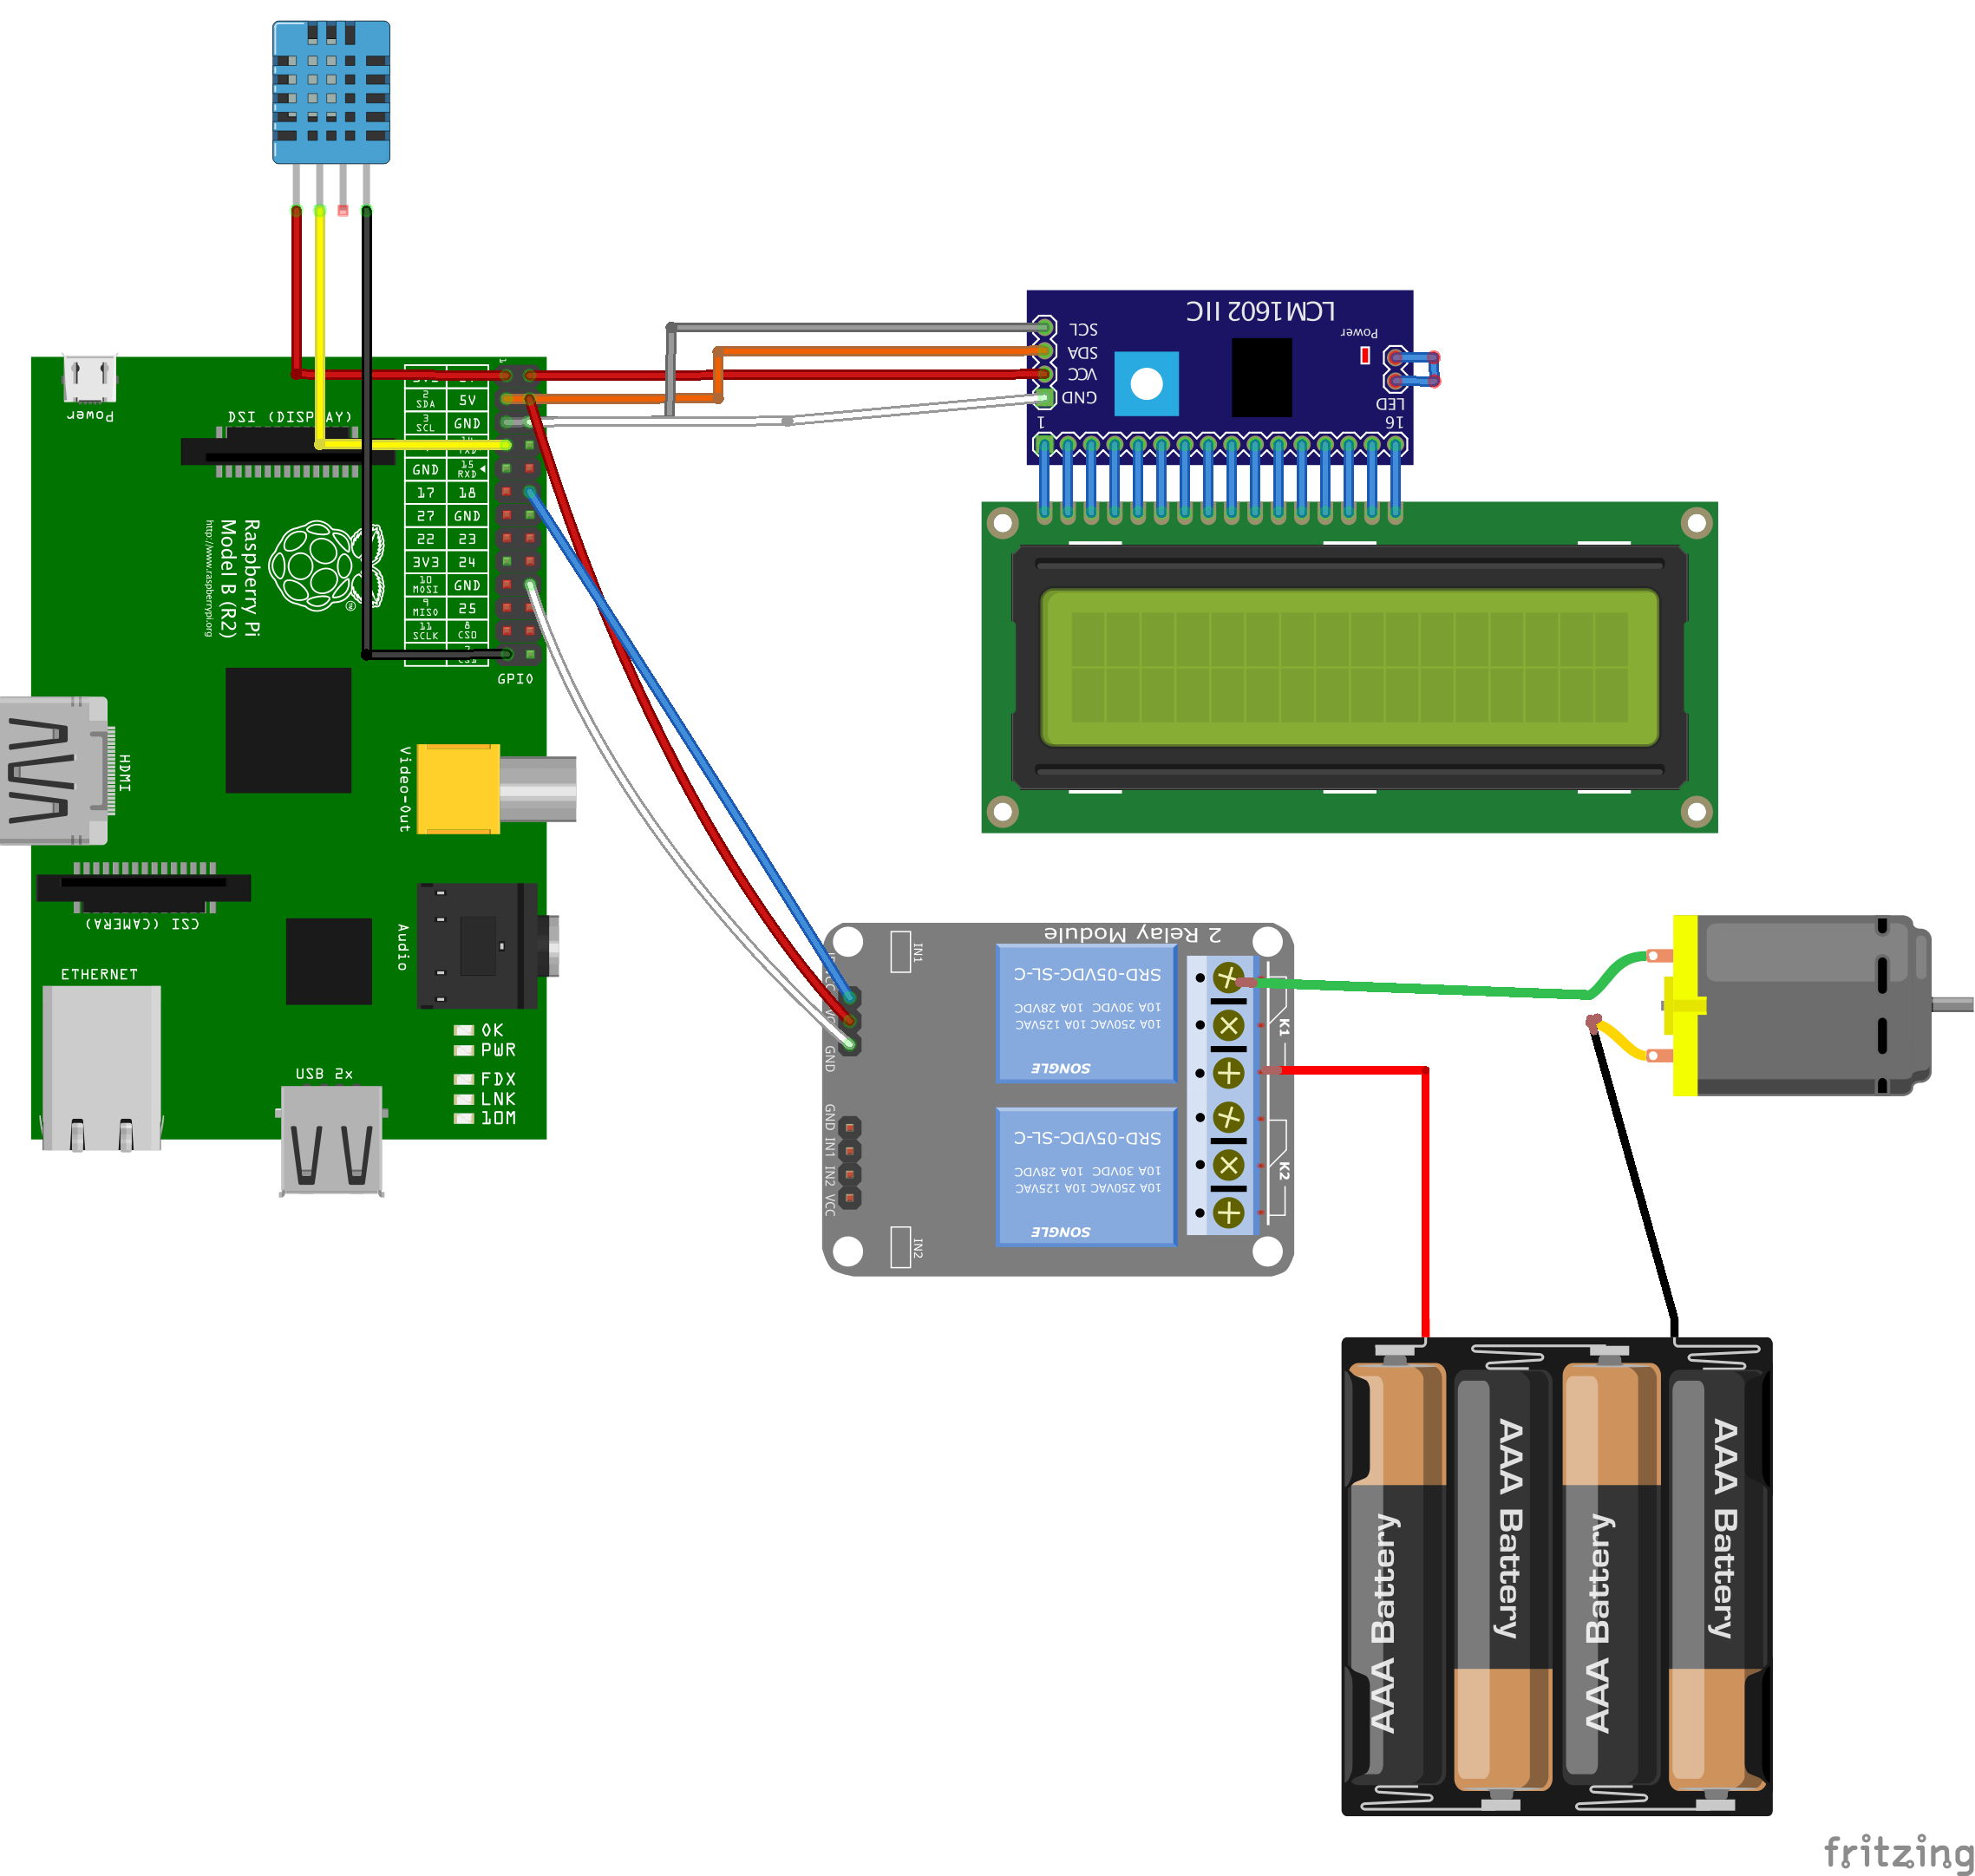
Step 4: Preparing Raspberry PiWire lcd screen, dht11, water pump through relay with raspberry pi.
Wiring DHT11 to Pi
- S -> GPIO4 (pin 7)
- (+) -> 3V3 (pin 1)
- (-) -> GND (pin 25)
Wiring LCD Screen
- VCC -> 5V (pin 2)
- GND -> GND (pin 6)
- SDA -> GPIO2 (pin 3)
- SCL -> GPIO3 (pin 5)
Wiring Relay for Water pump
- S -> GPIO18 (pin 12)
- (+) -> 5V (pin 4)
- (-) -> GND (pin 20)
Wiring water pump with relay and battery pack
- Water pump has two cable. One should be connected to relay, the other should be wired with battery pack cable.
- Other battery pack cable should be connected to relay. Checkout the diagram above to learn how to connect them.
In this part, we're gonna run the nodejs application on pi to collect sensor data and control the water pump. Raspberry pi should be connected to the Internet. You could do it via ethernet or wifi.
Node has to be installed on pi before going further. If you didn't install nodejs before please follow the tutorial here to install it.
Connect your raspberry pi and run the followings:
git clone git@github.com:demirhanaydin/waterpi-node.git
cd waterpi-node
npm install
You should put your public key, private key, and certificate files which you downloaded from aws iot page under certs folder. Also you should download the root CA certificate file from root certificate. Save that file as a rootCA.pem and put it under certs folder.
Then open device.js file with your favorite text editor and update these lines with your file paths. You should get your IOT_DEVICE_URL from AWS IoT platform by clicking your thing. It should be like https://XXXXXXXXX.iot.us-east-1.amazonaws.com
Then run
sudo node index.js
If everything is correct, you should be able to see sensor values printed on the lcd screen.
Also you should see the values in your DynamoDB table. The application sends sensor data to IoT platform every 20 seconds
Basic sinatra application visualizes the data which is on dynamodb table with using highcharts. Also, it can control the water pump remotely. What it does is that whenever user clicks a start/stop button, it publishes an event to AWS IoT platform. Raspberry Pi takes this event and processes it whether to start or stop the pump.
Ruby should be installed on your computer to continue the tutorial. If it's not, then checkout this page to install it.
Open your Terminal and run the following commands
git clone git@github.com:demirhanaydin/waterpi-web.git
cd waterpi-web
bundle install
You should put your public key, private key, certificate, and rootCA files under certs folder. Then open boot.rb and update these lines with proper values. You should take your aws access key and secret from Security Credentials page on AWS Management Console.
If you're done, then you should run the project like
ruby app.rb
Open your browser and type http://localhost:4567/ You should be able to see collected sensor data coming from dynamodb on the charts.
When you click start, to pump will start watering the plant.
Here are some photos I have taken when I was developing the project
Congratulations!


_ztBMuBhMHo.jpg?auto=compress%2Cformat&w=48&h=48&fit=fill&bg=ffffff)


Comments
Please log in or sign up to comment.