This needs to be a Raspberry Pi 4, so that you can run the 64-bit operating system. Earlier versions of Raspberry Pis are likely to throw memory errors while running this program. The 2 GB RAM model is sufficient.
×
1
Raspberry Pi Power Supply
I recommend the official Raspberry Pi power supply.
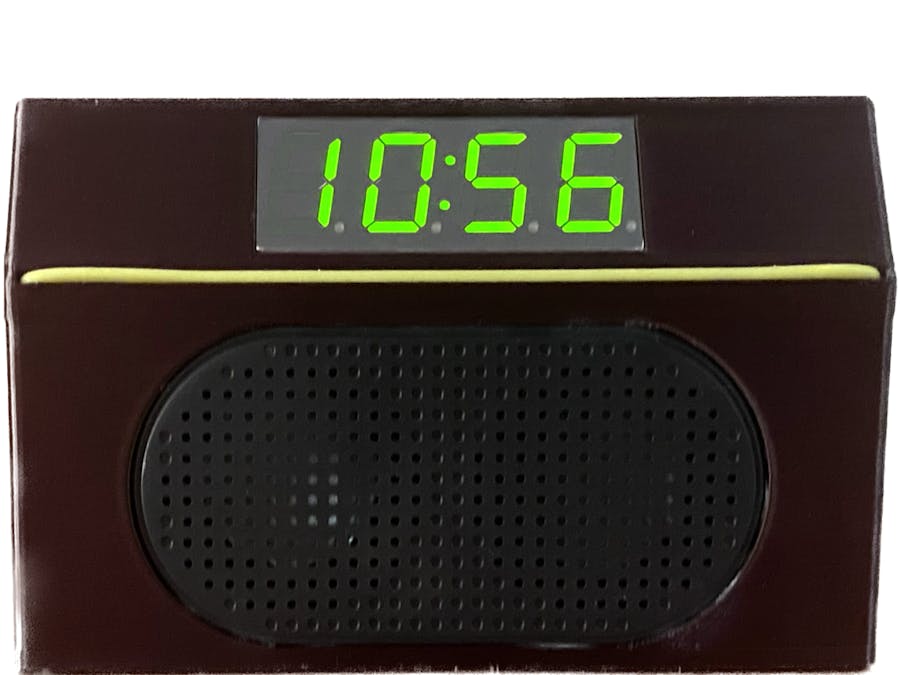
I built a talking ChatGPT AI virtual assistant named DaVinci. It works great, but I thought I could develop a device that sits on my limited desk space that has more utility. That led me to develop Edison.
A brief video demo of Edison
Edison – The Voice Controlled AI Assistant and Clock Radio is a voice-controlled clock, internet radio and talking ChatGPT virtual assistant capable of answering questions, providing information and even telling bedtime stories. Edison also provides written responses if your device is wirelessly connected to a display.
Edison – The Voice Controlled AI Assistant and Clock Radio runs a python program on a Raspberry Pi 4 that utilizes Picovoice Porcupine (and (PyAudio) to detect a wake word; Picovoice Cobra voice activity detection to determine when the user begins and finishes speaking their instruction or query; Picovoice Leopard to convert the spoken instruction or query to text; VLC media player to play requested internet music stations; OpenAI ChatGPT to respond to the query; Amazon Polly text to speech to convert the response into a natural-sounding human voice; and Pygame to play the converted audio.
The Python code and detailed instructions for building and running Edison - The Voice Controle AI Assistant and Clock Radio are on my GitHub site linked below. The instructions include how to obtain access keys for ChatGPT, Picovoice solutions and Amazon Polly to use their APIs.
After you 3D-print the Edison Enclosure and Baseplate, mount the Raspberry Pi 4 on the four pegs on the Baseplate with the power socket over the indentation. You can permanently affix your RPi to the base by putting a little glue at each peg after the RPi is mounted. There is an elliptical hole on the back of the main enclosure for the power supply plug, so be certain to arrange your Pi on the base in the correct direction.
Push the metal part of the USB microphone through the rectangular hole on the backside of the enclosure so the half-sphere plastic part is outside the enclosure and the metal USB connection if on the inside. Use the angled USB connector to attach to the USB microphone and USB speaker inside the enclosure and plug it into the Raspberry Pi.
After you mount the 7-segment display and the USB speaker in the enclosure, secure them with some glue, and connect the wiring, push the excess wires inside the enclosure and attach the baseplate to the enclosure with glue or screws (2.5mm x 0.45mm x 10mm Phillips flat head).
The STL files for 3D-printing Edison.
Schematics
Wiring
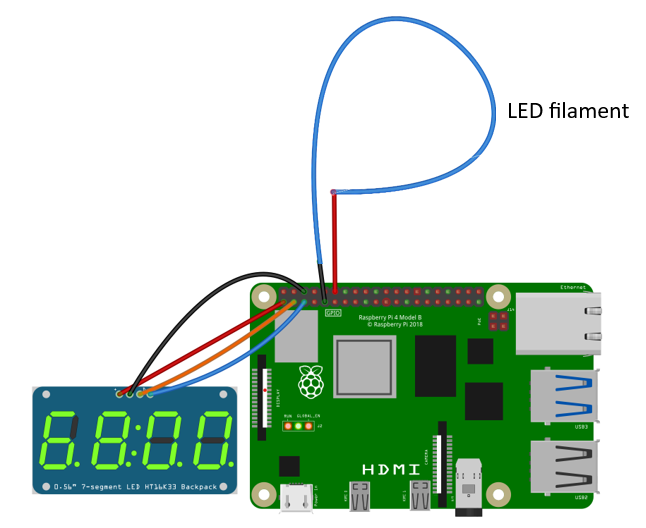
The LED filament is controlled by GPIO pin 18. The other end is connected to a ground pin. The filament should be pressed into the groove on the face of the enclosure and threaded through the holes at the ends of the groove. You may need to use needle nose pliers to help pull it through the holes.
The I2C backpack on the display is attached as follows:
Backpack V+ to GPIO pin 3V3 (red wire) Backpack GND to GPIO pin Ground (black wire) Backpack SDA to GPIO pin 2 (orange wire) Backpack SCL to GPIO pin 3 (blue wire) The USB microphone and speaker are connected to the USB
Code
Edison.py
Python Code
The python code and detailed instructions on how to install it and its dependencies on a Raspberry Pi 4 are here.


Comments
Please log in or sign up to comment.