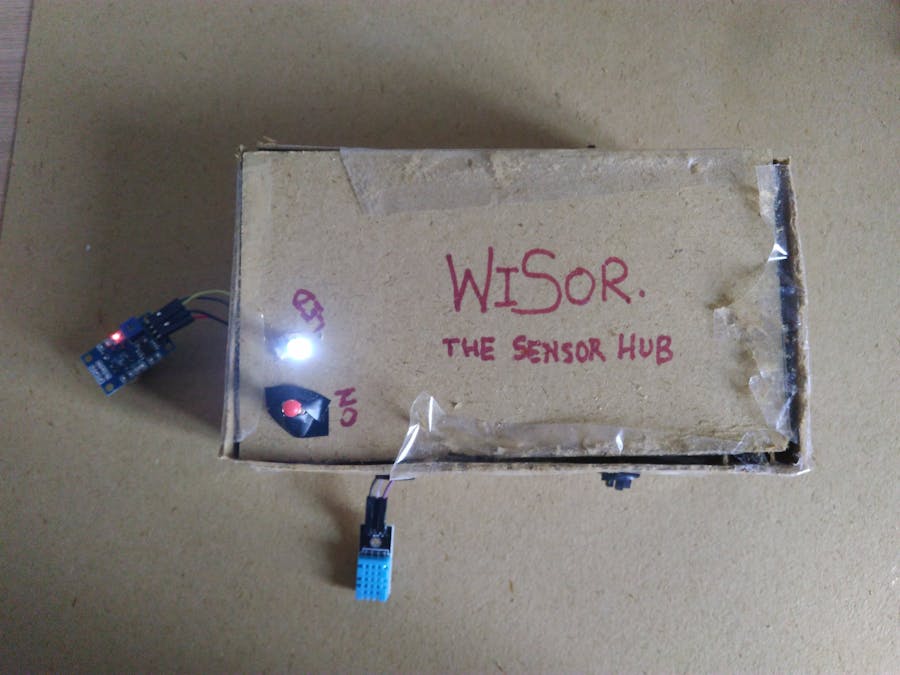
What if you can connect all your most used sensors to a single Box, acting like a Hub for your sensors??
The WiSor does exactly that for you!
With the Particle powered WiSor, you can connect up to 5 well known and commonly used sensors in plug and play style, and view their data in real time on the Blynk app created for this project.
The commonly used sensors have specific connection points on the WiSor as shown in the images below.
As shown in the figure, I have marked specific ports for some commonly used sensors like the DHT11, MQ135 Air quality sensor, Light intensity sensor, etc.
In this tutorial, I have programmed the Hub for 2 sensors, the DHT11 and the MQ135. First of all, have a look at the video showing the WiSor in action! :)
Sorry for the poor sound quality in the video.
Now that you have seen how the project works, lets jump onto the steps to create this project from scratch.
1. Components Required :The sensors are used for testing the Hub. Other than that, the list of components required are :
1. Particle Photon, the brain of WiSor
2. 4 AA Batteries to power the device
3. 4xAA Battery Holder
4. LM-7805 Voltage cutter IC to provide 5 V to the photon as it can not operate on the 6V provided by the pack as its threshold value is 5.5V. This is a very important component unless you have an alternate power source.
5. Toggle Switch for switching on/off the device when needed.
6. JumperWires for connections.
I have built my box using cardboard, some glue and tape, as I didn't have access to a 3D Printer, but building a 3D printed Box would be much more rugged and durable.
Sorry for the messy box, I am not that good at craft, but the device will work perfectly with this messy box too! So lets move forward.
2. Making the necessary connections:Now make the connections exactly as shown in the schematics, and please don't forget to add a resistor of 1k with the LED ground, I couldn't include it as it wasn't available on fritzing.
After making the shown connections, your project will look something like this:
Keep this things in mind while connecting the given circuit:
- Make sure the switch connections are done properly, otherwise the photon will go into safe made and you cant use it.
- Make sure you properly glue the switch and led so that it doesn't move, as it can alter the wire connections.
Now, after this let's move on to the coding of particle photon.
3. Particle Build CodeAs mentioned above, I have configured my WiSor for 2 sensors, the DHT11 and the MQ135. The Code will show the readings of this sensors on the Blynk app that we will create in the next step.
First, open the particle build and make sure that your particle photon is connected and online. Follow the following steps:
1. Open the Particle Build and create a new app and name it as you want, I have named it WiSor.
2. Now include all the necessary libraries for this project, in my case they were as follows.
3. Now, its time to code! Write the code according to the sensors your are using, my code shows operation of two sensors as stated above. The code is as follows:
#include <Adafruit_DHT.h>
#include "Adafruit_DHT/Adafruit_DHT.h"
#include "SPI.h"
#include "blynk.h"
#include "MQ135.h"
// DHT parameters
#define DHTPIN 1
#define DHTTYPE DHT11
#define BLYNK_PRINT Serial
// Variables
int temperature;
int humidity;
int boardLed = D7;
MQ135 gasSensor = MQ135(2);
float rzero = gasSensor.getRZero();
int ppm = gasSensor.getPPM();
// DHT sensor
DHT dht(DHTPIN, DHTTYPE);
char auth[] = "Your Authentication Code";
void setup()
{
   pinMode(boardLed,OUTPUT); // Our on-board LED is output as well
   Serial.begin(9600);
   Blynk.begin(auth);
   // Start DHT sensor
   dht.begin();
}
void loop()
{
   Blynk.run();
   int co2_ppm = gasSensor.getPPM();
   int ppm = co2_ppm / 4;
   digitalWrite(boardLed,HIGH);   //indicator LED on WiSor turns on
    //temperature measurement
   temperature = dht.getTempCelcius();
   // Humidity measurement
   humidity = dht.getHumidity();
    //virtual pin 1 will be the temperature
 Blynk.virtualWrite(V1, temperature);
  //virtual pin 2 will be the Humidity
 Blynk.virtualWrite(V2, humidity);
   //virtual pin 3 will be the ppm value of CO2 gas
 Blynk.virtualWrite(V3, co2_ppm);
   //virtual pin 4 will be the final ppm value
 Blynk.virtualWrite(V4, ppm);
   //virtual pin 5 will be the temperature
 Blynk.virtualWrite(V5, int(rzero));
}
Now, we will move on to the Blynk app part.
4. The Blynk AppNow, we will create the app to view the information of our WiSor Box. Steps to create the app are as follows:
1. Download the app from the play store or the app store depending on the phone you are using. The download links for both are provided below:
https://play.google.com/store/apps/details?id=cc.blynk - for Android
https://itunes.apple.com/us/app/blynk-iot-for-arduino-esp32/id808760481?mt=8 - for ios
2. After that, open the app and register using your active email id, as it sends authentication code for each app via email. Now create a new project, and select the particle photon under devices tab., wifi option and name your app as you please, I named it WiSor.
3. Now, add the following components to your app, as shown in the figure below.
This is the while procedure for app creation, but still if you want to get things easy, just scan the qr code given below using the Blynk qr code scanner so you will get an exact copy of my app on your device easily.
So, finally everything is done. You are ready to test your own WiSor Box, so enjoy!
Feel free to ask me about any doubts you have regarding this project, or and of my projects!


Comments
Please log in or sign up to comment.