This project titled "VOICE CONTROLLED HOME AUTOMATION" enables the user to control lights(can be extended to other appliances as well) by receiving specific commands via Google Assistant. Interesting isn't it??
What motivated me to build this project?
I was always fascinated by the way Google Assistant and Alexa work. So I wanted to control home appliances via these AI assistants. I had gone through few of the projects on hackster.io and read a few articles on the internet. This excited me to make this project.
Excited to build it???
I will give you step by step instructions to do so.
STEP 1:
Hardware Connections:
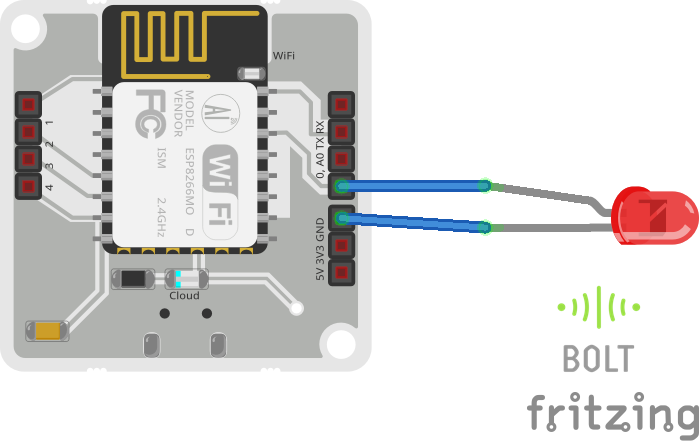
Connect the longer pin of the LED(positive pin) to pin 0 of the BOLT module and the shorter pin(negative pin) to the GND pin of the BOLT module.
It is as simple as that!
STEP 2:
Obtaining credentials from the BOLT Cloud:
Login to your BOLT Cloud account and make a note of the device ID.
Now click on the API button which is the 5th option on the left hand side bar.
Note down the API key of your device by clicking on the symbol which resembles the human eye.
Make sure that the enable radio button is selected.
Next click on the 'copy' symbol next to the 'eye' symbol to copy the API key on to the clipboard.
This is how your API key will look like:
72ddbee6-0609-4b7f-88d2-014e822b94a4
STEP 3:
Generating GPIO Commands
We know that an LED's output is digital. In order to control the LED, it is important for us to write a digital write command to control the LED.
For reference, you can visit the following link:
https://docs.boltiot.com/docs/write-digital-output-1
The command which the LED would receive will look something like this:
https://cloud.boltiot.com/remote/api_key/digitalWrite?pin=pin_number&state=HIGH/LOW&deviceName=device_id
Note: state = HIGH for turning on the LED and state = LOW for turning off the LED
In the above command:
api_key = is the key you obtained from the BOLT Cloud
pin_number = is the pin to which the LED is connected (in this case it is pin 0 )
device_id = is the ID of your BOLT device you obtained from the BOLT Cloud.
STEP 4:
Integrating IFTTT via Google Assistant and Webhooks
1.Click on this link to create a new applet in IFTTT (an applet connects two or more applications together)
2.Sign up/Login using the Gmail ID that you would use with your Google Assistant
3. Click on "+this" to create a trigger
4. Choose "GOOGLE ASSISTANT" and then "SAY A SIMPLE PHRASE"
5. Type the phrase which you want Google Assistant to understand
6. Click on "Create Trigger"
7. Click on "+that"
8. Under the "Choose Action Service" type "webhooks"
9. Click on "Make a web request"
10. Under the URL option enter the URL you obtained from STEP 3
https://cloud.boltiot.com/remote/api_key/digitalWrite?pin=pin_number&state=HIGH&deviceName=device_id
Note: Change the pin, state, api_key and device_id to the respective credentials of your BOLT Device.
Note: Method would be set as"GET" and Content Type would be"application/json"
11. Click on Create Action
12. Then click on Finish
Follow the similar steps to switch OFF the LED. Note that there is only one change in the entire process that is state would be set to LOW.
https://cloud.boltiot.com/remote/api_key/digitalWrite?pin=pin_number&state=LOW&deviceName=device_id
AND THERE YOU GO!
It is as simple as that!
Now all you have to do is to pick up your Android phone and just say "OK GOOGLE TURN ON THE LIGHTS" or "OK GOOGLE TURN OFF THE LIGHTS".


Comments
Please log in or sign up to comment.