

Hardware components | ||||||
 |
| × | 1 | |||
| × | 1 | ||||
 |
| × | 3 | |||
| × | 1 | ||||
 |
| × | 1 | |||
| × | 1 | ||||
| × | 1 | ||||
Software apps and online services | ||||||
 |
| |||||
| ||||||
| ||||||
Hand tools and fabrication machines | ||||||
 |
| |||||
 |
| |||||
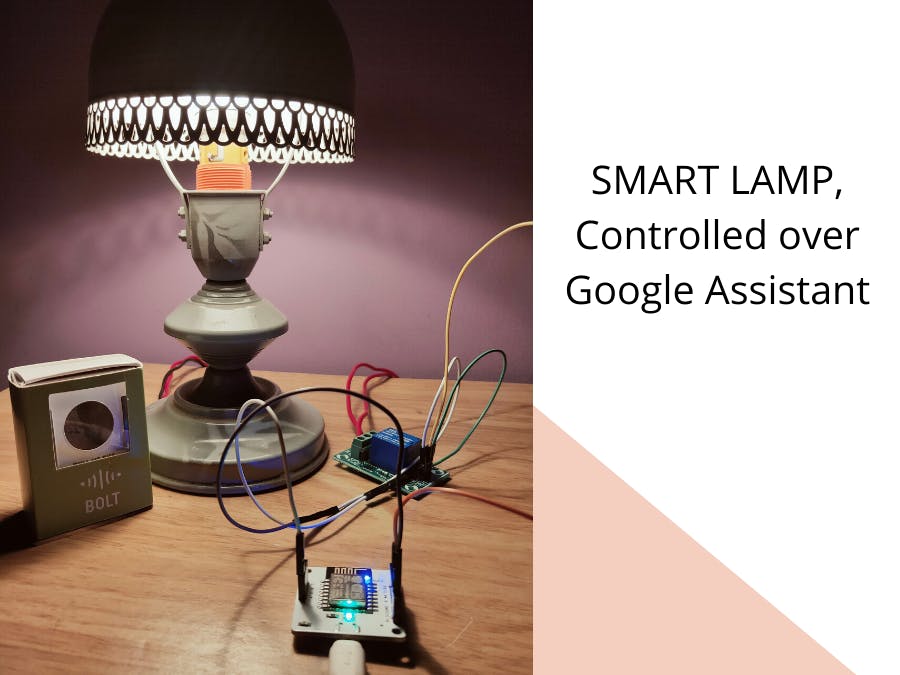
What if during a party or after a tiring day you enter your room and switch on the lights just by your voice? isn't that interesting, we can create it just by few steps by having required hardware and platform to make it work in the real time, the same can be implemented for many devices like controlling FAN over your voice, Air Conditioner and many more. As technologies rises in the present day world most people are converting their day-to-day devices to be controlled over voice and making home smarter. What if we are able to do a one, come on together lets's build a light controlled system through your voice and make your home smarter.
STEP 1 : HARDWARE SETUPFirst let's review the products required for building the project.
1. Bolt IoT wifi module.
2. Single channel relay module.
3. Jumper wires( Male-Female)
4. 2 pin socket
5. LED Light bulb.
6. Bulb holder.
7. Flexible wire.
CIRCUIT CONNECTIONS1. Connect the 5V supply pin of the Bolt to the (5V/V+) pin of the relay module.
2. Connect the GND pin of the Bolt to the GND pin of the relay module.
3. Connect any one of the digital pin i.e (0-4) of the Bolt to the INP/REL (input ) pin of the relay module.
4. Connect a wire from the bulb holder to the COM ( common ) pin of the relay module.
5. Connect a wire from the NO ( Normally open) pin of the relay module to the 2-pin socket.
6. Connect the remaining terminal of the bulb holder to the other terminal of the 2-pin socket.
7. Power ON your bolt wifi module and connect to the cloud.
Login to the bolt cloud account through your login credentials and move on to your cloud dashboard.
1. Click on 'products' tab and then click on ' add product '.
2. Give a suitable product name, select output devices and GPIO option then click on DONE.
3. Configuring the product.
- Click on the configure icon.
- Hardware part.
- Code part.
- Save the configuration.
NOTE: use the pin number you have used to connect the digital pin i.e(0-4) of the bolt module.
STEP 5: LINKING THE PRODUCT- Click on the link icon.
- Select the device to be linked.
- Click on 'API' tab.
- Enable the API key and copy the API key to a editor( WORD/NOTEPAD) for future references.
- In the 'Devices' tab copy the DEVICE ID to the editor.
- Go to IFTTT website to create a new applet by clicking here.
- Login using your Gmail account ( Make sure that you use same account which you will be using on your mobile to interact with Google Assistant)
- Click on '+This' to create a trigger.
- Search for 'Google Assistant' service and then select the option.
- Select the 'say a simple phrase' option.
- Type the phrase you want to say during the interaction with Google Assistant.
- complete all the fields before trigering.
- Click on 'Create trigger'.
- Click on '+that' to choose an action service.
- search for 'Webhooks' service and then select the option. ( this is used in order to make a web request)
- click on 'Make a web request'.
- Complete action fields ( step 5 of 6)
1.For the URL option copy the URL below.
https://cloud.boltiot.com/remote/API_KEY/digitalWrite?pin=PIN_NUMBER&state=HIGH/LOW&deviceName=DEVICE_ID
The parameters that you need to replace are:
- API_KEY( your API key which was saved in the editor)
- PIN_NUMBER( the pin number you have connected your digital pin of the bolt module to the input of the relay module)
- state(HIGH/LOW) use HIGH in order to switch on your lighting system and vice- versa.
- DEVICE_ID ( use your device id which was saved in the editor)
The sample URL to turn the Light ON having device ID BOLT7422246 connected to PIN 4 is:
**To learn more abut creating GPIO control command click here. **
The above step makes you understand how to create a API command link to turn ON or turn OFF a pin of the bolt module.
2. For Method select 'GET'.
3. For Content Type select ' application/json '.
4. Body is optional.
5. Click on 'Create action' and then click on 'Finish'.
Repeat the STEP 7 in order to complete the process for switching off the system by changing the (state) parameter to LOW i.e(state=LOW) in the URL.
Here is an example below
- You can add a suitable phrase to switch off your lighting system. Here is a screenshot below for the same
You can switch on your lighting system by saying the phrase you have set in IFTTT in the Google Assistant. That's it you are done, Now you can explore many things using the method above to control different lighting systems.
This system uses web request (API call) which turns the state of the digital pin to HIGH or LOW depending on our input. The state of this pin is used to switch the relay ON or OFF i.e (if the state of the digital pin is HIGH then relay is ON and vice-versa) and a web request is made when you say the phrase in the Google Assistant.
When the relay is in ON state it completes the circuit between the Bulb and the power supply, as a result of which the bulb is ON.In the same way when the relay is in OFF state it breaks the circuit between bulb and power supply as a result of which bulb goes OFF.
CONCLUSIONThis method can be used for switching purpose for different lighting systems including Bulb, LED, Lamps etc.., The same method can be used for other systems like switching circuits for FAN, TV, AC and so on.
Since the technologies are rising today the voice controlled systems are necessary for the ease of the people after a tiring day or for a smart home setup, this would enable you to create such a product by having basic understanding of suitable hardware and the software required to do so.
VIDEO_iF8WbXJVmd.png)


_iF8WbXJVmd.png)
Comments