The Voice Controlled Digital Cute Pikachu project merges technology and nostalgia by bringing the iconic Pokémon character to life through voice commands. Using the DFRobot Gravity: Offline Language Learning Voice Recognition Sensor, users can interact with Pikachu, triggering animated responses. Thanks to DFRobot for the hardware free trial!
This project showcases the potential of voice recognition technology and offers Pokémon fans a fun and engaging way to connect with their favorite character. It combines modern tech with beloved pop culture, creating an entertaining and educational experience for users.
These are what We are going to do:
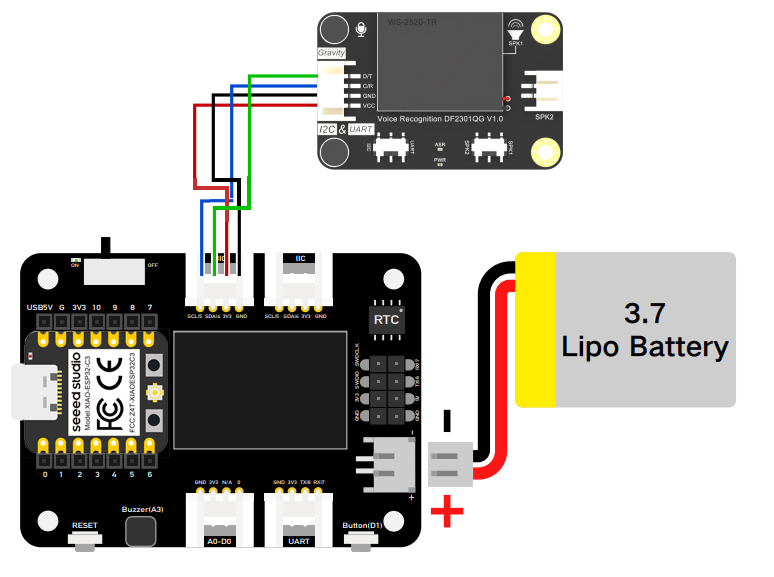
1. Display the GIF image on a 0.96" OLED Screen located at the Seeed Studio Expansion Base for XIAO.
2. Utilize the DFRobot Gravity: Offline Language Learning Voice Recognition Sensor to learn specific command words, including "Hey Pikachu, " "Be Happy, " "Peace, " "Run, " and "Go to Sleep."
3. Deploy the program onto the XIAO ESP32C3 board, connect a battery, and use the Seeed Studio Expansion Base to achieve voice control animations.
4. Create a 3D-printed case.
Display Pikachu Gif Images on Xiao Expansion Base OLED ScreenStep 1: Search for Pikachu Gif, and split it to static images. Here i'm using Split GIF image in frames (ezgif.com)
Step 2: Convert images into byte arrays using image2cpp (javl.github.io)
Step 3: Configure the function
void Happy() {

  // Diplay Animation
  // Frame1
display.clearDisplay();

// Happy1
display.drawBitmap(0, 0, Happy1, 128, 64, 1);
display.display();
delay(frame_delay);

// Happy2
display.clearDisplay();
display.drawBitmap(0, 0, Happy2, 128, 64, 1);
display.display();
delay(frame_delay);

// Happy3
display.clearDisplay();
display.drawBitmap(0, 0, Happy3, 128, 64, 1);
display.display();
delay(frame_delay);

// Happy4
display.clearDisplay();
display.drawBitmap(0, 0, Happy4, 128, 64, 1);
display.display();
delay(frame_delay);

// Happy5
display.clearDisplay();
display.drawBitmap(0, 0, Happy5, 128, 64, 1);
display.display();
delay(frame_delay);

// Happy6
display.clearDisplay();
display.drawBitmap(0, 0, Happy6, 128, 64, 1);
display.display();
delay(frame_delay);

// ... dan seterusnya untuk Happy7 hingga Happy23
// Happy7
display.clearDisplay();
display.drawBitmap(0, 0, Happy7, 128, 64, 1);
display.display();
delay(frame_delay);

// Happy8
display.clearDisplay();
display.drawBitmap(0, 0, Happy8, 128, 64, 1);
display.display();
delay(frame_delay);

// Happy9
display.clearDisplay();
display.drawBitmap(0, 0, Happy9, 128, 64, 1);
display.display();
delay(frame_delay);

// Happy10
display.clearDisplay();
display.drawBitmap(0, 0, Happy10, 128, 64, 1);
display.display();
delay(frame_delay);

// Happy11
display.clearDisplay();
display.drawBitmap(0, 0, Happy11, 128, 64, 1);
display.display();
delay(frame_delay);

// Happy12
display.clearDisplay();
display.drawBitmap(0, 0, Happy12, 128, 64, 1);
display.display();
delay(frame_delay);

// ... dan seterusnya untuk Happy13 hingga Happy23
// Happy13
display.clearDisplay();
display.drawBitmap(0, 0, Happy13, 128, 64, 1);
display.display();
delay(frame_delay);

// Happy14
display.clearDisplay();
display.drawBitmap(0, 0, Happy14, 128, 64, 1);
display.display();
delay(frame_delay);

// Happy15
display.clearDisplay();
display.drawBitmap(0, 0, Happy15, 128, 64, 1);
display.display();
delay(frame_delay);

// Happy16
display.clearDisplay();
display.drawBitmap(0, 0, Happy16, 128, 64, 1);
display.display();
delay(frame_delay);

// Happy17
display.clearDisplay();
display.drawBitmap(0, 0, Happy17, 128, 64, 1);
display.display();
delay(frame_delay);

// Happy18
display.clearDisplay();
display.drawBitmap(0, 0, Happy18, 128, 64, 1);
display.display();
delay(frame_delay);

// ... dan seterusnya untuk Happy19 hingga Happy23
// Happy19
display.clearDisplay();
display.drawBitmap(0, 0, Happy19, 128, 64, 1);
display.display();
delay(frame_delay);

// Happy20
display.clearDisplay();
display.drawBitmap(0, 0, Happy20, 128, 64, 1);
display.display();
delay(frame_delay);

// Happy21
display.clearDisplay();
display.drawBitmap(0, 0, Happy21, 128, 64, 1);
display.display();
delay(frame_delay);

// Happy22
display.clearDisplay();
display.drawBitmap(0, 0, Happy22, 128, 64, 1);
display.display();
delay(frame_delay);

// Happy23
display.clearDisplay();
display.drawBitmap(0, 0, Happy23, 128, 64, 1);
display.display();
delay(frame_delay);


if (frame_delay>50) frame_delay=frame_delay-20;
loop();
}This Gravity: Offline Voice Recognition Sensor is built around an offline voice recognition chip, which can be directly used without an internet connection. It comes with 121 built-in fixed command words and supports the addition of 17 custom command words. Meanwhile, this voice recognition module compatibility with multiple common controllers enables it to provide a flexible solution for makers and electronics enthusiasts in terms of voice interaction.
The Voice Recognition module is equipped with a self-learning function and supports the addition of 17 custom command words. Any sound could be trained as a command, such as whistling, snapping, or even cat meows, which brings great flexibility to interactive audio projects.
For this project we train some specific command words, including "Hey Pikachu" (ID = 1); "Be Happy" (ID = 5); "Peace" (ID = 6); "Run" (ID=7); and "Go to Sleep" (ID = 8).
You can follow the complete tutorial to training the module here SKU_SEN0539-EN_Gravity_Voice_Recognition_Module_I2C_UART-DFRobot
Set and Deploy the Final Program Onto the XIAO ESP32C3 BoardLastly, you must set the loop function in the Arduino IDE as shown in the example below:
void loop() {
  uint8_t CMDID = 0;
  CMDID = DF2301Q.getCMDID();
  if(0 != CMDID) {
    Serial.print("CMDID = ");
    Serial.println(CMDID);
  }

// If we say "Hey Pikachu", function Awal() running
  while(CMDID == 1) {
    Awal();
  }

// If we say "Be Happy", function Happy() running
  while(CMDID == 5) {
    Happy();
  }

// If we say "Peace", function Peace() running
  while(CMDID == 6) {
    Peace();
  }

// If we say "Run", function Run() running
  while(CMDID == 7) {
    Run();
  }

// If we say "Go to Sleep", function Sleep() running
  while(CMDID == 8) {
    Sleep();
  }

}- Addition of more GIFs that can be displayed.
- Integration with other devices such as servos that can move robots, to make it more engaging.
- Replacing audio feedback with something funnier


Comments
Please log in or sign up to comment.